
|
|
|
|
Harley Hahn's
•
Top VPN
|
HARLEY HAHN'S VPN CENTER
Are you in a hurry? No problem.

A VIRTUAL PRIVATE NETWORK or VPN is a service that lets you camouflage your connection to the Internet in such a way that no one can find out who you are or what you are doing. Using a VPN to protect your privacy is important if you want to: • Minimize how much you are tracked, when you use the Web. • Hide your identity, when you share files using BitTorrent or Usenet. • Use restricted services, such as Netflix or Hulu that work only in certain countries. • Avoid Internet barriers, at work; or in countries that restrict what you can access. To use a VPN, all you need to do is subscribe to an inexpensive commercial service — typically $6 to $10 per month — and then download and install free VPN software. Once you have a VPN account set up and the VPN software installed on your computer (or your phone or tablet), it is a simple matter to connect to a VPN. The instant this happens, your Internet connection becomes private and secure. As you can imagine, the details of how a VPN service works are highly technical. However, if you are willing to skip all the technicalities, you can follow along with me and I'll show you how fast and easy it is to get started. The procedure is simple:
My goal is to have you follow along with me and be up and running in just 9½ minutes. Right now, I'll take a few moments to explain some basic concepts, and then we'll get started.
Table of Contents
Introduction
Whenever you connect to the Internet, your Internet Service Provider (ISP) assigns a unique identification number called an IP NUMBER to your connection. (IP stands for "Internet Protocol".) Depending on the type of connection you have, your IP number may or may not change from time to time. Every time your computer interacts with a remote computer, your IP number is given to the remote computer to use as your Internet address. For example, when you look at a Web page, the Web server sends data to your IP address, and the Internet routing system makes sure that data gets to you. Thus, it is possible for a program running on a remote computer to record your IP number and use it to keep track of what you are doing. This happens a lot, as many Web servers are designed to detect and remember your IP number in order to track your activities and store your preferences. Here is another example: If you use a risky file-sharing system, such as Usenet or BitTorrent, it is possible for someone with a sophisticated monitoring program to find out your IP number. Once they have what is, in effect, your unique ID, they are able to detect and record which files you are sharing. Closer to home, remember that it is your ISP that assigns an IP number to your computer or mobile device, which means that they can use this number anytime they want to look up your personal information (name, address, phone, and so on). Most of the time, they have no interest in doing so. However, if someone with the proper authority makes the right type of legal request, your ISP can — and certainly will — track you down and release whatever information they know about you. As you will see in a moment, the main way a VPN service maintains your privacy is by making sure that your IP number — and hence, your identity — is kept secret from the outside world.
To use a VPN, you start by establishing an account with a VPN SERVICE PROVIDER. Once you have an account, you download and install a program, called a VPN CLIENT, on your computer or mobile device. You then start the VPN client and use it to connect to a VPN SERVER, a remote system maintained by your VPN service provider. The VPN software encrypts all the data passing between the client and the server. This means that if hackers (or the government) are snooping on your activity, they will not be able to steal sensitive information or see what you are doing. This is especially important when you are using a public wireless connection, such as free WiFi. (Read that last sentence again.) At the other end, the VPN server connects to another type of server called a PROXY SERVER. The proxy server acts as your personal way- station, sending data to and from the Internet on your behalf, but without releasing your personal IP number. It does so by using its own IP number. Moreover, because many different users are accessing the proxy server at the same time, they all end up looking to the outside world as if they have the same IP number — that of the proxy server — which further protects your identity. Even your ISP can't trace your activity past your connection to the VPN server (and, remember, that part of the connection is encrypted). Thus, there are two parts to the system, each of which contributes in a different way to your privacy and security: • Security: The software that connects your VPN client to the VPN server encrypts all the data that flows in and out of your computer so that, if someone were to intercept it, it would look like gibberish. • Privacy: The proxy server handles all the data flow between the VPN server and the outside world. In doing so, everything you do is tagged with the IP number of the proxy server, not your computer's IP number. In this way, the VPN server and the VPN client cooperate to ensure that your Internet connection is secure (between your computer and the remote VPN server) and private (between the VPN server and the outside world).
Using a VPN with a proxy server can guarantee that the IP number of your computer or your mobile device is camouflaged and that your Internet connection is encrypted. However, I want to make sure you understand that nothing can guarantee complete privacy, especially when you use the Web. For example, when you voluntarily enter information into a form on a Web page, you are giving that information to the company that owns the Web site. And, very often, such information is entered into databases, where it is shared with many other companies. In addition, many Web sites track you without your knowledge by storing information (called "cookies") on your computer or mobile device. In this way, Web sites are able to keep track of your activities over time — information that is also entered into shared databases — and even a VPN can't prevent that.
Aside from providing privacy and security, commercial VPN services offer another useful service: you can change your apparent geographic location whenever you want. Here is how it works. It is possible to ascertain the location of any computer connected to the Internet by looking up its IP number in a public database. For instance, if you connect to the Internet using an IP number from New York City, it is easy for any Internet server to determine that you are in New York. For example, this is how Google always seems to know your location. As we discussed above, when you use a VPN service, all your communication with the outside world is carried out by a proxy server, which uses its own IP number. Thus, all the remote computers to which you connect will think that your geographic location is the location of the proxy server. For example, if you live in New York but you use a VPN server in, say, Los Angeles, all the Web sites you use will think you are in Los Angeles. Commercial VPN services typically maintain a large number of VPN servers in different parts of the world. You can choose whichever server you want and change it at any time. In this way, you can control your apparent geographical location. Let me show you an example. Below, we are going to discuss a VPN service provider named OctaneVPN. It happens that, as I write this, OctaneVPN has VPN servers (with proxy servers) in 82 cities in 40 different countries. Indeed, there are servers in 25 different cities in the United States alone. If you become an OctaneVPN customer, you will be able to choose whichever VPN server you want to use, which lets you change your apparent location to any of 82 cities around the world. The same is true for any of the major VPN service providers. Changing your apparent location is useful when you want to use a service that is only available in certain parts of the world, for instance:
• Amazon Prime
Here is a typical example. I have a friend who was visiting India and wanted to use Netflix. However, Netflix was not available in India, and whenever he connected to the Internet with an Indian IP number, Netflix would not let him access the service. To get around the restriction, he simply used a VPN server residing in the United States. As far as Netflix was concerned, he was now in the U.S. and there was no problem. Another reason to use a VPN to change your apparent geographic location is to avoid censorship. For example, if you work at a company that controls which Web sites you are allowed to visit, you may be able to bypass the controls by using a VPN to change your "location". Similarly, if you live in, or are visiting, a country that has strict Internet controls, using a VPN may enable you to visit Web sites that otherwise would be unavailable from your location. If you are using a mobile device When you use a mobile device with GPS (such as a phone or tablet), your apps can, and will, access your GPS coordinates to determine your location. Using a VPN service will not be able to prevent this, as GPS is not an Internet service and, hence, has nothing to do with IP numbers.
The reasons to use a VPN service are:
• Security
We are now ready to get you started with a VPN service. There are three steps: 1. Open an account with a VPN service provider. 2. Download and install a VPN client. 3. Configure the VPN client and connect to the VPN server of your choice. This will automatically secure your Internet connection and provide access to a proxy server to hide your IP number. At that moment, your Internet connection becomes secure and private.
As a rule, VPN service costs between $6 and $10 a month. To me, that's a bargain. There are many VPN service providers, so you have a large choice. Here are the ones that I recommend, all of which are well-run companies that will do a good job for you at a fair price:
OctaneVPN
It happens that OctaneVPN, a well-known, reputable VPN service provider, offers free tech support, as well as a money-back guarantee. Moreover, OctaneVPN also furnishes free VPN client software that is particularly easy to use, so let's go with them. Click the link below, and register for one of the VPN service plans. (If you are not sure which plan to choose, just pick the cheapest one for now.) Then come back to this page to continue. Note: If later, you decide that you don't like the service, just contact the OctaneVPN tech support department, and they will refund your money without a hassle. (I tested this, so you don't have to.) Once you have registered with OctaneVPN, you will see a Web page that tells you that your account was created successfully. At that time, if you want, you will be able to print a receipt. You will then be emailed a confirmation message. Once this message arrives, which shouldn't take long, you are ready to install the VPN client software. The confirmation message will contain three important pieces of information. First you will get a Username and Main Password. These are what you use with the OctaneVPN client and to log into the OctaneVPN Web site. You will also get a PPTP/IPSec Password. This is used with a special security system which we don't need to worry about, because the OctaneVPN client makes it unnecessary.
The next step is to download and install the Octane VPN client on your computer. To do this, you will visit the download page on the OctaneVPN Web site. (I'll give you a link to this page in a moment.) The OctaneVPN client comes in two different versions: one for Windows computers and one for Mac computers. In this Quick Start Guide, I will be showing you the Windows version. However, if you are a Mac user, don't worry: once you get the program installed, it works pretty much the same way as what you will see here. (If you are using a different device, such as a phone or tablet, see the note below.) When you get to the download page, look for two images similar to the following: one for Windows and one for Mac.
To download the appropriate OctaneVPN client, select the version for your system and install the program in the regular manner. At the very end of the installation process, you will see a final window that indicates that the installation is finished. Notice that you have the option to start the OctaneVPN client. Make sure the box next to Start OctaneVPN is checked. 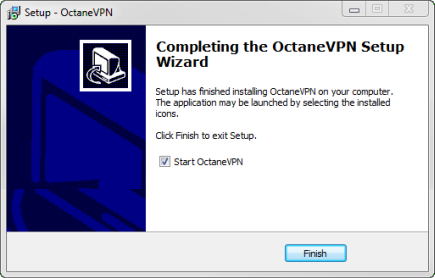
Click the Finish button to complete the installation and start the OctaneVPN client program. (If necessary, you can always start the program by clicking the icon on your desktop, or by looking for OctaneVPN in your list of installed programs.) Once the OctaneVPN client is running, return to this Quick Start Guide and continue with the next section, at which time I will show you how to configure the program and connect to the VPN of your choice. Right now: click the link below to display the Octane VPN download page: Install the appropriate version of the program on your computer and then return to this page to continue with the next section of the VPN Quick Start Guide. If you are using a mobile device or Linux The OctaneVPN client works with Windows and Macintosh computers. If you have a different type of computer, or if you use a mobile device (such as a phone or tablet), you will have to use a different VPN client. If this is the case, I suggest that you skip the installation for now and keep reading to the end of this VPN Quick Start Guide so you can see, generally, how everything works. It will only take you a few minutes. Later, you can use one of the following links to find the instructions you need to install a VPN client on your device.
Installing a VPN client: iPhone and iPad
For your convenience, I will repeat this information at the bottom of the page.
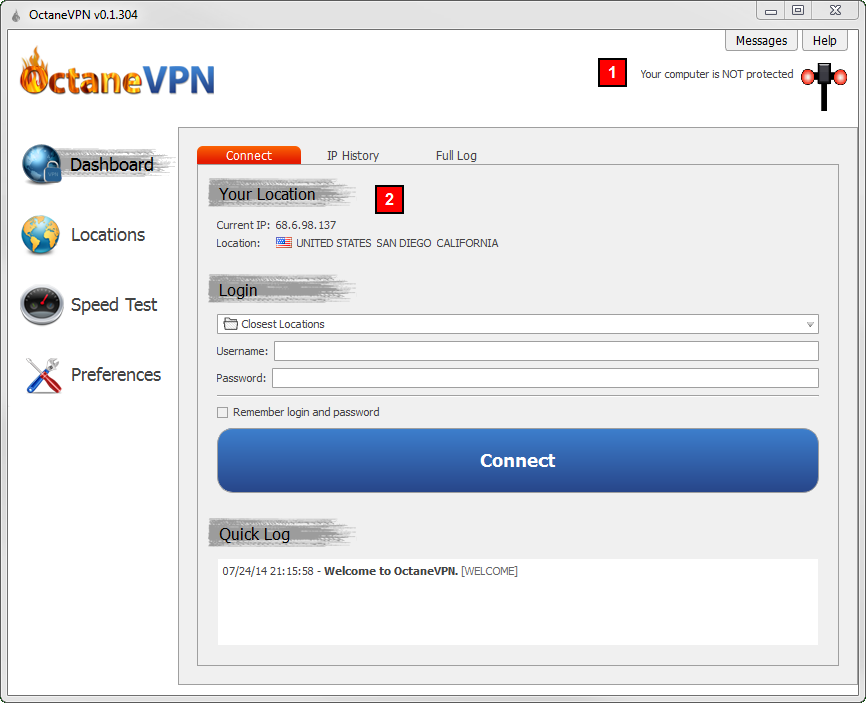
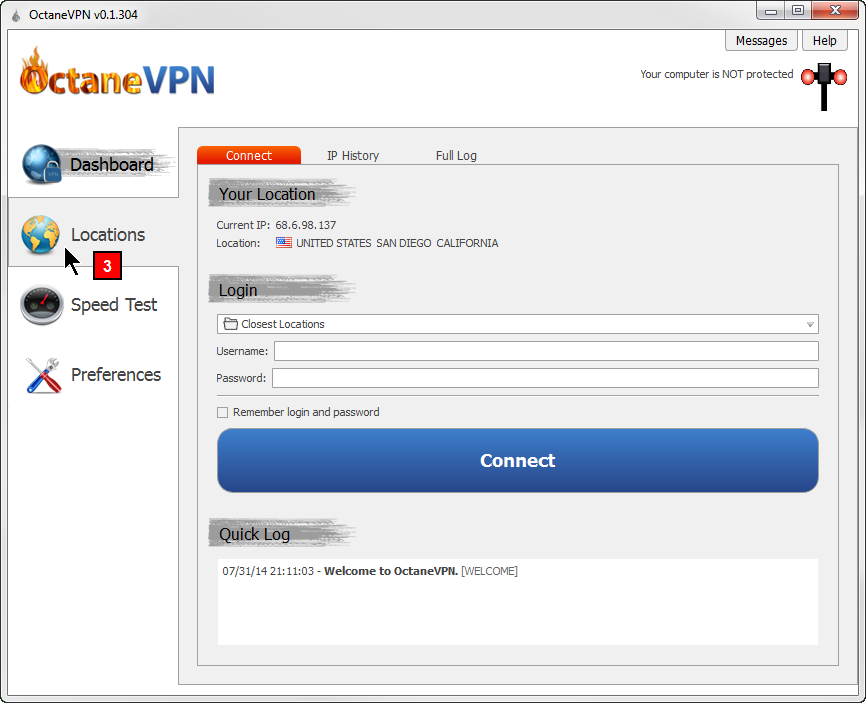
In this section, you will learn how to configure your VPN client for the first time. Although you will see a lot of screenshots and instructions, the process is actually pretty easy and will only take a few moments. The first time you start the OctaneVPN client, you will see a window similar to the one in the screenshot below. This is the main window, also called the Dashboard. Note: In the screenshots that follow, you will see some red boxes with numbers. I have placed them there, so I can refer to them in our discussion. Before we move on, there are two things I want to point out to you. (The numbers below correspond to the numbers in the red boxes you see below.) 1. Are you connected to a VPN server? Near the top right-hand corner, you see what looks like a strange street light with two orange/red light bulbs. To the left of the light you see the words Your computer is NOT protected. This means that you have not yet connected to a VPN server. Once you are connected, the light bulbs will turn green and the message will change. 2. Your current location The program shows you your IP number and makes its best guess as to your geographical location. As you will see below, once you connect to a VPN, your apparent IP number and geographical location will change. |

|
|
|
The first thing we need to do is tell the program which VPN locations we want to use. To do so: 3. Click the Locations icon (see the screenshot below). |
|
|
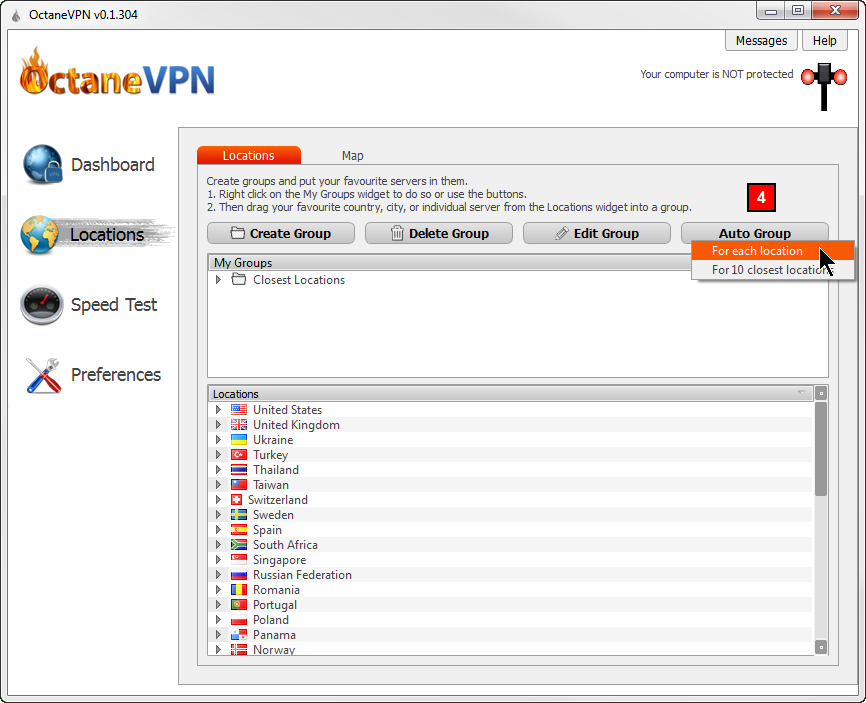
You will now see the Locations window (below). As I will show you in a minute, to connect to a VPN server, you choose it from a "group". The program lets you organize any of the VPN servers into as many groups as you want. For example, you might have one group for the North American VPN servers; another group for the European servers; and so on. For now, however, to make it as simple as possible, we will tell the program to do the work for us by creating a default group for each country. To create these groups, all you have to do is: 4. Click Auto Group, then select For each location. |
|
|
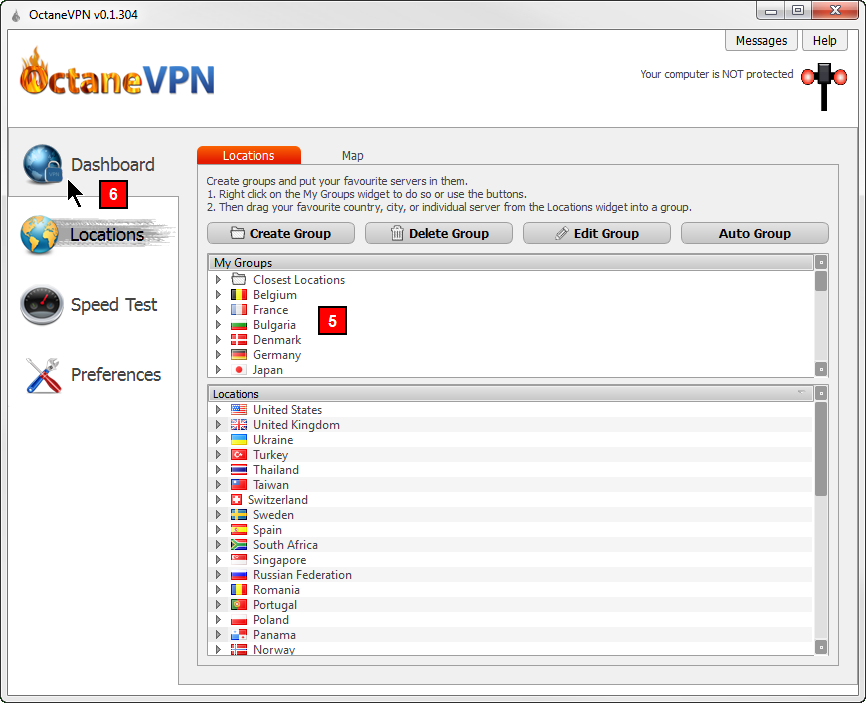
In the screenshot below, you can see the VPN server groups we just created, under the My Groups heading. You can move the scroll bar down if you want to see them all. You will notice that: 5. There is now one VPN server group for each country. We are now ready to return to the main window. 6. Click the Dashboard icon to return to the main window. |
|
|
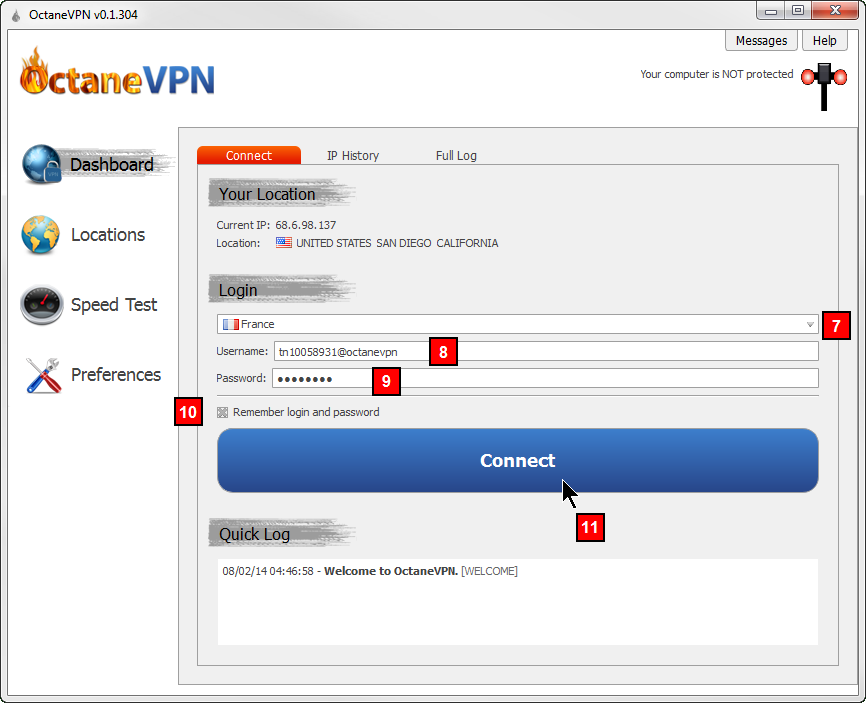
You will now see the main window, the Dashboard, again. (See the screenshot below.) All you have left to do is choose a VPN server, enter your username and password, and tell the program to connect you. To choose a server, you use the long box at the top of the Login section. Click on the little arrow at the far right. This will bring up a drop-down list of your VPN server groups. In the example below, I have chosen France. 7. Pull down the list and choose a country. Next, enter your Username and Password. This information was emailed to you in the confirmation message you received. 8. Enter your Username. 9. Enter your Password. Once your Username and Password are entered, you can tell the program to remember your Username and Password, so you don't have to re-enter them every time you start the program. 10. Click the little box to the left of Remember login and password. You are now ready to connect the VPN server. 11. Click the large, blue Connect button. |
|
|
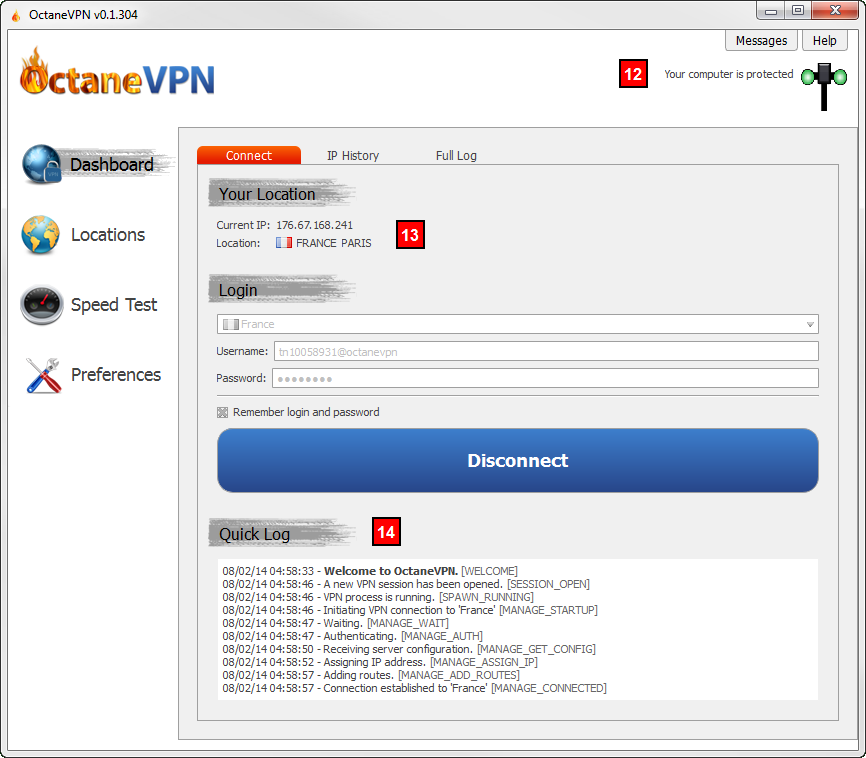
We are finished. Your connection to the Internet is now secure and private! As we discussed earlier, your connection is secure because all the data passing to and from the VPN server is encrypted. And, it is private because, to the outside world, it looks as if your IP number is that of a remote proxy server (in our example, a server in France). As you can see in the screenshot below, near the top right-hand corner, the two light bulbs are now green. To the left of the light you see the words Your computer is protected. This means: 12. Your computer is now connected to a remote VPN server and proxy server. If you look at the Your Location section of the window, you will see: 13. The location of the VPN server and the IP number of the proxy server. Finally, in the Quick Log section at the bottom of the window, you can read a list of technical messages describing what operations the VPN client program has carried out on your behalf: 14. A log of the operations carried by the program. These messages can be helpful if you encounter a problem. |
|
Now that we are finished and you have a working VPN service, let's give it a test. To do so, we will connect to a Web site owned by the BBC (British Broadcasting Corporation). This site features a video service called iPlayer, which is supposed to be available only to people who live in the United Kingdom (U.K.). Of course, the program used by the Web site has no idea where you actually live so, in order to guess, it looks at your IP number. If you have been following along with the instructions on this page, your IP number will make it look as if you are in France. To begin the test, click the BBC link below. BBC iPlayer: Watch Channel One The Web site will detect that you are not in the U.K., and you will see the following error message: 
Now, let's make it look as if you are in the U.K. To do so, you will return to the OctaneVPN program and disconnect from the French VPN server (see the screenshot below). You will then connect to the U.K. VPN server and try the Web site again. 15. Click the large, blue Disconnect button. |

|
|
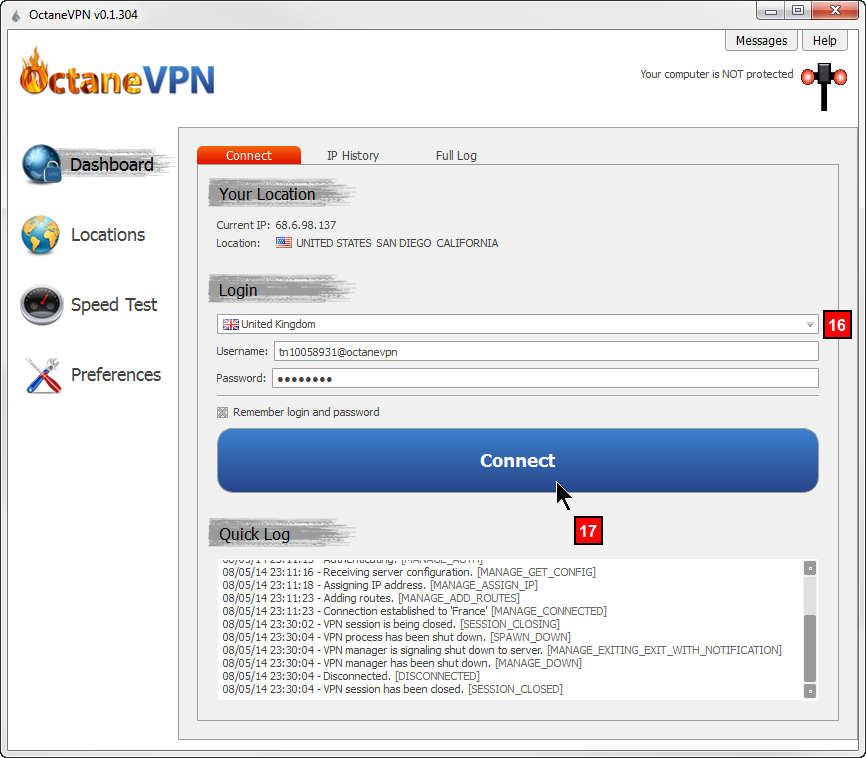
You are now disconnected from the French VPN server, as you can see in the screenshot below. To connect to a U.K. VPN server, use the long box at the top of the Login section. Click on the little arrow at the far right. This will bring up a drop-down list of your VPN server groups. 16. Pull down the list and choose United Kingdom. Hint: The list is long, so you may have to scroll down to find "United Kingdom". You are now ready to connect to the United Kingdom VPN server. 17. Click the large, blue Connect button. |
|
|
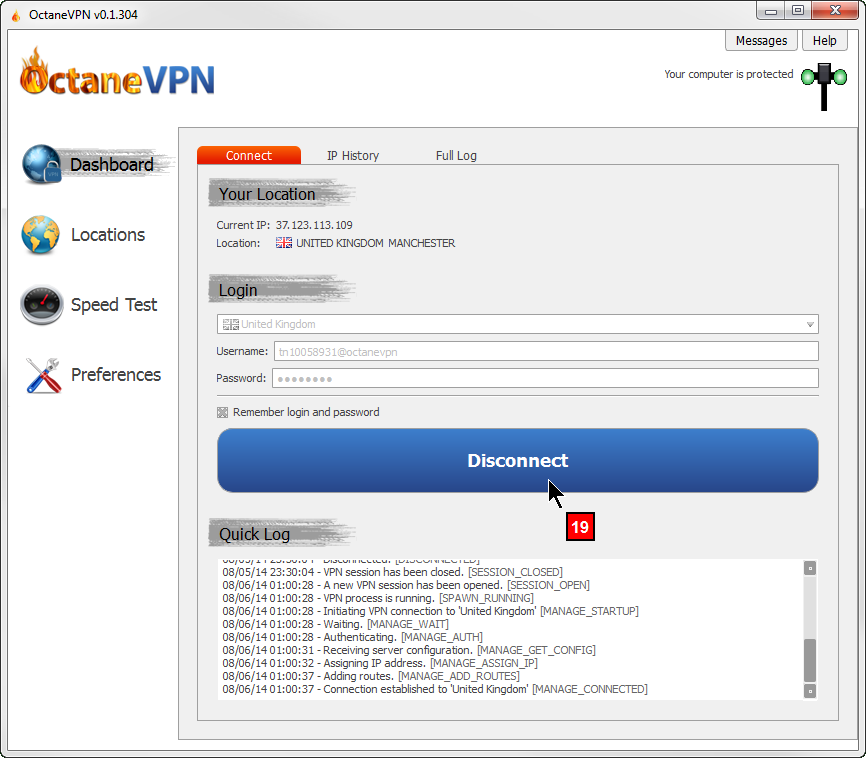
After a moment, you will be connected to the U.K. VPN server. You can see this in the screenshot below. If you look at the Your Location section of the window, you will see: 18. The location of the VPN server and the IP number of the U.K. proxy server. |

|
|
To finish the test, click again on the BBC link below. This time, you should be able to view the content (BBC Channel One, a general entertainment video channel). BBC iPlayer: Watch Channel One When you are finished, disconnect from the VPN server (see below). 19. Click the large, blue Disconnect button. |
|
|
|
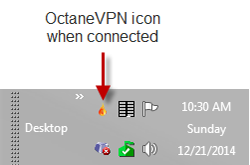
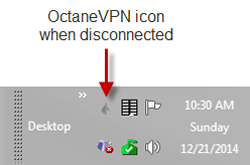
If you want to completely stop your VPN client program, you might think that all you have to do is close the program's window. However, this is not always the case. Because VPN clients are designed to stay running indefinitely, closing the window may not stop the program. This is the case with OctaneVPN. To terminate OctaneVPN, look for its icon in the Notification Area (also called the System Tray) at the far right of the Windows Taskbar. The OctaneVPN icon looks like a small flame, and it may be difficult to notice, especially when the VPN is disconnected. (See below.) |
|
|
Right-click the OctaneVPN icon to see the context menu, then select Exit.
The program will now terminate.
This marks the end of the VPN Quick Start Guide. Once you subscribe to a VPN service, and install and configure a VPN client program, your Internet activities well be as secure and private as possible. Moreover, as we discussed above, you will be able to change your apparent geographical location whenever you want. If you have followed along with this guide and have become an OctaneVPN user, you are ready to go. If you have not yet chosen a VPN service, here is a short list of the services I prefer. Each of the following links will take you to a page where you can check out prices and, if you like, register for that service.
OctaneVPN
I have chosen these particular VPN services for several reasons. First, all the services you see above have grown out of the Usenet business. (Usenet is a very old Internet system, used for discussion groups and file sharing.) As a result, these companies have years of experience running a highly technical Internet service, and they all know how to protect their customers' privacy. Second, all of these VPN services offer unlimited usage: you don't have to pay more if you want to download a lot of data (say, to watch movies over Netflix). Third, all these companies offer good tech support (and believe me, I ask a lot of questions). Finally, I am personally familiar with these companies and people who work there. In my experience, they know what they are doing, and they will give you reliable service at a fair price. Using OctaneVPN with a mobile device or Linux As I mentioned earlier, the OctaneVPN client works with Windows and Macintosh computers. If you have a different type of computer, or if you use a mobile device (such as a phone or tablet), you will have to use a different VPN client. Here are the links to use to find the information and software you need. First, to start an OctaneVPN account: Once you have an account, use the appropriate link below to find the instructions you need to install a VPN client on your device.
Installing a VPN client: iPhone and iPad
|

|
|
© All contents Copyright 2026, Harley Hahn
|