
|
|
|
|
Harley Hahn's
File Sharing
Le petit guide
Master List
•
Top Usenet
•
Top Usenet
|
HARLEY HAHN'S USENET CENTER File Sharing Tutorial
In the previous section, we discussed how to generate an SFV ("simple file verification") file. Using an SFV file enables someone who downloads your data files to determine quickly whether or not all the data is intact. Although SFV files are small and easy to use, there is a drawback. If there is a problem with a data file, the SFV program will tell you the name of the file, but nothing more. An SFV file does not help you actually fix the problem. Throughout the 1980s and 1990s, most Usenet users depended on slow, dial-up Internet connections. Moreover, the older Usenet servers were not nearly as reliable as today's commercial servers. As a result, data errors were all too common, and it caused a great deal of inconvenience. People would spend a lot of time (sometimes days) downloading a large multi-part binary file, only to find that the entire thing was useless because of a small amount of missing or corrupted data. In such cases, there were only two things you could do to fix the data. First, you could download everything all over again. This was not only time-consuming, but problematic. If the original problem was a transmission error, downloading the data again might work. However, if one of the data files on the Usenet server was corrupted, all that would happen is that, after many hours (or days) of downloading, you would end up with the exact same incorrect data. The second solution was to send a message to the person who posted the original files, asking him or her to please repost a correct version of the file with the problem. You would then have to wait patiently, hoping that the request would be honored. In 2001, however, a solution was created that, virtually overnight, made Usenet file sharing significantly more reliable. In that year, two programmers, Tobias Rieper and Stefan Wehlus, conceived of a system, called PARCHIVE, that would provide a straightforward way to detect and fix data errors, even if a large chunk of the data was completely missing. (I'll explain the name in a moment.) The fundamental ideas behind Parchive were borrowed from the design of RAID disk storage systems. (RAID stands for "redundant array of independent disks".) The basic idea behind both RAID and Parchive is to use the original data to create a special set of files that contain information called PARITY BITS, which are added to the data being stored or transmitted. Later, if the original data is lost or corrupted, the parity bits can be used to recover the missing data. You can now understand the name Parchive: it stands for "parity archive". (A collection of files used for a particular purpose is often referred to as an ARCHIVE.) A Parchive program works by dividing the original data into BLOCKS. The program then reads each block and creates a set of files, called PAR FILES, containing parity information in the form of RECOVERY BLOCKS. Later, if there is a problem, any Parchive program can use the recovery blocks to recover missing data or fix corrupted data. In 2002, a brand new Parchive specification was created. This specification, which was proposed by a programmer named Howard Fukada, offered significant advantages over the original system. The new Parchive system generates and uses PAR2 FILES, which are significantly different from the earlier PAR files. The Parchive program that I recommend is QUICKPAR (usually spelled QuickPar), which is what we will be using in this tutorial. QuickPar, which is freeware, can be used in two ways. First, you can use QuickPar to generate PAR2 files, which you can then upload with your data files. Second, when you download data files that come with accompanying PAR2 files, you can use QuickPar to check the data and, if necessary, fix any problems. For compatibility, QuickPar can also check data using an SFV file, as well as the older PAR files, As you might imagine, generating PAR2 files is a complex operation. What makes is easy is that QuickPar will do all the work for you automatically. If you want to follow along at your own computer as you read, take a moment now to download and install QuickPar.
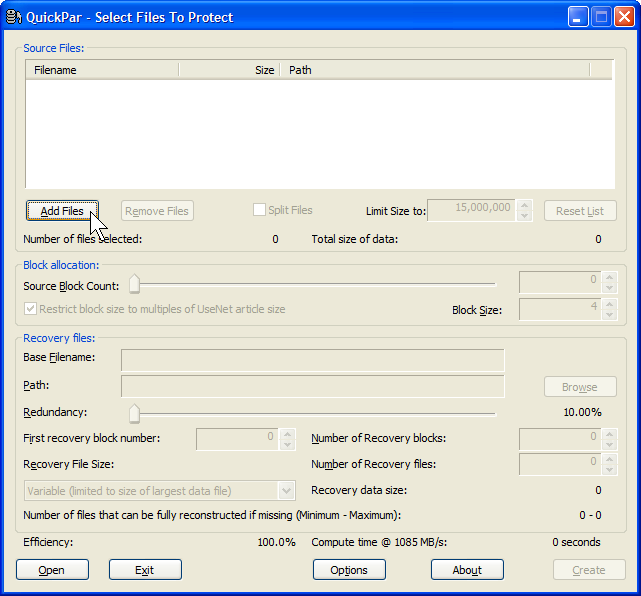
QuickPar download site: To begin, start QuickPar. You will see a window like the one below. The first goal is to select the data files you want to process. To do so, click on the Add Files button. |
|
|
|
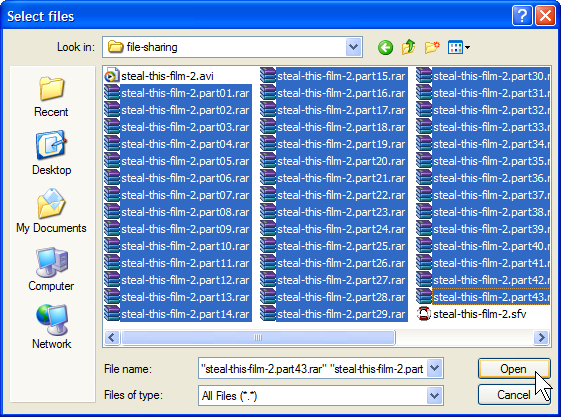
You will now see the window below which is used to select the files for which you want to create PAR2 data recovery files. Navigate to the directory (folder) that contains the files to be uploaded. Select only the RAR files, then click on the Open button. Do not select the original file (in this case, the avi file) or any other files (such as the sfv file). |
|
|
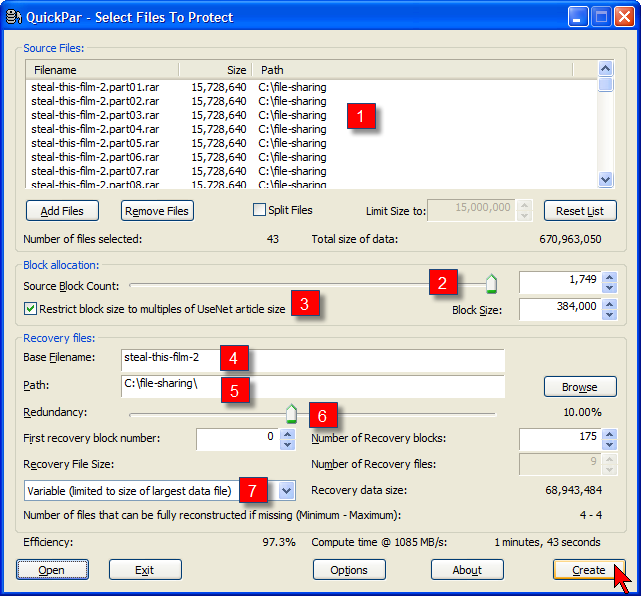
Once you have selected the files to process, you will be returned to the original window. The names of the selected files will appear in the Source Files box near the top of the window. (See the screenshot below.) At this point, you need to check that 7 important settings are specified correctly. You then click on the Create button to create the PAR2 files. It looks complicated, but it really isn't, because most of the time the default values will be just fine. However, do take a moment and check the settings which I have marked in red on the screenshot, using the instructions below. |
|
|
Within the Source Files section of the window: 1 Filename This column contains the list of all the files that will be processed by QuickPar. Double- check that all the RAR files are listed. At the same time, make sure no other files are in the list. Within the Block allocation Files section of the window: 2 Source Block Count QuickPar will divide all the data in your files into slices, called "blocks". This setting controls how many blocks there will be. Make sure the slider is all the way to the right. If it isn't, you can move it. In our example, QuickPar is showing us that the data in the 43 RAR files we are about to process will be divided into 1,749 PAR2 blocks. 3 Restrict block size to multiples of UseNet article size When you prepare PAR2 files for Usenet fire sharing, you want to make sure the block size works well for Usenet. To do so, this setting should be checked. If there is no checkmark in the box to the left, click on the box and the checkmark will appear. Within the Recovery Files section of the window: 4 Base Filename This is what QuickPar will use for the first part of the name of all the files in generates. Make sure there are no extra characters. For example, if you were to see steal-this-film-2-part01, you would delete the last few characters to change the base filename to steal-this-film-2. 5 Path This is the path of the directory (folder) in which QuickPar will place the newly generated PAR2 files. Unless you have a good reason to do otherwise, use the same path as where the RAR files are stored. (This will probably be the default.) If you need to change the path, you do so by clicking the Browse button on the right. 6 Redundancy The redundancy value is to the right of the slider, below the Browse button. This setting controls the level of data recovery the PAR2 files will support. A higher value enables more data recovery, but requires more PAR2 files. For Usenet file sharing, a good redundancy value to use is 10.00%. This will probably be the default. If not, change the value 10.00% by moving the slider. For a finer adjustment, you can click on the slider and then use the right- and left-arrow keys. 7 Recovery File Size
This setting controls the size of the PAR2
files that will be generated. For Usenet
file sharing, you should choose:
Once you have checked all the settings, start the PAR2 file generation by clicking on the Create button, in the bottom right-hand corner of the window. As the PAR2 files are being generated, you will see a window showing you the progress. |

|
|
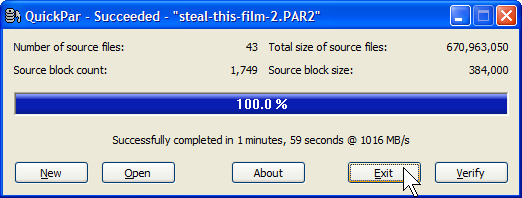
When QuickPar has finished generating all the PAR2 files, it will display a confirmation window. Before you exit, you can verify that the PAR2 files are correct by clicking on the Verify button. However, you don't need to because QuickPar verifies automatically. (Still, it's free, and you might want to do it just for fun.) |
|
|
At this point, you are finished with QuickPar. Close the program by clicking on the Exit button. In our example, QuickPar created 10 PAR2 files, which you can see in the screenshot below. 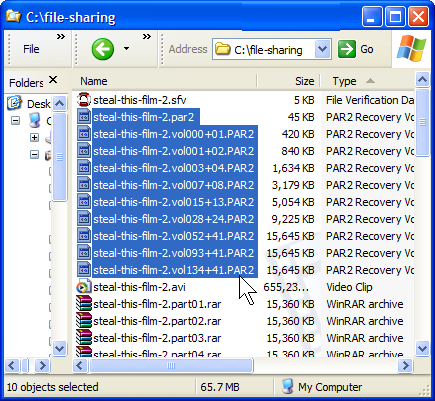
You will notice that, except for the first file, the names of the PAR2 files are all a bit strange. Before we move on, I want to take a moment to discuss the PAR2 naming conventions. As you might guess, the names do mean something and, although they look mysterious, the explanation is actually quite simple.
© All contents Copyright 2026, Harley Hahn
|