

|
|
|
|
Harley Hahn's
File Sharing
Le petit guide
Master List
•
Top Usenet
•
Top Usenet
|
HARLEY HAHN'S USENET CENTER File Sharing Tutorial
In the following sections, you and I will go through all the steps required to upload a large binary file. To do so, we will be using a sample file named steal-this-film-2.avi. (If you want to follow along at your own computer, you can use any binary file you want.) This particular file contains a video called "Steal This Film, Part II", a freely sharable documentary about file sharing. The name of the video was taken from the book Steal This Book, written in 1970 by Abbie Hoffman, a well-known U.S. political activist. For the purposes of our tutorial, I have created a directory (folder) to hold our work files. To start, the directory holds only the file we will be uploading. 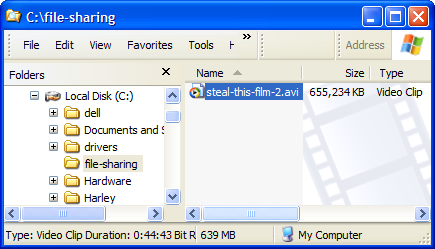
The first step in uploading a large binary file is to compress the file and break it into pieces. There are a large variety of compression programs that can do the job. However, the program that is used most widely is WINRAR (usually spelled WinRAR). WinRAR produces compressed files called RAR FILES, which use a proprietary format. "RAR" stands for "Roshal Archive", named after the Russian programmer, Eugene Roshal, who developed the software. If you want to follow along with a sample file of your own, as you read the tutorial you will need WinRAR. Take a moment now and download and install it. Hint: If you use Windows and you are not sure which version to use, choose the 32-bit version. WinRAR download site: http://www.rarlabs.com/download.htm Because WinRAR uses a proprietary format, it is not a completely free product. It is free to download, but if you want to use it permanently, you are supposed to pay for it. If you don't, the program will keep working, but it will nag you to upgrade to the paid version. To begin, start WinRAR, navigate to the directory that contains the file you want to share, select it, and click on the Add button: 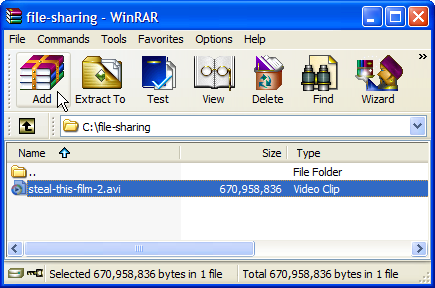
You will now see a window that contains the settings that specify how your RAR files should be generated. The first setting you need to specify is the number in the bottom left (Split to volumes, bytes). This number specifies the size of the individual RAR files. In this case, I have typed the value "15 mb" (15 megabytes). Note: By default, WinRAR assumes that any number you type by itself refers to kilobytes. Thus, you must specify "mb" for megabytes. 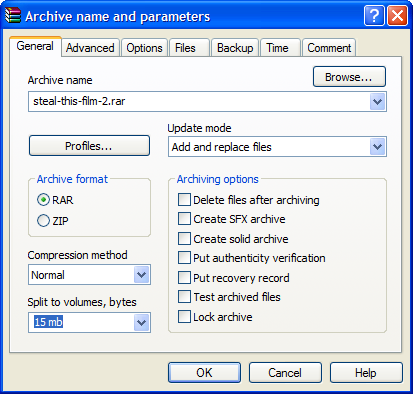
There is no mandatory size for RAR files. It is up to you to make sure that, relative to the size of the original file, the RAR files should be not too large and not too small. I realize that sounds vague. If you are ambitious, there is a complex formula you can use to calculate the optimal size. Most of the time, however, you'll do just fine if you choose your RAR file size from the following table. Recommended Size for RAR Files
In our example, the file we want to upload is about 655 MB, as you can see from the screenshot at the top of the page. Using the table, I specified a RAR file size of "15 mb". The only other specification you may want to consider is the Compression method selection. The default is "Normal", which tells WinRAR to compress the data. However, if you pull down the list, you will see several choices. 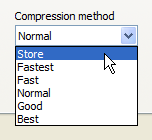
The only choice you need bother with is "Store". This tells WinRAR to "store" the data the way it is without compressing it. If you know that the file you want to share is already compressed, you can choose "Store" which will increase the processing speed significantly. This is the case with most multimedia files, such as the avi file we are using, so I have selected "Store". Once you have specified the Split to Volumes size and the Compression method , you are ready to create the RAR files. Click on the OK button. 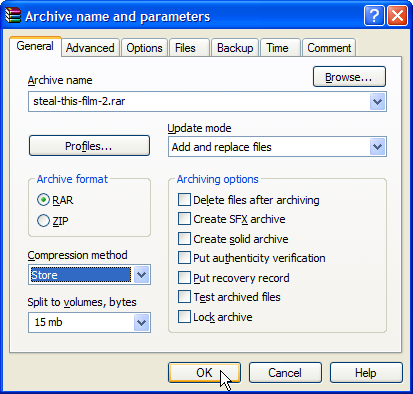
WinRAR will begin to compress and split the file. You will see a window, similar to the one below, showing the progress. 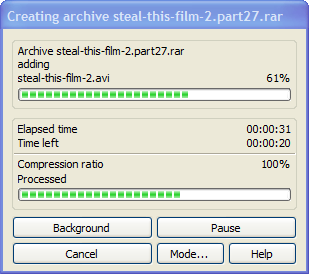
Once the processing is finished, you will have multiple RAR files. By default, WinRAR names RAR files using the following pattern:
xxxxx.part01.rar
where xxxxx is the filename (first part) of the original file. The file extension is replaced by: partnn.rar where nn is a number, starting with 1. Since the original file is named: steal-this-film-2.avi the filename is: steal-this-film-2 and the file extension (which gets replaced) is: avi In this case, WinRAR split the original file into 43 parts, which are given the names: steal-this-film-2.part01.rar through: steal-this-film-2.part43.rar This is a pattern you should learn to recognize, as you will be seeing it a lot. You can see the newly created files in the following screenshot. Notice the original file at the top of the list. 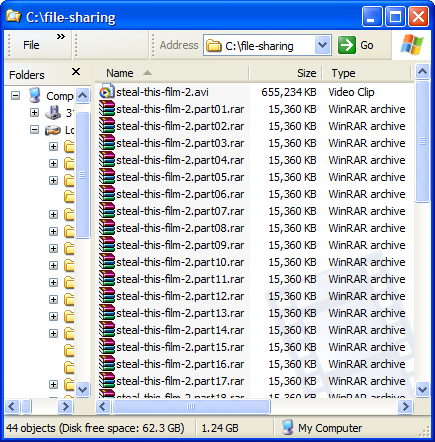
Now that the RAR files have been generated, we are ready to move on to the Step #2: creating a checksum file for error checking.
© All contents Copyright 2026, Harley Hahn
|
|