

|
|
|
|
Harley Hahn's
File Sharing
Le petit guide
Master List
•
Top Usenet
•
Top Usenet
|
HARLEY HAHN'S USENET CENTER File Sharing Tutorial
During this tutorial, we have been discussing the steps necessary to share a large video file named steal-this-film-2.avi. To upload the files, we will use a Usenet posting program called Camelsystem Powerpost. In this section, I will show you how to configure the program. In next section, we will take the last step by uploading all the files necessary to share the video. If you want to follow along on your own as you read this page, please take a moment to download and install Camelsystem Powerpost:
Camelsystem Powerpost download site:
Hint: After you navigate to the download page, you will have a choice of what to download. Choose the "setup" download in English. When you start Camelsystem Powerpost, you will see a window like the one below. The first time you use the program, you need to take a few minutes to specify the various settings the program will need to connect to your news server and post articles for you. To do so, pull down the Options menu and select Program settings. 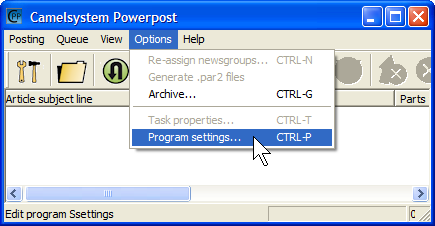
You will now see a new window called "Properties for Camelsystem Powerpost". This window will have four tabs. We will go through each tab in turn, specifying information as needed. We'll start with the Server settings tab, which you can see in the screenshot below. On this tab, you fill the information the program needs to communicate with your Usenet news server. I have marked the items you need to fill in with red arrows. (Notice the spelling mistake, by the way. Newsserver addres is missing an "s" at the end of "address".) 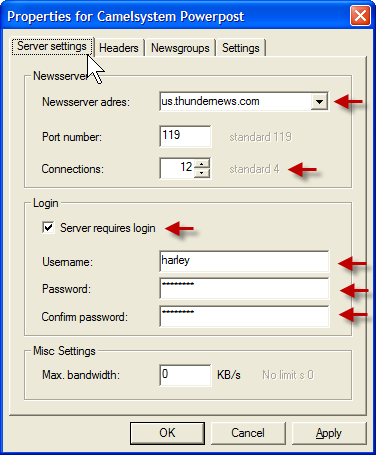
First, type the name of your news server in the top box. In our example, I have used the server for Thundernews (one of my favorite Usenet providers). Next, specify the number of connections. The default is 4; the maximum is 12. When you choose this number, I want you to consider the following trade-off: Uploading a large file can be a slow process, sometimes taking hours. The more connections you give the program, the faster it will upload. However, if you plan on doing some downloading at the same time, those connections will not be available. In our example, it happens that Thundernews provides all of its users with 50 connections, so I specified 12 (the maximum), which leaves me plenty of connections for other work. Another consideration is computer speed. You may find that using a large number of simultaneous connections to upload large files will slow down your computer so much that it interferes with your other work. Thus, if you plan on using the computer while your files are being posted, you may want to specify a smaller number of connections. Although the uploading will take longer, your computer will be able to provide a more normal response, allowing you to do other work at the same time. Moving on: to enable the program how to log in to your account, make sure there is a checkmark next to Server requires login; then fill in your username and password. To continue, click on the Headers tab. You will see the following window. To start, enter your name and email address. If you want to remain anonymous, use a fake name and address. (Just between us, my name is not really Fester Bestertester.) (Notice that, once again, the word "address" is misspelled. This time, there are two letters left out.) 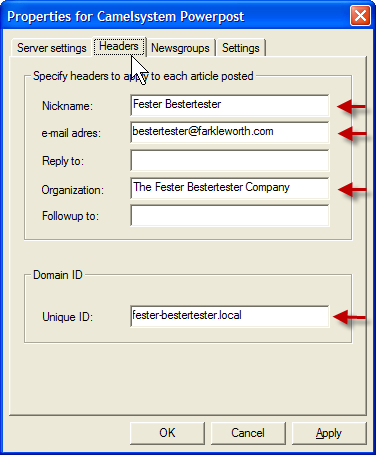
For the Organization, you can put the name of your school or company or group if you want. If you care about privacy, you can use a fake name or simply leave the space blank. Finally, you should set the Unique ID, a string of characters that will be appended to all the Message IDs the program generates, to ensure that the Message IDs are unique. The default is: camelsystem-powerpost.local It is a good idea to change the part before .local. I suggest something based on your nickname. (Do not use spaces.) In our example, I have used: fester-bestertester.local To continue, click on the Newsgroups tab. You will see the window below, which shows you a list of newsgroups. 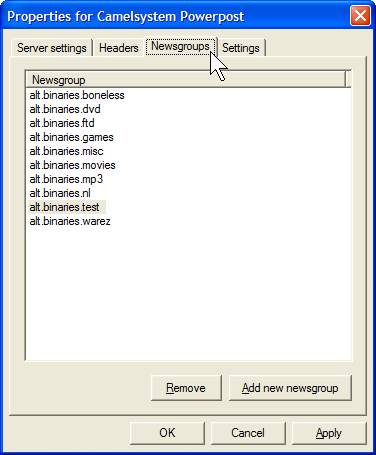
What you see here is the default list, which contains the groups you will want to use most of the time. If you want to post (upload) to a different group, you can add it to the list by clicking on the Add new newsgroup button. In our example, we will be uploading sample files, so we will be posting to alt.binaries.test, a special group that is set aside for practicing. In case you are wondering, alt.binaries.boneless is a catch-all, miscellaneous group used for general file sharing. As such, it is the most active of all the Usenet newsgroups, receiving more data than any other group. (As far as I know, no one knows the origin of the name "boneless". If you figure it out, please let me know.) To continue, click on the last tab, Settings. You will see the window below, which shows you a variety of miscellaneous settings. Once you get some experience, these options will start to make sense. For now, all I will say is that, unless you have a good reason to make a change, stay with the defaults (which are what you see below). 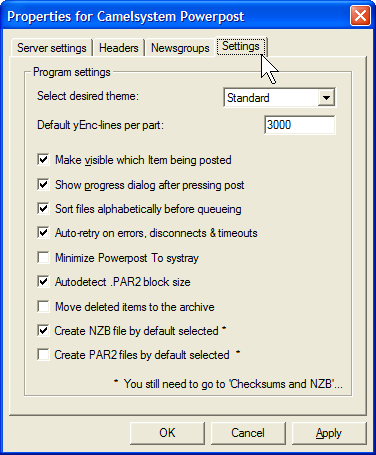
Before we move on, I do want to draw your attention to the last two settings. The second last setting tells the program to create an NZB file for us automatically. The last setting tells the program to not create PAR2 (error correction) files. We don't need PAR2 files is that, earlier, we used the QuickPar program to create our own files. If you want, Camelsystem Powerpost will create PAR2 files for you and, indeed, some people choose to do so. However, I advise against it. Creating your own files gives you more control over the process. Moreover, it allows you to check and verify the PAR2 files before they are posted. (You can see the details earlier in the tutorial.) You can now click on the OK button to close the Properties window and return to the main window. Once you specify the program settings, they are stored permanently, so there is no need to enter this information again unless something changes. From now on, whenever you run Camelsystem Powerpost, you can immediately jump to the next step: posting your files to Usenet.
© All contents Copyright 2026, Harley Hahn
|
|