Harley Hahn's Guide to
Unix and Linux
|
|
Harley Hahn's Guide to
|
|
A Personal Note
Chapters...
Command
INSTRUCTOR |
Chapter 6... The Unix Work Environment
As I explained in Chapter 3, Unix was developed using a text-based interface. Later, as more sophisticated hardware became available, graphical interfaces were created. Although the Unix interfaces were based on hardware, they were created with more in mind than their appearance and basic function. They were designed to provide a complex working environment that is particularly well-suited to the human mind. In this chapter, I'm going to show you how to use a combination of the text-based and graphical interfaces. My goal is to teach you enough so you can organize your work in a way that suits your thought processes and your temperament. Along the way, I'm going to cover other topics that are important to mastering the Unix work environment, such as how to copy and paste data, how to work as superuser, and how to shutdown and reboot your system. Throughout this chapter, I will be building on ideas from Chapter 4 and Chapter 5. So before you continue reading, please make sure you are comfortable with the following concepts: • From Chapter 4: userids, passwords, logging in and logging out, the shell prompt, upper- and lowercase letters, the system administrator, the superuser. • From Chapter 5: GUIs, desktop environments. As you read this chapter, a lot of what you have already learned will come together, as you start to use Unix in the way it was intended to be used.
In Chapter 3, I explained that Unix systems are multitasking, which means they can run more than one program at the same time. "Multitasking" is a technical term but, these days, it is fashionable to use the word to describe the type of mental processing that allows people to concentrate on more than one thing at a time. For example, one hears, "Women are better at multitasking than men," or, "It's okay if I talk on the phone while I drive, because I am good at multitasking." The truth is neither computers nor human beings can actually perform two similar tasks at the same time. This realization has important implications when it comes to learning how to use the Unix interfaces so, before we move on, I'd like to take a moment to talk about multitasking. We'll start with computers. Within a computer system, what looks like multitasking is, in reality, a very fast machine performing tasks so quickly that they look as if they are happening at the same time. In Unix, instead of talking about programs executing, we talk about PROCESSES executing. A process is a program that is loaded into memory and ready to run, along with the program's data and the information needed to keep track of that program(*). * Footnote The idea of a process is fundamental to Unix. Indeed, within a Unix system, every object is represented by either a file or a process. In simple terms, files hold data or allow access to resources; processes are programs that are executing. Processes can be divided into smaller units called threads, a thread being a set of instructions that runs within the environment of a process. It is possible to structure programs so that, within a process, more than one thread can run at the same time. At all times, Unix systems have many active processes, each of which requests processor time in order to run. (Although you may not be aware of it, there are processes running in the background.) However, a processor can execute only one process at a time. This means that a one-processor computer can honor only one request at a time. A multi-processor computer may be able to handle more than one request, but even then, it is not nearly enough to service all the processes at the same time. To manage so many overlapping processor requests, Unix uses a system in which each process in turn is allowed to use the processor for a very short interval, called a TIME SLICE. A typical time slice would be 10 milliseconds (10 thousandths of a second). Once the time slice is over, the current process is put on hold and a special service called the SCHEDULER decides which process to execute next. Because time slices are so short and processors are so fast, and because the Unix scheduler handles the whole thing so artfully, it looks to you and me as if Unix is doing more than one thing simultaneously. Thus, the illusion of multitasking is created(*). * Footnote In Chapter 26, we will talk more about processes and how to control them. For now, I'll tell you that if you want to see how many processes are active on your system right now, use the top command. (Note: This command is not available on all systems.) Now let's talk about humans. In certain circumstances, we can all do more than one thing at a time. For example, when we eat, we can smell, taste and chew at the same time. Similarly, we can talk while we walk, play an instrument while we sing, or listen to sound as we watch a movie. However, what we can't do is think about two things at the same time. We can, of course, switch back and forth between mental activities and, if we do it fast enough, it looks as if the activities are happening at the same time. For example, say you are instant messaging with four different people. As long as you answer each person within a reasonable amount of time, they have no way of knowing that you are not talking to them exclusively. This sounds a bit like what Unix does when it multitasks. However, there are important differences. First, compared to computers, human beings change from one task to another very slowly. (The next time you are instant messaging, try switching from one conversation to another every 10 milliseconds.) Second, human minds are much more complex than computers(*), and the type of tasks people carry out are much more complicated than what a computer does. * Footnote The most complex piece of matter in the known universe is the human brain. Third, as Unix switches from one process to another, it needs to keep track of only a small amount of information. When you change from one task to another, you need to reorient yourself in a much more complicated manner. Consider, for example, what must be happening in your mind as you switch from using your Web browser, to checking your email, to answering the phone, to returning to your Web browser, to eating a jelly donut. Although you aren't consciously aware of your mental processes, they are much more complex than what Unix does as it juggles multiple processes. (Moreover, even the latest versions of Linux don't know what to do with a jelly donut.) The biggest difference, however, between computers and humans is that we have free will. From moment to moment, we can think about whatever we want. This means that, as we use a computer, we form momentary strategies as to how we will do what needs to be done, and the operating system must support such strategies. Because there is no way of knowing in advance exactly how a person will think in a particular situation, an operating system must be flexible when it comes to providing a work environment. Within reason, every computer user should be allowed to structure his work environment according to his needs. Moreover, he should be able to change that environment whenever he wants, from one moment to the next, as his mental processes evolve. What's more, as a user becomes more experienced, there should be more sophisticated tools for him to use. For example, a beginner (or a dull person) will typically do only one thing at a time on his computer. He will expand one window to take up the entire screen, and he will control what is happening by using the mouse almost exclusively (and not the keyboard). As a result, he will be unable to carry out any but the simplest tasks. An experienced person (especially one who is smart and creative) will use multiple windows, will use the keyboard as much as possible, and will structure his moment-to-moment work so that it moves quickly and efficiently. If you have ever watched someone work who is a master at using his computer, you know what I mean. When people design user interfaces, they must take into account that, when it comes to thinking, humans have important limitations. For example, it is very difficult for us to remember much of what happens from one moment to the next(*) and — conventional wisdom notwithstanding — we are incapable of concentrating on two things at the same time. * Footnote Can you close your eyes and remember what you read ten seconds ago? What we can do is reorient ourselves within a fraction of a second as conditions change. This is why mothers can watch a toddler, hold the baby, talk on the phone, and cook dinner, all at the same time. (It is also why people think they can talk on the phone and drive safely at the same time.) Our limited memory and our ability to reorient ourselves mean that a good user interface must allow us to juggle as many tasks as we want, and it should do so in such a way that we feel comfortable, once we are used to the interface. Moreover, the user interface should be able to support our growth. That is, no matter how skillful we become, our interface should still be able to meet our demands. It is my contention that the text-based and graphical interfaces that come with Unix are so well-designed and so flexible that, when they are combined well, they are able to meet all these demands and then some. For this reason, I want you to consider two important ideas as you read this chapter. First, I want you to understand that what you are about to read is more than a mere description of how things work. The system I am about to show you has evolved by trial and error, and has been designed by some of the smartest people who have ever lived. The goal of this system is to overcome the limitations of both the computers and the humans who use them, in such a way that the human thinks that both he and the computer are actually multitasking. Second, I want you to take some time to practice and master the interfaces you will meet in this chapter. The real power of Unix comes when you are able to combine the text-based interfaces with the graphical interfaces. I believe that, overall, Unix has the best system of user interfaces that has ever existed (including Microsoft Windows and the Macintosh). By the time you finish this chapter, I expect you to agree with me.
From time to time, I have referred to two different Unix interfaces, text-based and graphical. The time has come to give them formal names. The graphical interface is, of course, the GUI (graphical user interface) we discussed at length in Chapter 3. Unix GUIs are created by a combination of X Window, a window manager and a desktop environment. The text-based interface is called the COMMAND LINE INTERFACE (CLI). Here is why. As you know from Chapter 4, the basic Unix text-based interface is simple. The shell (command processor) displays a prompt. You type a command. The shell does what's necessary to carry out the command. Once the command has been processed, the shell displays another prompt, you type another command, and so on. The entire process uses only text (plain characters), and the line on which you type your commands is called the COMMAND LINE. Thus, we have the name "command line interface". I want you to know the term CLI, because it is the counterpart of GUI, and you will see it a lot in your reading, especially on the Internet. However, when people talk, they don't say CLI; they say "command line". For example, you might read the following on a Web site: "Although the Groatcake Software Package was designed for a GUI, there is also a CLI version." When people talk about interfaces in person, however, you are more likely to hear, "I started with the GUI version of the Groatcake Software Package, but now I prefer using the command line version." Even more common would be, "I prefer to use the Groatcake Software Package from the command line." In other words, when you read or hear "command line" or when you read "CLI", it tells you that someone is typing a command, not selecting a choice from a menu. GUI programs are important. For example, just about everyone uses the GUI programs for Web browsers and office software, so I expect that you too will spend a lot of time using your GUI. However, most of the power of Unix lies with the command line, because it provides a fast and simple way to use the hundreds of different Unix commands. Indeed, once we leave this chapter, we will be concentrating on using command line programs for the rest of the book. — hint — As a Unix user, the basic skill you need is the ability to solve problems by using the command line to enter one command after another.
In Chapter 4, we discussed what happens when you log in with a traditional Unix text-based system. You see the prompt login: and you type your userid. You then see the prompt Password: and you type your password. The system completes the login process, starts your shell, and leaves you at the shell prompt. When you are finished, you log out. With a GUI, it's more complicated. I'll explain what happens with Linux. If you are using another type of Unix, things may be a bit different, but you should be able to figure it out. After you turn on the computer, Linux will start. When the system is ready for you to log in, you will see a login screen. The exact appearance varies depending on what Linux distribution you are using. However, most distributions will show you the same basic elements. First you will see a small box with the label "Username:". This box corresponds to the login: prompt. You are being asked to enter your userid. Before you enter your userid, take a moment to look around. You will see several other choices: Language, Session, Reboot and Shutdown. To select a choice, you can either click on it with your mouse or press what is called an ACCELERATOR KEY. To figure out what the accelerator key is for a particular choice, look carefully at the word. One letter will be underlined. To select that choice, hold down the <Alt> key and press that letter. For example, let's say that, in the word "Session", the letter "S"is underlined. This means that the accelerator key for Session is <Alt-S>. — hint — Accelerator keys are a standard feature of GUIs, and you will find them on many menus and dialog boxes. For example, within most GUI-based programs, you can display the File menu by pressing <Alt-F>, the Edit menu by pressing <Alt-E>, the Help menu by pressing <Alt-H>, and so on. Do take time to look for accelerator keys, as they can make your work easier. You will find that, when you want to make a selection, it is a lot easier to press a simple key combination than it is to take one hand off the keyboard to move your mouse and click a button. To return to the login screen, the four choices are used as follows: • Language: To change the language that Linux will use for this particular work session. • Session: To select what type of work session you want. Normally, you would not have to change either the language or type of session, because the default will be what you want. • Reboot: To reboot the computer. • Shutdown: To shutdown the computer. Once you enter your userid, you will be prompted to enter your password. Linux will then proceed with the login process and start your desktop environment. When you are finished working, you log out by selecting the "Logout" item from the main menu. You will then be asked to confirm that you want to end your work session. (Depending on what desktop environment you are using, you may also be given a choice to shutdown or restart the computer.) Once you confirm that you want to log out, Linux will terminate your desktop environment and return you to the login screen. At this point, you can either log in again or select Reboot or Shutdown.
You now know that Unix can boot as either a GUI-based system or as a CLI-system. Before we continue our discussion of interfaces, I'd like to take a few minutes to explain to you how Unix can offer such flexibility. The concepts are not only interesting, but they will also show you a lot about the type of thinking and organization that makes Unix such a good operating system. When a computer system, a program or a device can be in one of several states, we use the term MODE to refer to a particular state. For example, we might say that you can use Unix either in text mode (with a CLI) or in graphics mode (with a GUI). The concept of modes is so basic to computing that computer people often use the term whimsically to refer to states of mind. For instance, one programmer might tell another, "Sorry I didn't come to visit you yesterday. I was in cleaning mode, and I spent all afternoon vacuuming the house." The reason I mention this idea is because Unix was designed to be flexible when it boots. This is done by having the capability of running Unix in one of several different modes. These modes are called RUNTIME LEVELS or, more simply, RUNLEVELS. The strict definition of a runlevel is somewhat technical: a runlevel is a system software configuration that allows a specified group of processes to exist. This is a tough definition, so let's be a bit more informal. A runlevel specifies which fundamental services Unix will provide. At different runlevels, Unix provides different sets of services(*). * Footnote The runlevel system that is used in Linux was originally introduced in System V. Within the BSD world (including FreeBSD), runlevels are not used. Instead, the system boots into either single-user mode or multiuser mode. Thus, the discussion of runlevels in this chapter applies to Linux, but not to FreeBSD. (For information about System V and BSD, see Chapter 2.) Each time a Unix system boots, it goes through a complex process and, as part of that process, the runlevel is set. Setting the runlevel controls the mode in which Unix will run. Figure 6-1 shows the runlevels that are used with most Linux distributions. Figure 6-1: Typical Linux runlevels
In most cases, Linux will boot, by default, into either runlevel 3 or runlevel 5. If your system is set to boot into runlevel 3, you will see a text-based login screen, and you will log in and log out in the manner we discussed in Chapter 4. Once you log in, you will work with a basic CLI. If your system boots into runlevel 5, Linux will start your default GUI. You will log in using a graphical login screen (as I described earlier in the chapter), and you will work with a desktop environment. Most people want to use a desktop environment so runlevel 5 is the default. However, when a system administrator needs to solve a problem with a server — such as a Web server or mail server — he will usually want runlevel 3, because the CLI allows him to do what he wants quickly and easily. (Most system administration is done by typing commands, not by making selections from menus.) For this reason, desktop systems are usually set to boot into runlevel 5, and servers are set to boot into runlevel 3. Runlevel 1 is a holdover from the old days, when most Unix systems were shared by a number of users and managed by a system administrator. From time to time, the admin would have to do some work that required that no one else be logged in to the system. In other words, for a short period of time, the admin would have to turn a multiuser user system into a single-user system. To do this, the admin would send a notice to all the users that the system would be going down in, say, 5 minutes. When the interval had passed, he would reboot Unix into what, today, is runlevel 1. This would place the system in what used to be called SYSTEM MAINTENANCE MODE and is now called SINGLE USER MODE. The admin could now do his work, knowing that no one else would be able to log in. Once his work was finished, he would reboot into multiuser mode (runlevel 3 or 5), and the users would, once again, be allowed to log in to the system. Today, runlevel 1 is not used much. This is because modern Unix systems are so flexible that admins can do a lot of work — even upgrades and maintenance — while other users are logged in. (This was not true in the old days.) The only times admins need to boot the system into runlevel 1 occur when there are very serious problems, such as when a hard disk becomes corrupted. — technical hint — If you would rather use the basic CLI rather than a GUI (as many people do), you can change your system so that by default it boots to runlevel 3 instead of runlevel 5. If you use a computer at a company or school, just ask your system administrator(*) to make the change for you. If you maintain your own computer, you'll have to do it yourself. I won't go into the details, as they lie beyond the scope of the book, but I'll give you the general idea. First, make the system boot automatically to runlevel 3 by changing the value of initdefault to 3 in the /etc/inittab file. Then examine the symbolic links in the rc3.d directory, and make sure the GUI is not started automatically for this runlevel. Hint: If you are using a CLI at runlevel 3 and you want to start the GUI, you can use the startx command. Before we leave this section, here are two questions to ponder. However, let me warn you, don't actually make the changes I am about to describe or you will be sorry. Just think about them. 1. What would happen if you set the value of initdefault to 0 (Halt)? 2. Would would happen if you set it to 6 (Reboot)? * Footnote
"Real admins understand runlevels."
Because so many people use Microsoft Windows, it is instructive to compare it to Unix and ask: Does Windows have runlevels? (If you don't care about Windows, just skip this section.) There are two answers to this question. First, Windows does have boot options that look like runlevels, but really aren't. Second, Windows has a facility that does offer runlevels, but it is hidden so well hardly anyone knows it exists. To begin, Windows has a special startup menu that you can display as the system initializes. (With Windows XP, hold down <F8> as the system starts.) The menu is called the Windows Advanced Options Menu, and it gives you a number of different choices, which you can see in Figure 6-2. Figure 6-2: Windows XP Pro: Startup options
These choices do allow Windows to boot into different modes. However, unlike Unix runlevels, the Windows startup options are not configurable, and they do not offer a great deal of flexibility. To get very technical for a moment, the Windows boot modes are more like Unix kernel boot options than runlevels. (If this makes no sense to you, don't worry about it.) Still, Windows does have a system that can work the same way as runlevels, in that you can decide which system services you want to run. It is possible to create what are called "hardware profiles". (Right-click on "My Computer", and select "Properties". Click on the "Hardware" tab, and then click on the "Hardware Profiles" button.) Hardware profiles were intended to let you boot a computer using different sets of devices. For example, with a laptop computer, you may want different hardware configurations when the machine is docked than when you are using it on its own. This much is common knowledge (at least among the type of people who care about stuff like this). What is less well known is that, once you have created a hardware profile, you can choose which system services you want enabled and disabled for that profile. This is very similar to Unix runlevels. Seeing as this is not a Windows book, I won't go into the details. However, if you are interested in exploring on your own, here's what to do with Windows XP Professional. Start by creating one or more hardware profiles. Then, from the Control Panel, click on "Administrative Tools", and then "Services". Right-click on any service, select "Properties", and then click on the "Log On" tab. You will now be able to enable or disable this service for the various hardware profiles. An example of when you might want to do this would be if you have a special hardware profile for a laptop when it is not connected to a network. In such a situation, you would want to disable all the network-related services.
My guess is that, even if you have never used Unix, you have some experience with GUIs, either with Microsoft Windows or with a Macintosh. However, before we discuss how to integrate the Unix GUI and CLI in your work, I want you to be completely comfortable with the basic concepts, so I'm going to take a few minutes to discuss the most important ideas. Learning to use a graphical user interface is easy. Learning to use it well is not so easy. So even if you are a veteran GUI user, do take a few moments to skim this part of the chapter. I bet you'll find something you don't know. Although the various desktop environments have a lot of commonality, there are small but important differences, and it is difficult to write down a single set of instructions that will work for all the different interfaces. In addition, virtually every part of a GUI can be customized. The first time you use a particular GUI, you will find that the default settings look and act in a specific way. Once you become a veteran user, you should take some time to customize your system according to your own needs and preferences. In the following three sections, I will discuss the basic ideas that you must understand to use a GUI. This will be enough to get you started. After you have finished reading, please set aside some time to read the built-in help that comes with your specific desktop environment. In particular, look for a list of the shortcut keys. Learning how to use them well is the single most important thing you can do to master any GUI. In Chapter 5, I have already covered the first few important ideas: • A GUI allows you to work with windows. • A window is a bounded area of the screen, usually a rectangle. • Windows can overlap. • As the need arises, you can change the size of a window, or move it from one part of the screen to another. Let's move on.
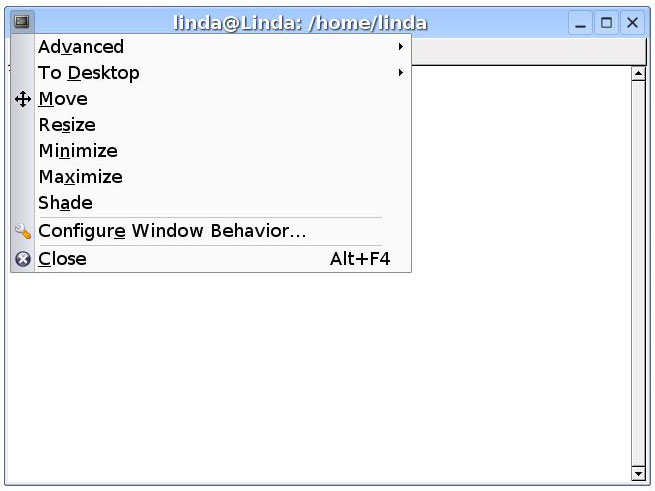
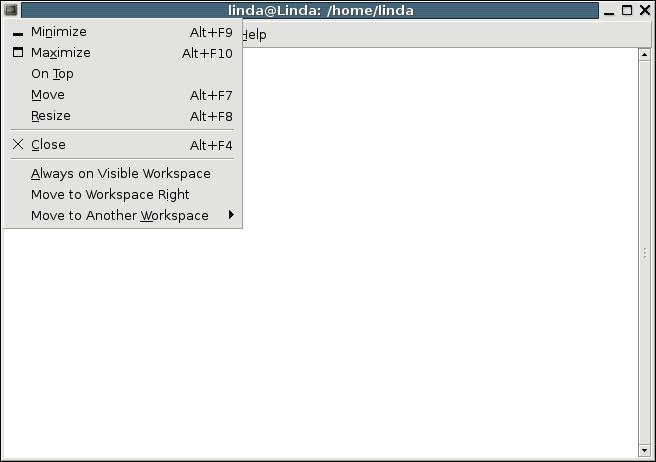
On your screen will be a small, movable image called a POINTER. You use a pointing device, usually a mouse, to move the pointer around the screen. The shape of the pointer may change, depending on what you are doing and where it is on the screen. To initiate an action, you move the pointer to a specific position on the screen and then press a button. Your mouse may have either one, two or three buttons. X Window is designed to work with a 3-button mouse, which means — as a general rule — that Unix desktop environments use a 3-button mouse. These buttons are referred to the LEFT, MIDDLE and RIGHT BUTTONS. — hint — Unix GUIS are designed to work with a 3-button mouse. If your mouse only has two buttons, you simulate the middle button by pressing the left and right buttons at the same time. (Pressing two mouse buttons at the same time is called CHORDING.) Alternatively, if your mouse has a scroll wheel, pressing the wheel may simulate the middle button. For Macintosh users: If you are using OS X with a one-button mouse, you simulate a right-click by using Control-Click, and you simulate a middle-click by using Option-Click. That is, to right-click, hold down the <Control> key and click the mouse button. To middle-click, hold down the <Option> key and click the mouse button. There are only two things you can do with a mouse button: click or hold. When you press it and let go, we say that you CLICK the button. If you press the button twice in rapid succession, we say that you DOUBLE-CLICK. On rare occasions, you may have to TRIPLE-CLICK, that is, press a button three times quickly. When you click the left button, we say that you LEFT-CLICK. This is the most common type of click. Similarly, you can RIGHT-CLICK (less common) and MIDDLE-CLICK (least common). When you see the word "click" by itself, it always means left-click. For example, you might read, "To pull down the Groatcakes Menu, click on the icon of a groatcake." This means to left-click on the icon of a groatcake. (An ICON is a tiny picture that represents something.) Aside from clicking, you can press a button and HOLD it. Most of the time, you hold down a button when you want to move something. For example, to move a window, you position the pointer onto the TITLE BAR (the horizontal area at the top of the window that has the name of the program). Hold down the left button and move the mouse. The window will follow your movement. Once the window is where you want it, release the mouse button. When we move an object in this way, we say that we DRAG it. Thus, we can say that to move a window, you drag its title bar to a new location. Much of the time, you make choices by selecting an item from a list called a MENU. There are two types of menus: pull-down menus (more common) and pop-up menus (less common). A PULL-DOWN MENU is a menu that appears when you click on a particular word or icon. For example, most windows have a horizontal list of words near the top of the window (the MENU BAR). If you move the pointer to one of these words and click, a list of related items will appear below the word. You can then select an item from the list. The most important pull-down menu is the WINDOW OPERATION MENU, which you will find in virtually every window. To display the Window Operation menu, click on the tiny icon at the top-left of the window (at the left edge of the title bar). Doing so will display a list of actions that pertain to the window itself, the most important of which are: Move, Resize, Minimize, Maximize and Close. You can see this in Figures 6-3 (KDE) and 6-4 (Gnome). — hint — As I mentioned earlier in the chapter, you can also pull down a menu by pressing its accelerator key. For example, you can pull down the File menu by pressing <Alt-F>. Using accelerator keys saves you the trouble of taking your hand off the keyboard in order to move the mouse and click a button.
Whenever you pull down a menu, take a careful look at the choices. Some of them will have the name of a key or a key combination next to them. These are called SHORTCUT KEYS. By pressing the shortcut key, you can select the particular actions without having to go to the trouble of pulling down the menu. A few shortcut keys are standardized — that is, they are the same for all windows within most GUIs — and are worth memorizing. The most important such shortcut key is <Alt-F4>. Pressing it will close the current window. Make sure you memorize <Alt-F4>. Using it will make your work with a desktop Environment a lot smoother. If you don't learn to use it, every time you want to close a window, you have to use the mouse, which is awkward and slow. Personally, I use <alt- F4> many times a day. The second type of menu, the POP-UP MENU, appears out of nowhere after some action has occurred, often a right-click. By convention, right-clicking on an item will display what is called a CONTEXT MENU, that is, a group of actions that relate to the item itself. To try this for yourself, position your pointer over anything you want — for example, within a window that contains a program — right-click and see what happens.
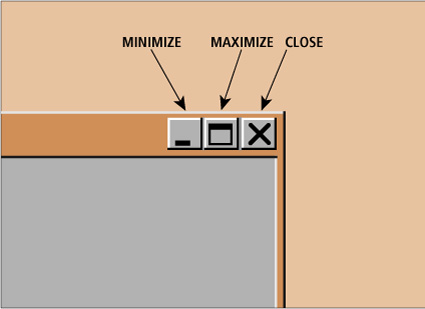
It is possible to change the size of the windows you are using to suit your minute-to-minute preferences. When you do this, we say that you RESIZE the window. The details can vary from one GUI to another. However, there are two standard methods. First, you can use your mouse to change the borders of a window. Move the pointer to the border you want to change. Then hold down the left button and drag the border to a new location. You can also start with the pointer at a corner of the window. Dragging the corner changes two adjacent sides at the same time. (Try it.) Second, you can use the keyboard to move the borders of the window. Pull down the Window Operation menu and select "Resize". You can then use the arrow keys (<Left>, <Right>, <Up> and <Down>) to change the size of the window. (Many people don't know about this feature.) Similarly, you can move a window by selecting "Move" from the Window Operation menu, and then using the arrow keys to move the window however you want. When you are finished, press <Return> (or <Enter>). Aside from changing the size of a window or moving it, there will be times when you want the window to vanish temporarily. You don't want to close the window (which would stop the program). You just want it out of the way until you need it. In such cases, you MINIMIZE or ICONIFY the window. This causes it to vanish from the main part of the screen. At the same time, a small representation of the window (an icon) appears on the TASKBAR, the horizontal bar at the bottom of the screen. When a window is minimized, the program inside the window keeps running. So, for example, you might have seven windows, four of which are open, and three of which are minimized to the taskbar. However, even though only four windows are visible, all seven programs are still running. Once a window is minimized, you can expand the window back to its original size and position whenever you want. When you do, we say that you RESTORE the window. I'll tell you how to minimize and restore in a moment. Before I do, I want to mention two more things you can do with a window. First, you can CLOSE a window permanently, which stops the program running in the window and makes the window disappear. Second, you can MAXIMIZE a window, which expands it to take up the entire screen. This is handy when you want to concentrate on only one task. Maximizing the window allows you to concentrate on that task without being visually distracted by other windows. So, how do you minimize, restore, close and maximize windows? There are several ways. Before I explain, I want to take a moment to discuss what I call the "window controls". If you look at the top right-hand corner of a window, you can see three small boxes (see Figure 6-5). From right to left, there is a CLOSE BUTTON (it looks like an "X"), a MAXIMIZE BUTTON (a small rectangle) and a MINIMIZE BUTTON (an underscore).
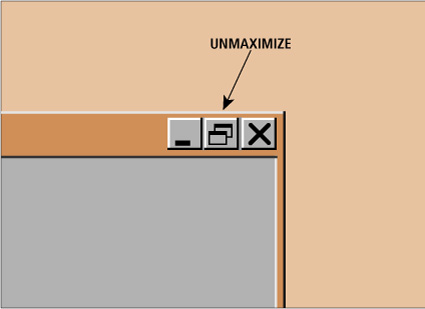
The use of these buttons is straightforward: • Click on the Minimize Button to minimize the window to the taskbar. • Click on the Close Button to close the window and stop the program running in the window. (This is the same as pressing < Alt-F4>.) • Click on the Maximize Button to maximize the window. This enlarges the window to take up the entire screen (although you will still see the taskbar). However, you don't have to click on these buttons. There is an alternative that you may prefer: you can select the same actions from the Windows Operation menu. Display the menu by clicking on the small icon in the top-left corner of the window and select either "Minimize", "Maximize" or "Close". Once a program is minimized to the taskbar, you can restore it by clicking on the representation of the window in the task bar. This will cause the window to be expanded back to its original size and position. When you maximize a window, it expands to fill the entire screen. When this happens, the middle of the three window control buttons changes from a maximize button to an UNMAXIMIZE BUTTON. (See Figure 6-6.) To change the window back to its original size and location, simply click on this button. Alternatively, you can pull down the window operation menu and select the appropriate action.
With a GUI, you can have as many windows as you want, each of which contains its own program. However, when you type on the keyboard, or click, or hold down a mouse button, the input will go to only one specific window. The window to which your input goes is said to have the FOCUS and is called the ACTIVE WINDOW. The window that has the focus is highlighted in some way. Typically, its title bar will be a different color than the other windows. (See Figure 6-7 later in the chapter.) From one moment to the next, you can change which window has the focus, according to your needs. For example, over the course of a few minutes, you might change from a Web browser, to an email program, to a word processor, and back to the browser. There are several ways to change the focus. First, if the window is open, just click on it. Alternatively, you can click on the name of the window in the taskbar. In either case, the focus will be brought to the window you select, and the keyboard will be connected to the program that is running in that window. In addition, if the window is partially obscured by another window, the window with the focus will be redrawn to be on top and will become completely visible. Another way to change the active window is to use what is called TASK SWITCHING. Each program that is running in a window is called a TASK. To see all the tasks that are currently running, just look at the task bar (usually at the bottom of the screen). Each task will have its own small button. As I mentioned, if you click on one of these buttons, it sends the focus to that window. This works fine, but there is an easier way. Pressing <Alt-Tab> allows you to switch from one task to another without having to take your hands away from the keyboard. When you press <Alt-Tab>, your GUI will highlight a specific task. (You will see small pictures in the center of your screen. It will be obvious.) Press <Alt-Tab> again and the next task is highlighted. All you have to do is hold down the <Alt> key, and keep pressing <Tab> until you get to the task you want. Release the keys and the window for that task will be given the focus. — hint — To switch from one task to another, press <Alt-Tab> repeatedly. At first, this can be a bit slow, so here is a trick. Hold down the left <Alt> key with your left thumb. Without letting go, press the <Tab> key repeatedly with the middle finger of your left hand. (Take a moment to try it now.) To cycle through the tasks in the opposite order, simply press <Alt-Shift-Tab> instead of <Alt-Tab>. (Give it a try.) Do take a few moments and master the <Alt-Tab> and <Alt-Shift-Tab> key combinations. Not only will they speed up your task switching, but they are so handy that they will change the way you organize your work environment.
When you are using a GUI, the basic space in which you work is called your DESKTOP. As we discussed in Chapter 5, the name is a metaphor. As such you can imagine your windows open on the desktop like pieces of paper on a real desk. The desktop metaphor runs out of steam quickly, so we won't push it. Instead, I want you to consider your desktop as an abstract environment in which you can organize your work. The desktop has characteristics that reach well beyond the physical reality of the screen. Understanding those characteristics is crucial if you are to master the Unix working environment(*). * Footnote In the Yoga Sutras, written about 2,000 years ago, the ancient sage Patañjali addresses this very concept. In Book II, Verse 21, he writes (in the original Sanskrit): Tadartthah eva drsyasya atma. This can be translated as "The nature and intelligence of the Unix desktop exist solely to serve the user's true purpose, emancipation." The most important idea is that you can have more than one desktop, each of which has its own background, its own windows, its own taskbar, and so on. Switching from one desktop to another is easy and, when you do, it feels as if you are switching to a totally new system. What's in a Name? Desktop, Workspace Within a GUI, the desktop is the basic working environment. The desktop contains the background, the windows, the task bar, and so on. Most desktop environments allow you to use multiple desktops. This has the advantage of being able to create what look and feel like multiple graphical work environments. The name "desktop", however, can be confusing, because it is often used to refer to the desktop environment itself, that is, the GUI as a whole. For this reason, you will often see desktops referred to as WORKSPACES, which makes a lot more sense. For example, when you work with KDE, you use "desktops". When you work with Gnome, you use "workspaces". Regardless of what they are called, they are the same thing and, minor details aside, work the same way. There are two ways to switch from one desktop/workspace to another. You can use your mouse or your keyboard. To use your mouse, look at the bottom of the screen near the taskbar. You will see a set of small squares, one for each desktop. For example, if you have four desktops, there will be four squares. You can see this in Figure 6-7 (later in the chapter). To change to a desktop, just click on its square. Although this sounds a bit vague, it's easy once you get the hang of it. Just experiment a bit. To use your keyboard to switch from one desktop to another, there are shortcut keys. These keys can vary from one desktop environment to another, so the best thing is to check the documentation under "Shortcut Keys". (Look for a Help icon.) With KDE, the desktop shortcut keys are <Ctrl-Tab> and <Ctrl-Shift-Tab>. With Gnome, they are <Ctrl-Alt-Left>, <Ctrl-Alt-Right>, <Ctrl-Alt-Up> and <Ctrl-Alt-Down>. (That is, hold down <Ctrl> and <Alt> and press an arrow key.) Using the desktop shortcut keys is so simple that you will probably master it quickly and never have to use your mouse to switch from one desktop to another. As a general rule, desktop environments offer four different desktops by default. However, it is possible to add more if you want. To do so, right-click on one of the small desktop squares at the bottom of the screen. This will pop up a context menu. Look for a menu item like "Preferences" or "Desktop Configuration". Before we leave this section, I want to bring up an idea that we will revisit at the end of the chapter. So far, I have shown you how the Unix work environment makes it possible to do more than one thing at the same time. Within each desktop, you can open multiple windows, each of which runs a separate program. You can have multiple desktops, each of which has its own set of windows. Moreover, using shortcut keys, it is easy to move from one desktop to another and, within a desktop, from one window to another. What I want you to think about is, given all these resources, what is the best way for you to organize your work? As you will come to see, how you answer this question is very important to your total Unix experience. — hint — As you organize your work, you can move a window from one desktop to another. Right-click on the window's title bar. This will pop up a menu that will let you move the window to the desktop of your choice.
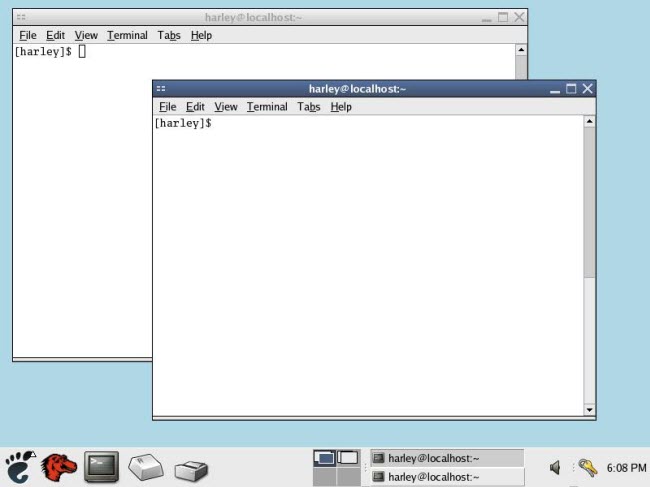
In Chapter 3, we talked about terminals, and how they were used in the old days to access multiuser Unix systems using a CLI or command line interface. We discussed how, today, we don't use actual terminals. Instead, we run a program that emulates (acts like) a terminal. When we run such a program under a GUI, the program emulates an X terminal (the graphics terminal we discussed at the end of Chapter 3). As I have explained, most of the power of Unix lies in using the CLI. This means that most of what you will be doing as you read this book is entering commands at the shell prompt, one command after another, as well as working with text-based programs. In order to do this, you will need access to a terminal. Obviously, we don't use real terminals. Instead, we use terminal emulators. So the question arises, how do we access a terminal emulator? With modern Unix systems, there are two ways, both of which are important. We'll discuss one now (terminal windows) and the other (virtual consoles) in the next section. Within your desktop environment, all your work is done within windows, so it only makes sense that you would run a terminal emulation program within a window. Doing so is easy. All desktop environments come with a simple way to start a terminal program. Just open the main menu and look for it. Within Gnome, for example, if you look in the System Tools submenu, you will see "Terminal". Within KDE, if you look at the System submenu, you will find two such programs: "Terminal" and "Konsole". (I'll explain why there are two in a moment.) When you start such a program, a window will appear on your screen. Within that window, you have a standard CLI. As an example, take a look at Figure 6-7, where you will see two terminal windows. |
|
As you remember from Chapter 4, the shell is the command processor. It displays a prompt and waits for you to enter a command. It then processes the command. When the command is done, the shell displays another prompt, and waits for the next command. In our example, at the first shell prompt, I entered the date command (to display the current time and date). The shell processed this command, and then displayed another prompt. Since the terminal emulator runs in a window, and since you can have as many windows as you want, you can have multiple terminals running at the same time. Although you may wonder why you would want to do so, the time will come — once you are an experienced Unix user — when it will be commonplace for you to have a variety of command-line programs working for you at the same time, each one in its own terminal window. — hint — Most desktop environments have a collection of icons that allow you to start frequently used programs. (You will find these icons at either the top or bottom of your screen.) If you right-click in this area, you will see a pop-up menu that will allow you to add and delete programs by creating an icon for them. My suggestion is to add your favorite terminal program. That way you can open a new terminal window whenever you want, just by clicking on an icon. This is so important that I suggest you take a moment and do it now. At the same time, you can reduce the clutter by deleting the icons for programs that you won't be using. As I mentioned earlier, KDE gives you a choice of two terminal programs. Actually, the need to emulate a terminal has been around for so long that there are many different terminal programs, and most desktop environments give you a choice as to which one you want to use. Some desktop environments let you choose the terminal program you want directly from the menu. (This is the case with KDE, which is why you see two choices.) Other desktop environments have only one Terminal item in the menu, but you can change it to refer to whichever terminal program you want. (This is the case with Gnome.) To see the choices, right-click on Terminal item and select "Properties". So which terminal program should you use? Strictly speaking, it doesn't really matter all that much, because all terminal programs offer the same basic functionality: providing a CLI within a window. However, if you want to get fancy, the Konsole program is a particularly good one, in that it has a number of useful features not found in other terminal programs. For example, you can run multiple CLI sessions in the same window, each session having its own tab. You can then switch from one session to another clicking on a tab or by using the shortcut keys <Shift-Right> and <Shift-Left>. (That is, hold down the <Shift> key and press the right-arrow key or the left-arrow key.) You will find these keys particularly handy. My advice is to use Konsole if it is available on your system. It is a common program and it may be installed on your computer even if you are not using KDE. Once you start using Konsole, do take some time to read the built-in help. It's easy to understand, and doing so will help you a lot. What's in a Name? xterm, xvt, Konsole When X Window was first developed, it came with a terminal program named xterm, which emulated the VAXstation 100 (VS100) graphics terminal. (See Chapter 3 for a discussion of graphics terminals.) The original version of xterm was developed in the summer of 1984 by Mark Vandevoorde, a student at MIT. (Interestingly enough, Vandevoorde developed xterm as a standalone terminal emulator: it had nothing to do with X. Within a short time, however, xterm was recast and ported to the new X Window system, where it has lived ever since. Hence, the name xterm for X Window terminal.) The modern version of xterm can emulate both a character-based terminal (the old DEC VT102, very similar to a VT100) and a graphics terminal (the Tektronix 4014). For a long time, xterm was the main terminal program available with X. In 1992, John Bovey of the University of Kent, wrote xvt, a new terminal emulator to replace xterm. Although xvt was more or less compatible with xterm, the new program was faster and required less memory (a big deal in those days). One reason was that it was only a basic VT100 emulator; it did not include Tektronix 4014 support. (Thus, the name xvt, X Window VT100 emulator.) Since the 1990s, many X Window-based terminal programs have been written, and almost all of them have been based on either xterm or xvt. In 1998, a German programmer Lars Doelle released Konsole, a brand new terminal program. Konsole was part of the KDE project and, over the years, it has been enhanced so that, today, it is one of the most powerful terminal emulators around. Konsole, by the way, is the German word for "console". This is a happy coincidence because, as I mentioned in Chapter 5, it is the custom that KDE programs should have names that begin with K.
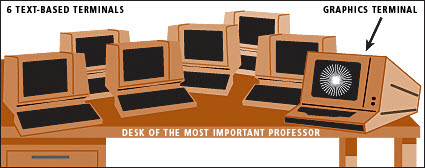
It's 1980 and we are at a major East Coast university, visiting the Most Important Professor on campus. The MIP has a fancy office with a large desk and seven different terminals, all of which are connected to a powerful Unix system. (See Figure 6-8 below.) The MIP is showing us around his office. "Six of these terminals are text-based devices, offering the standard command-line interface," he explains. "In fact, this particular terminal over here is the console." Wait a second, we say. Isn't the console supposed to be near the computer or, at the very least, in the system administrator's office? "In most cases, yes," says the MIP, "but I'm a very important person. The six text-based terminals are for me to use however I want. It often happens that I need to work on more than one project at a time, so having all the terminals all to myself is very convenient. If the system breaks, let the admin come to my office to use the console." How kind of you, we say. But do you really use all six terminals? "You bet I do. I'm important. I need a lot of terminals. However, I do let my secretary(*) use one of them from time to time." Finally, the MIP points to the seventh terminal, off to one side. "This is a graphics terminal, very special" he says. "It's true; there are only a limited number of programs that run on such a terminal but, since I am so important, I must, of course, have one." * Footnote A secretary was a mammalian version of a personal digital assistant. Secretaries flourished in the university environment from the 1930s to the late 1980s. Compared to PDAs, university secretaries were unreliable, difficult to control, not upgradable, and often had memory problems. Moreover, because of licensing restrictions in the 1980s and 1990s, many secretaries were impossible to discard, even if they were performing poorly. In 1996, secretaries were put on the endangered species list and, since 1998, they have been considered extinct. The last sighting of an actual university secretary was in late 1998 at the University of North Dakota, Fargo. However, the sighting was not confirmed, and most authorities believe the "secretary" was actually a reference librarian (also on the endangered list).
Let's move forward 25 years. You have just read about the Most Important Professor, and you are thinking wistfully, "Imagine having seven terminals all to yourself. Wouldn't that be wonderful? I wish I were that important." Actually, if you have your own Unix computer, you are that important. All modern Unix systems allow you to use multiple terminals at the same time, one of which is a graphics terminal. Moreover, you don't have to clutter your desk with more than one monitor and keyboard. Unix will use the same monitor and keyboard for each terminal. All you have to do is press a shortcut key to switch from one terminal to another. Here is how it works with Linux (other systems are similar). When you start Linux, your GUI — that is, your desktop environment — starts automatically. What you may not know is that, at the same time, Linux actually starts seven different terminal emulation programs running on your behalf. They are called VIRTUAL CONSOLES. (Unfortunately, the name is a bit misleading, as I will discuss in the next section.) Virtual consoles #1-6 are full-screen, text-based terminals for using a CLI. Virtual console #7 is a graphics terminal for running a GUI. In fact, when your desktop manager starts, what you are looking at is actually virtual console #7. The other six virtual consoles are invisible. To switch from one virtual console to another, all you need to do is press a special key combination. For virtual console #1, press <Ctrl-Alt-F1>. (That is, hold down the <Ctrl> and <Alt> keys and press <F1>.) For console #2, press <Ctrl-Alt-F2>; for console #3, <Ctrl-Alt-F3>; and so on. When you press one of these key combinations, you will instantly see a full-screen CLI terminal. You have six of them to use however you want. To return to the GUI (your desktop environment), just press <Ctrl-Alt-F7>. (Remember, the 7th virtual console is the graphics terminal.) — hint — The shortcut keys to switch from one virtual console to another are actually <Alt-F1> (terminal #1) through <Alt-F7> (terminal #7). However, within most GUIs, these keys have other uses, so you must hold down the <Ctrl> key as well. For example, say you are working with your GUI (terminal #7). To switch to terminal #3, you press <Ctrl-Alt-F3>. You are now at a CLI. To switch to terminal #4, press <Alt-F4>; to switch to terminal #1, press <Alt-F1>; and so on. To switch back to terminal #7 (the GUI), press <Alt-F7>. So why would you want to use <Alt> by itself instead of <Ctrl-Alt>? It's simpler and quicker, and Unix people like it when things are as simple and as quick as possible. When you switch away from a virtual console, the program that is running in it keeps running. For example, you start a program in terminal #4 to perform a lengthy job (such as compiling a large program or downloading a lot of files from the Internet). You can then press <Alt-F5> and switch to terminal #5 to work on something else. Later, you can press <Alt-F4> to return to terminal #4 and see how your program is doing. The question arises, why bother with the six text-based virtual consoles? Why not just stay in the GUI and use terminal windows and multiple desktops? There are several reasons. First, the text-based virtual consoles use the entire screen, and display characters using a monospaced (constant width) font typeface. Overall, this is a particularly pleasing way to use a CLI, much more so than a terminal window under a GUI, even a maximized window. (Try it and see.) Second, it is cool to press <Alt-F1>, <Alt-F2>, and so on, to switch from one command line to another. (Again, try it and see.) Third, if you ever have a serious problem with your desktop environment, it's handy to be able to switch to a virtual console in order to solve the problem. For example, if your GUI freezes, you can usually press <Ctrl-Alt-F1> to get to another terminal. You can then log in fix the problem or reboot the system. To complete our discussion, let me explain why I told you the story about the Most Important Professor. There are two reasons. First, I want you to realize how powerful modern Unix really is. If you used Unix in 1980, you would have had to share terminals, usually by going to a terminal room and waiting your turn. If you somehow managed to acquire your own personal terminal, it would have been a very big deal. The truth is, in 1980, computing equipment was so expensive that even the most important person at a university wasn't important enough to have several terminals in his office, let alone seven. And yet, today, that's exactly what you have on your desktop when you use Linux on a PC. (FreeBSD actually gives you eight.) Second, I want you to notice that the idea of multiple virtual consoles is a software implementation of a hardware reality from over a quarter century ago. How many computing paradigms that old are still so valuable? So far, in this book, we have met two: the system of clients and servers (Chapter 3), and the flexible, open-ended design of X Window (Chapter 5). To these two, we can now add another basic principle. Unix is based on the idea of using terminals to access a host computer. This idea is so powerful that — long after the actual terminals were gone — the system they inspired is still thriving. What's in a Name? Virtual Within computing, the term "virtual" is used to describe something that exists because it is simulated by software. For example, the virtual consoles we discussed in this chapter are not real, in the sense that they do not have an independent physical existence. They exist only because they are created by software. A more important example is the idea of virtual memory, a method of simulating more memory than physically exists in the computer. For example, if a computer has 2 GB of memory, the operating system may simulate, say, an extra 4 GB of virtual memory by using the hard disk to hold the excess data. (Unix, by the way, uses virtual memory.) The term "virtual" comes from optics, a branch of physics. Imagine you are looking at a candle in front of a mirror. When you look at the actual candle, a physicist would say you are looking at the "real" image. When you look at the candle in the mirror, you are looking at the "virtual" image.
In Chapter 3, we talked about the idea of the console. This term can be a bit confusing, so let's take a moment to get it straight. In the old days, most Unix computers were connected to a number of terminals. When someone wanted to use the system, he or she would find an unused terminal and log in. One of the terminals, the console, was special because it was used by the system administrator to manage the system. In most cases, the console was kept in a locked room, either next to the host computer or in the admin's office. Physically, the console looked like other terminals, but there are two things that made it different. First, when Unix needed to display a very important message, that message was sent to the console. Second, when the system was booted into single-user mode — for maintenance or problem solving — only the console would be activated. In this way, other users would not be able to log in until the system was rebooted into multiuser mode. Today, the word "console" is often used as a synonym for terminal, which can be confusing. For example, the virtual consoles we just discussed are not real consoles. It would make a lot more sense to call them "virtual terminals". Similarly, consider the Konsole terminal emulation program I mentioned earlier in the chapter. The program was written by a German programmer, and Konsole is the German word for "console". Still, the name is incorrect. When you run Konsole you get a terminal window, not a console.
When you are working with multiple windows, each of which contains its own program, there will be times when you will want to copy or move information from one window to another. If you have used Microsoft Windows or a Macintosh, you are probably familiar with copying and pasting. With Unix, there are two different ways to copy data. First, X Window allows you to select and insert text from one window to another or within the same window. Second, many GUI-based programs support the Windows-type of copy/paste facility (<Ctrl-C>, <Ctrl-V> and so on). These two systems are completely separate and they work differently, so you need to learn how to use them both. Let's start with the X Window system, as it is simpler. The X Window select/insert facility works only with text, that is, characters. To start, you select some text with your mouse (more on that in a moment). You then move the mouse to where you want to insert the text and click the middle button. That's all there is to it. As soon as you click the middle button, the selected text will be inserted. If your mouse doesn't have a middle button, click the right and left buttons at the same time. To select text, position the mouse pointer at the start of the text. Then hold down the left mouse button while you drag the pointer over the text. As you drag the pointer, the selected text will be highlighted. (Open a terminal window and try it.) Alternatively, you can select text in two other ways. If you double-click, a word will be selected; if you triple-click, the entire line will be selected. (Again, try it. It takes a bit of practice.) Although the instructions might sound a bit complicated when you read them, selecting and inserting text is actually quick and easy once you get the hang of it. If you are in front of your computer, I suggest that you take a few moments now to open two windows and practice selecting and inserting. If possible, have someone show you how it works. — hint — Since it is X Window that provides the select/insert facility, you can only use it within your GUI. You can't use it with the virtual consoles. There is, however, a program called Linux gpm that extends this functionality to text-based virtual consoles (#1-6). With FreeBSD, there is a similar program called moused. If gpm or moused is installed on your system (as they often are by default), you can select and insert within the text- based virtual consoles in the same way that you do within your GUI. The only difference is that, to insert text, you may have to right-click rather than middle-click.
As I explained in the previous section, you can use the X Window select/insert facility to copy text within a window or between two windows. In addition to selecting and inserting, many GUI-based programs also support a completely different system called copying and pasting. The Unix copy/paste facility works the same way as it does with Microsoft Windows. It even uses the same keys and menus. Unlike Windows, however, not all GUI-based Unix programs use copy/paste. You will have to check for yourself. Before we get into the details, here is a brief summary: To start, you "copy" or "cut" data to the "clipboard". You can then "paste" the contents of the clipboard anywhere it makes sense to do so. Most of the time you will be copying text, that is, characters. However, you can also copy graphics, as long as it makes sense to do so with the programs you are using. To work with copy/paste, you need to understand four basic ideas: • The CLIPBOARD is an invisible storage area. • When you COPY to the clipboard, the original data is not changed. • When you CUT data to the clipboard, the original data is deleted. • To copy data from the clipboard, you PASTE it into a window. Thus, to copy data from one place to another, you copy and paste. To move data from one place to another, you cut and paste. Whenever you copy or cut, the current contents of the clipboard are replaced, and you can't get them back. For example, let's say the clipboard contains 50 paragraphs of text. You then copy one single character to the clipboard. The clipboard now contains only the one character; the 50 paragraphs of text are gone. On the other hand, when you paste data, the contents of the clipboard do not change. This means that the contents of the clipboard remain unchanged, until you perform another copy or cut. This allows you to paste the same data over and over. (Of course, the contents of the clipboard are lost when you reboot or when you shutdown the system.) So how do you copy, cut and paste? To start, you must select the data you want to go to the clipboard. There are two ways to do this. First, you can use the mouse. Position the mouse pointer at the start of the data you want to copy or cut. Then hold down the left mouse button while you drag the pointer over the text. As you drag the pointer, the selected text will be highlighted. Alternately, if you are working with data that can be typed, you can select using the keyboard. Position the cursor at the beginning of the text you want to copy, and hold down the <Shift> key. While you are holding it down, use any of the cursor control keys to move the cursor. The text it passes over will be selected. Once you have selected your data, you can copy or cut it in three different ways. You can press <Ctrl-C> to copy and <Ctrl-X> to cut; or you can right click to pop up a menu and select "Copy" or "Cut"; or you can pull down the Edit menu and select either "Copy" or "Cut". Similarly, you can paste in three different ways. Move the cursor to where you want the data inserted and press <Ctrl-V>; or right-click and select "Paste"; or pull down the Edit menu and select "Paste". — hint — If you make a mistake when you cut or paste, you can cancel the last operation by pressing <Ctrl-Z> or by selecting "Undo" from a menu. With some programs, you can cancel more than one operation by pressing <Ctrl-Z> more than once.
In order to maintain security, Unix is designed so that each userid has a limited set of privileges. For example, you can delete your own files, but you can't delete someone else's files unless he gives you explicit permission. Similarly, as a regular user, you cannot make changes or run programs that could affect the integrity of the system. In Chapter 4, we discussed the idea that, from time to time, it becomes necessary for the system administrator to log in as superuser, in order to have privileges beyond those of a regular user. For example, an admin may need to add a new user to the system, change somebody's password, update or install software, and so on. As I explained, there exists a special userid, root, that has such privileges. When you log in as root, you are the superuser and you can do pretty much whatever you want. (Obviously, the root password is a very important secret.) If you are using a shared system, say, at school or at work, someone else will take care of the system administration, so you don't have to worry about it. If you forget your password, for example, you have someone to ask for help. However, when you use your own Unix system, such as a PC running Linux or FreeBSD, you are the admin and, as such, you must know how to work as superuser. In order to become superuser, you need the superuser password, usually referred to as the root password. If you installed Unix on your computer, you will have chosen the root password as part of the installation process. — hint — Some Linux distributions are set up so that a root userid is not created during the installation process. In such cases, use your regular password as the superuser password. — hint — On any Unix system, the root password is the single most important piece of information you possess. Thus, it makes sense to memorize it rather than writing it down. However, if in the course of human events, you happen to forget the root password for your own computer, it is a big, big deal. In the olden days, there was not a lot you could do other than reinstall Unix. With modern systems, there is a way out. For the details, see Appendix E, What to Do If You Forget the root Password. Once you know the root password, there are two ways to become superuser. First, at a login prompt, you can log in as root. You can do this when the system first starts, or by using a virtual console. Alternatively, if you are already logged in as a regular user, you can use the su (substitute userid) command to change to superuser. The purpose of the su command is to allow you to change temporarily to another userid. Just type su followed by the new userid. Here is an example. You are logged in as harley, and here is what the shell prompt looks like: [harley]$ (In this example, we are using the Bash shell. The shell prompt has been set to show the current userid. We will discuss the shell prompt in detail in Chapter 13.) You now enter the su command to change to userid weedly. You are then prompted for weedly's password. Once you enter the password, your current shell is put on hold and a new shell is started for weedly.
[harley]$ su weedly
When you are finished working as weedly, all you need to do is end the current shell. To do this, you type exit. Once you end the new shell, you will be returned automatically to your original shell as userid harley:
[weedly]$ exit
Although you can use su to change to any userid (if you have the password), it is mostly used to change to superuser. Before we get into the details, I want to explain one more thing. Whenever you log in, Unix runs certain commands to set up an environment specific to your userid. (Later in the book, when we talk about shells, I'll show you how to customize the process.) Let's say you are logged in as harley, and you enter the following command: su weedly You have changed your userid to weedly, but you are still working under the harley environment. If you want to change both your userid and the environment, type a - (hyphen) after the command name. Notice there is a space on each side of the hyphen. su - weedly You are now working as weedly within the weedly environment. When you type exit, you will go back to working as harley within the harley environment. I know this all sounds a bit mysterious but, I promise you, one day it will make sense. The reason I mention it now is that I am about to show you how to use su to change to superuser. When you do, it is important that you work under the superuser environment, not your own environment. To change to superuser, use the su command with the userid root. Remember not to leave out the hyphen. su - root You will now be asked for a password. Once you enter the password, your current shell will be put on hold, and a new shell will be started. Within the new shell, your userid will be root, and you will have full superuser privileges.
[harley]$ su - root
Notice that the shell prompt has changed to #. As I explained in Chapter 4, this indicates you are the superuser. When you are finished doing whatever you need to do as superuser, type exit and you will be returned to your old shell:
# exit
As a convenience, if you use the su command without a userid, the default is root, which is what you want most of the time anyway. Thus, the following two commands are equivalent.
su -
One last word. If your system is shared by a number of people, you must be careful what you do as superuser. There's a lot I could say, but it all boils down to two basic rules:
1. Respect the privacy of others.
— important hint — When you are logged in as root, you can do anything that can be done, which can lead to mistakes. The best way to guard against accidentally causing a problem (or a catastrophe!) is to be the superuser for as short a time as necessary. For example, on my system, I am normally logged in as harley. When I need to perform a system administration task, I use su to become superuser just long enough to do what I have to do. I then return to harley as soon as possible. There is no need to stay logged in as root, because I can become superuser again whenever I want. In other words, spend most of your time as Clark Kent, not as Superman.
As I mentioned in the last section, it can be dangerous to spend too much time as superuser: you might inadvertently type something that will cause trouble. There is, in addition, another potential problem. Let's say you are logged in as root, and you happen to get hungry. You walk away from your computer for a moment to get some hot buttered groatcakes. While you are gone, you unexpectedly get into an argument with someone about whether or not the water in a sink in the Southern Hemisphere flows out in the opposite direction than the water in a sink in the Northern Hemisphere(*). When you get back, you find that — while you were gone — some wiseguy took over your machine and, acting as superuser, deleted hundreds of files. * Footnote It doesn't. Of course, you should never walk away from your computer while you are logged in under any userid. That's like leaving your car unlocked with the keys hidden under the seat. However, leaving your computer while you are logged in as root is like leaving the car unlocked with the engine running and the door open. The best defense against these types of inadvertent errors is to use the sudo command. The job of sudo is to allow you to execute a single command as another userid. (The name sudo means: "substitute the userid, then do something".) Like su, the default is to assume userid root. Thus, to run a specific command as superuser, type sudo followed by the command: sudo command For example, to run the id command as root, you would use: sudo id (The id command displays your current userid.) When you use sudo to run a command as root, you will be asked to enter your password (not the superuser password). As superuser, you run any command you want(*). Here is a simple example showing how the userid changes when you run the id command as root. Don't worry about understanding all the output right now. All I want you to notice is how the name of the userid (uid) changes.
[harley]$ id
* Footnote You might be wondering if this is a security problem. As I mentioned, when you use the sudo command, you are asked for your own password, not the superuser password. Does this mean that, on a shared system, anyone would be allowed to use sudo to run a command as superuser? The answer is no, because not everyone is allowed to use sudo. You can only use sudo if your userid is on a special list. This list is kept in the file /etc/sudoers, and it can be changed only by the superuser. (The name of this file will make sense after we talk about the Unix file system in Chapter 23.) As a convenience, once you have entered the superuser password correctly, you can run sudo for a certain amount of time without having to enter the password again. The default on most systems is 5 minutes, although it can vary. This means that, if you use the sudo command more than once within a 5 minute interval, you will only have to enter the password once. What's in a Name? su, sudo The su (substitute userid) command allows you to change to another userid. The sudo (substitute the userid and do something) command allows you to run a single command under the auspices of another userid. The name su is pronounced as two separate letters: "ess-you". The name sudo is pronounced phonetically to sound like "pseudo". In fact, the first few times you hear someone talk about sudo, you will be confused as it sounds as if they are saying "pseudo". It is the custom to use su and sudo, not only as names, but as verbs. For example, let's eavesdrop on two Unix people who have had a bit too much to drink. Person 1: "I have an idea. Let's edit the password file just for fun. All we have to do is pseudo the vipw command." Person 2: "Ahh, that's too lame. Let's ess-you instead. I like to live dangerously."
We have discussed how, from time to time, it is necessary to become superuser in order to carry out certain tasks. Certainly this is true often enough if you are managing a system with multiple users ("I forgot my password"). But how often is this the case when you are the only user, running Linux or FreeBSD on your own PC? The answer is, when you have your own system you don't need to become superuser all that often. However, there are times when it is necessary. In particular, there is one important function you will want to perform that does require special privileges. Most Unix programs are written so they can be customized by editing a CONFIGURATION FILE. The configuration file contains information that is read by the program, usually when it starts. This information affects how the program does its work. For example, earlier in the chapter, we discussed the startup process, when Unix boots into a particular runlevel. This process depends on information in a specific configuration file named inittab (see below). Configuration files are particularly important when you are installing new software. Most likely, the software uses a configuration file and, if you want to set certain options, you will need to modify the file. In most cases, the details will be explained in the documentation that comes with the software. With some software, there are easy-to-use programs that help you to change a configuration file. For example, within your desktop environment, there are menu-based programs that you can use to select preferences and specify options. What you may not know is that all of these preferences and options are stored in a configuration file somewhere. When you "apply" the changes, all the program is doing is updating the configuration file according to your instructions. Although this is a convenient way to modify a configuration file, it is important that you learn how to edit such files on your own, for several reasons. First, most programs don't come with a menu-based configuration program so, if you want to make changes, you'll have to do it for yourself. Second, changing a configuration file yourself is faster (and more fun) than using a program to do it for you. Third, even if there is a menu-driven program, it may not allow access to all possible options and preferences. To really know what is available, you will have to look inside the configuration file. Finally, when you look inside a configuration file, it gives you insight into how the underlying program functions. It is common for programmers to put comments in such files and, sometimes, the only way you can actually understand the more subtle aspects of the program is by reading the comments. — hint — In Unix, you are encouraged to look inside any system file you want, including configuration files. Before you can edit a configuration file safely, you must fulfil several requirements. First you must be comfortable working as superuser. Second, you must be able to use a text editor well. The best choices are either vi (which I will teach you in Chapter 22) or Emacs. Finally, you must, in a general sense, know what you are doing. This will come in time. You may be wondering, how do Unix configuration files compare to what is done in Microsoft Windows? Within Windows, programs store configuration information in two places: in the Registry and, sometimes, in .ini files. Windows users are encouraged to leave the Registry alone. This is because if you screw up the registry, you can cause yourself big trouble. Moreover, the contents of the Registry are poorly documented. Indeed, many of the entries are not documented at all. Unix has a very different philosophy. There is no central Registry. Instead, every program is allowed to have its own configuration file. Moreover, the contents of that file are documented. Users are encouraged to read the file and (when appropriate) make changes. Of course, if you change a configuration file incorrectly, you might cause a problem. However, it will be confined to that particular program and, in most cases, it will be easy to fix. — hint — Before you edit any important file, such as a configuration file, make a backup copy. That way, if something goes wrong, you can restore the original. (You will learn how to work with files in Chapters 23, 24 and 25.) Here is an example to show you how I do it. Let's say I want to edit a file called harley, and the date happens to be December 21, 2008. Before I start, I would make a copy of the file and call it harley-2008-12-21. Then, if I have a problem, I can copy the file back to its original name. Why don't I use a name such as harley- or harley-original or harley-old? It would work, but sometimes I want to leave the backup file around after I finish my work. By embedding the date in the file name, I know exactly when the backup file was created.
In the previous section, I told you not to edit a configuration file until you know what you are doing. However, there's no reason why you can't look inside a file, just to see what's there. Below is a list of several interesting configuration files. To look inside, you use a program called less. The job of less is to display the contents of a file, one screenful at a time. We will discuss less in detail (including its name) in Chapter 21. For now, I'll tell you that to display the contents of a file you type less followed by the name of the file. For example, to examine the file named /etc/passwd, you use the command: less /etc/passwd Once less starts, it shows you the first screenful of information. To move forward, you press <Space>; to move back, press <b>; for help, press <h>; to quit, press <q>. That's all you'll need for now. Here is a list of configuration files you may find interesting. You don't need to be superuser to look at them (just to change them). Don't worry if you don't understand what you see. Eventually, you will. In particular, the file name will make sense to you after you read Chapter 23. (Note: these files are found on most Linux systems. If you use a different type of Unix, some of the files may have different names.) /boot/grub/menu.lst: Information about the operating systems that can boot on your computer. /etc/hosts: A list of hostnames and IP addresses that are known to the system. /etc/inittab: Definition of the various runlevels. /etc/passwd: Basic information about each userid. (The actual passwords are encrypted and kept elsewhere.) /etc/profile: Commands that are executed automatically when a userid logs in. /etc/samba/smb.conf: Configuration information for Samba, a facility that allows Unix systems to share files and printers with Windows systems.
At the beginning of the chapter, we talked about what happens when you log in. It's now time to talk about what to do when you are finished working. Basically, you have two choices. You can SHUTDOWN, which stops Unix and turns off the computer; or you can REBOOT (also called RESTART), which stops Unix and then starts it again. You can perform both of these actions by making a selection from a menu, or by typing commands. From within your desktop environment, you shutdown or reboot by opening the main menu and selecting "Logout" (or something similar). As part of the logout process, you may have a choice to shutdown or reboot. If not, you can click on "Shutdown" or "Reboot" when you find yourself back at the login screen. Using GUIs, however, is rather boring. It's a lot more interesting to shutdown or reboot by typing commands. Before I teach you the commands, let me recall to your memory the idea of runlevels. If you look back at Figure 6-1, you will see that there are 6 different runlevels, each of which causes Unix to run in a particular way. Normally, a runlevel is chosen as part of the startup process in order to boot the system. For example, runlevel 5 boots Linux in multiuser mode with a GUI. However, there are two runlevels that have special meanings. Runlevel 0 halts the system (that is, causes it to shutdown), and runlevel 6 reboots the system. Thus, when you choose "Shutdown" from a menu, it's like changing to runlevel 0; and when you choose "Reboot", it's like changing to runlevel 6. As you might have guessed by now, almost anything that you can do in Unix by using a menu, you can also do by typing a command. The command to change runlevels is called init. In order to use init, you need to be superuser. Once you are superuser, type the command followed by the runlevel to which you want to change. For example, you can reboot the system by changing to runlevel 6: sudo init 6 To shutdown the system, you can change to runlevel 0: sudo init 0 If you feel brave, try changing to another runlevel and see what happens. Although you can use init to reboot or shutdown, it is not designed for everyday use. Instead, we normally use two other commands, reboot and shutdown. The reboot command is straightforward. Just type it and your system will change to runlevel 6: sudo reboot The shutdown command is a bit more complex, because you have to specify when you want to shutdown. The are various choices, but the simplest one is to use the word now: sudo shutdown now Typing this command tells the system to change to runlevel 0 right away.
During the booting and shutdown processes, Linux displays a lot of messages on the console. Most of these messages relate to finding and configuring the hardware components of your system. Other messages have to do with starting or stopping the services that are involved in the boot process, and the processes that will run in the background once the system has booted. A discussion of all the details is beyond the scope of this book. However, it is interesting to look at these messages, just to see what's there. As the system boots, many of the messages go by so fast you won't have time to read them, let alone figure out what they mean. Once you have logged in, however, you can display the boot messages at your leisure. Just go to a command line and enter: dmesg | less Although the boot messages look cryptic, you will eventually be able to understand them(*). * Footnote If you are a guy and you have a special someone in your life, here is an especially good way to impress her. Invite your special someone over on a Friday night and, when she arrives say, "You are in for a real treat." Then show her the output of the dmesg command. If you are knowledgeable enough, invite her to pick any message and offer to explain it to her. According to my research, this technique works especially well when combined with pizza and non-caffeinated beverages. The job of the dmesg command is to display the boot messages. However, there are so many that, if you enter the command by itself, most of the output will scroll off your screen before you can read it. (Try it.) Instead, use the three-part command above dmesg, followed by the | (vertical bar) character, followed by less. This runs dmesg and sends the output to less, which will display the output one screenful at a time. The vertical bar creates what is called a "pipeline". (We'll talk about pipelines in Chapter 15; we'll talk about less in Chapter 21.)
We started this chapter by talking about the characteristics of people and computers. I explained that, as human beings, we have imperfect memories and cannot concentrate on more than one thing at a time. What we can do is work with complex mental ideas and, whenever necessary, change from one idea to another within a fraction of a second. Computers can store and recall data much faster and much more accurately than can humans. Computers can also perform straightforward tasks extremely quickly and, while they are doing so, they can change from one task to another within milliseconds. While human beings can think and plot strategies, computers can do many things quickly without mixing up the details. In this way, machines are able to make up for the shortcomings of our minds, and our minds are able to complement the astounding capabilities of the machines. The result — when we do it right — is a melding of human being and computer in such a way as to produce something that is neither one nor the other, but far greater than the sum of its parts. The glue that holds together the man/machine partnership is the user interfaces. In Unix, we have two of them, the GUI (your desktop environment) and the CLI (the command line). For the rest of this book, we will be concentrating on the CLI. In other words, we will be typing commands and learning how to use text-based programs. In order to do this well, you must become proficient in using terminal windows, regular windows, virtual terminals, and multiple desktops/workspaces — all at the same time. The ultimate goal is to be able to conceive of doing something and then — without thinking — to make it happen. You already know how to do this when you drive a car, play a musical instrument, or cook a meal. What I want is for you to be able to carry out the same type of actions when you are sitting in front of your computer, using Unix to work on mental tasks. Since we are all different, I can't teach you how to conceive of your moment-to-moment mental strategies. You will have to develop those skills for yourself. What I can do is focus your attention, right now, by reminding you of the wonderful tools that are at your disposal. To do so, I will summarize the default Linux work environment. Within Linux, you have 6 text-based virtual consoles, each of which has its own CLI. In addition, you have a 7th virtual console that contains your desktop environment (the GUI). Within your desktop environment, you have 4 different desktops/workspaces, each of which can have as many windows as you want, including terminal windows. You are able to copy and paste text from one window to another, and from one virtual console to another. Moreover, you can work as either a regular user or as superuser. To manipulate your work environment, you can use the following shortcut keys.
In KDE, to change from one desktop to another:
In Gnome, to change from one workplace to
another:
Within a desktop or workspace, to change from
one task to another:
Within your GUI, to change to a text-based
virtual console:
From a text-based virtual console, change to
another virtual console:
To copy text within the GUI:
To copy text between virtual terminals:
Within GUI-based programs, to copy, cut and paste data:
— hint — Unix has the best system of user interfaces that has ever existed.
Review Question #1: What is a time slice? What is a typical length for a time slice? Review Question #2: What is the Unix CLI? What is the GUI? Review Question #3: What is a runlevel? At this very moment, Fester Bestertester is sitting at the back of a lecture hall listening to a boring lecture on animal husbandry. To keep himself awake, Fester is playing a GUI-based game on his Linux laptop. What is the runlevel on Fester's computer? Across the campus, a Unix system administrator has brought down the system and rebooted, so he can solve an important hardware problem. What is the runlevel on the admin's computer? Review Question #4: Which person acts as superuser on your particular Unix system? Review Question #5: What is a virtual console? How do you switch from one virtual console to another? Applying Your Knowledge #1: The who command (which we will discuss in Chapter 8), displays a list of all the userids that are currently logged into the system. If a userid is logged in more than once, who will show that. Log in on each of your virtual consoles, one by one. Then switch to your GUI, open a terminal window, and enter the who command. What do you see? Applying Your Knowledge #2: Being able to switch from one desktop to another and being able to copy and paste quickly are important skills. Within your GUI, open two terminal windows, each in its own desktop. In the first desktop, enter the command date (to display the time and date) into the terminal window. Copy that command into the clipboard. Now change to the second desktop and paste the command into the other terminal window. Now repeat the exercise using two text-based virtual consoles. Which set of copy and paste procedures is more comfortable to you? Why? For Further Thought #1: Some Linux distributions are set up so that a root userid is not created during the installation process. In such cases, your regular password serves as the superuser password. Why would a distribution be set up in this way? What are the advantages? What are the disadvantages? For Further Thought #2: Why do so many people believe they can think about more than one thing at a time? What effect do fast, multitasking computer systems like Unix have on such beliefs? Is this healthy or unhealthy? Do you, personally, think it is okay to talk on the phone or text message while you are driving? What about when other people do it?
List of Chapters + Appendixes
© All contents Copyright 2026, Harley Hahn
|