Harley Hahn's Guide to
Unix and Linux
|
|
Harley Hahn's Guide to
|
|
A Personal Note
Chapters...
Command
INSTRUCTOR |
Chapter 24... Working With Directories
This is the second of three chapters explaining the Unix filesystem. In Chapter 23, we discussed the filesystem as a whole: how it is organized into a tree-like hierarchy of directories and subdirectories, how the various parts of the filesystem are used, and the types of files you will encounter as you use Unix. Within this overall hierarchy, each user is assigned a home directory to organize as he or she sees fit. In order to work with your part of the tree, as well as the filesystem as a whole, you need to be able to navigate quickly and easily from one directory to another. You also need to be able to organize your files by creating, deleting, moving and renaming subdirectories as needed. Finally, you need to be able to look inside the various directories, so you can work with the files and subdirectories therein. In this chapter, you will learn all the fundamental skills necessary to work with directories. In Chapter 25, we will conclude our discussion by looking at the commands that work with regular files.
In Chapter 23, we discussed how to write the full name for a file. Start with a / (slash), which stands for the root directory. Then write the names of all the directories you have to pass through to get to the file, following each name with a /. Finally, write the name of the file. Here is an example: /usr/share/dict/words In this case, the file words lies in the dict directory, which lies in the share directory, which lies in the usr directory, which lies in the root directory. When we write the name of a file in this way, we describe the path through the directory tree from the root directory to the file in question. To do so, we specify a sequence of directories separated by / characters. This description is called a PATHNAME or a PATH. What you see above is an example of a pathname. If the very last part of a pathname is the name of an ordinary file, we call it a FILENAME or, less often, a BASENAME. In our example, words is a filename. Here is another example of a pathname. Let's say your userid is harley and your home directory is /home/harley (see Chapter 23). You have a file named memo that you want to edit using the vi text editor (Chapter 22). To start vi, you enter the command: vi /home/harley/memo Sometime later, you decide to edit another file, document. You enter: vi /home/harley/document In these examples, the pathnames are:
/home/harley/memo
The filenames are:
memo
As you might imagine, typing a full pathname every time you want to access a file is tiresome and prone to error. As a convenience, Unix allows you to designate one directory at a time as your WORKING DIRECTORY (also known as your CURRENT DIRECTORY). Whenever you want to use a file in your working directory, you need only type the filename; you do not need to specify the entire path. For example, if you were to tell Unix that you want to work in the directory /home/harley (I won't go into the details just yet), the following commands would be equivalent:
vi /home/harley/memo
The rule is as follows: When you use a name that starts with a /, Unix assumes it is a full pathname, starting from the root directory. This is the case in the first command. When you use a filename only, Unix assumes you are referring to a file in your working directory. This is the case in the second command. (Once you have experience, this rule will make a lot of sense.) Each time you log in, Unix automatically sets your working directory to be your home directory(*), which is a convenient place to start work. As you work, you can change your working directory whenever you want by using the cd (change directory) command, which we will discuss later in the chapter. During a work session, it is common to change your working directory from time to time, depending on what you are doing. However, it does not matter where you end up. The next time you log in, you will start, once again, in your home directory. * Footnote How does Unix know the name of your home directory? The pathname of each userid's home directory is stored in the Unix password file, /etc/passwd, described in Chapter 11. Here is how I want you to think of it. Imagine the Unix filesystem as a very large tree. The trunk of the tree is the root directory, and all the other directories are branches of the tree. For example, the directories /home and /bin are branches off the root. The directory /home/harley is a branch off /home. At any time, you are sitting on some branch in the tree. That is your working directory. The moment you log in, you find yourself sitting on the branch of the tree that represents your home directory. To move to another branch of the tree, all you need to do is change your working directory. Thus, you can think of the cd command as a magic carpet that instantly moves you from one branch of the tree to another.
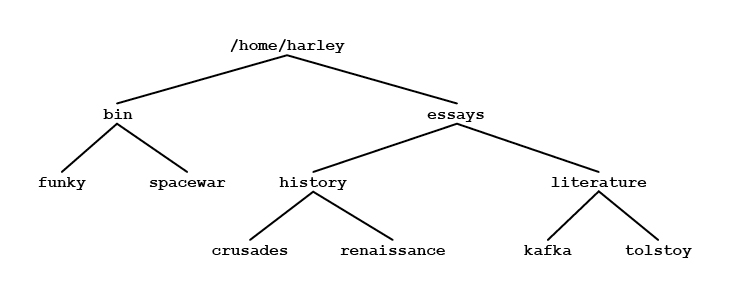
A pathname or path describes a location in the file tree by listing a sequence of directories separated by / (slash) characters. If the sequence starts from the root directory, we call it an ABSOLUTE PATHNAME. If the sequence starts from your working directory we call it a RELATIVE PATHNAME. To illustrate the differences, I'll use the directory tree in Figure 24-1. This tree shows subdirectories belonging to userid harley, whose home directory is /home/harley. (Remember, from Chapter 4, Unix files are owned by userids, not users.) |
|
Within the home directory, we have two subdirectories, bin and essays. In keeping with the Unix tradition, the files in the bin directory contain executable programs and scripts (see Chapter 23). In this case, there are two such programs, funky and spacewar. The essays subdirectory contains two subdirectories of its own, history and literature. Each of these directories contains two ordinary files. When userid harley logs in, the working directory is automatically set to be the home directory /home/harley. Let's take a look at how we might specify the names of the various files. Let's say we want to use a command in which we need to refer to the bin directory. Unix assumes that any name that begins with a / is an absolute pathname. That is, it shows the full path to the file, starting from the root directory. If a name does not begin with a /, Unix assumes that it is relative pathname. That is, it describes a path starting from the working directory. We can refer to the bin directory in two ways. First, the absolute pathname is: /home/harley/bin Alternatively, since the working directory is /home/harley, it is a lot simpler to use the relative pathname: bin Here is another example using the same working directory. We want to enter a command for which we need to specify the name of the tolstoy file in the literature directory. The absolute pathname is: /home/harley/essays/literature/tolstoy Again, the relative pathname is shorter: essays/literature/tolstoy Here is one final example. Let's say we want to do a lot of work with the files kafka and tolstoy. It is inconvenient to refer to these files using the absolute pathnames:
/home/harley/essays/literature/kafka
However, it is only a bit more convenient to use relative pathnames:
essays/literature/kafka
The best thing to do is to change the working directory to be: /home/harley/essays/literature (I will show you how to do this in a moment.) Once we change the working directory, we can refer to the files more simply as:
kafka
Think of the working directory as a base of operations you can change whenever you want. When you log in, you start out in your home directory, but you can change to any directory you want, whenever you want. The idea is to choose your working directory, so as to make filenames as simple as possible and easy to type. Throughout this book, you will find many examples in which I use filenames such as: vi kafka Now you understand that, in such cases, I am actually using relative pathnames. In this example, the command starts the vi text editor using the file named kafka in the working directory. Of course, when necessary, you can always use a full pathname: vi /home/harley/essays/literature/kafka I want you to remember this idea whenever you use a program whose syntax requires you to specify the name of a file. In such cases, you can use either an absolute pathname or a relative pathname. — hint — It is a fundamental rule of Unix that whenever you can use an ordinary filename, you can, indeed, use a pathname.
Unix provides three handy pathname abbreviations. The first is two periods in a row, pronounced "dot-dot": .. When you use .. in a pathname, it refers to the parent directory. To illustrate how this works, let us refer to the sample directory tree in Figure 24-1. Within the home directory /home/harley, there are two subdirectories, bin and essays. The bin directory contains two files. The essays subdirectory contains two subdirectories of its own, history and literature. Each of these directories contains two files. Say that you set the working directory to: /home/harley/essays/literature (To do so, you would use the cd command, which we will discuss later in the chapter.) Once your working directory is changed in this way, you can refer to the two files in this directory as kafka and tolstoy (using relative pathnames). At this point, the specification .. refers to the parent directory, that is: /home/harley/essays Let's say you want to refer to the file crusades within the history directory. One way is to type the entire absolute pathname: /home/harley/essays/history/crusades An easier way is to use the abbreviation .. to stand for the parent directory: ../history/crusades When you use .., it is the same as the name of the parent directory, so the above pathname is equivalent to the absolute pathname. You can use the .. more than once to move "up" more than one level. For example, from the same working directory, let's say you want to refer to the bin directory. You could use the absolute pathname: /home/harley/bin Alternatively, you can use the .. abbreviation twice: ../../bin The first parent directory is: /home/harley/essays The second parent directory (the grandparent) is: /home/harley Here is another example. You want to refer to the funky file within the bin directory. The absolute pathname is: /home/harley/bin/funky Starting from the same working directory, you can use: ../../bin/funky Here is one last example, which is a bit extreme. (Read slowly to make sure you understand it.) Your working directory is: /home/harley/essays/literature To refer to the root directory of the entire filesystem, you can use .. four times: ../../../.. Similarly, you can refer to the /etc directory as: ../../../../etc Of course, you would probably never use these examples, as it is a lot easier to type / and /etc. The .. abbreviation is most useful when you want to refer to directories near your working directory, without having to actually change your working directory. The second pathname abbreviation is a single period, usually referred to as "dot": . A single . refers to the working directory itself. For example, let's say the working directory is: /home/harley/essays/literature The following three specifications all refer to the same file:
/home/harley/essays/literature/kafka
Certainly, it is a lot easier to type . than the full name of the working directory. But, as you can see, you don't really need to specify any directory name. As long as a name does not begin with a /, Unix will assume that any pathname is relative to your working directory. This principle is important enough that I want to embody it in the form of a hint: — hint — Any pathname that does not begin with a / is considered to be relative to your working directory. You might ask, why would you ever need to use a single . abbreviation? There are certain situations in which you must specify an absolute pathname. In such cases, you can use the . abbreviation for the name of your working directory. The idea is to avoid typing a long pathname, not only out of laziness (although that is a good idea), but to make it less likely you will make a spelling mistake. (As I am sure you know by now, it is far too easy to make spelling mistakes when typing Unix commands.) Here is an example. Let's say you have written a program called plugh. (I will leave it to your imagination as to what this program might do.) The program is in the directory /home/harley/adventure which, at this moment, is your working directory. Normally, you would run a program by entering its name: plugh However, Unix can only run a program if it can find it. In most cases, this means that the file that holds the program should reside in one of the directories in your search path (see Chapter 13). In our example, the directory containing the program is not in your search path. However, Unix can always find and run a program if you specify the absolute pathname. Thus, you can run the plugh program by typing: /home/harley/adventure/plugh However, since the program lies in your working directory, an easier way is to use the . abbreviation: ./plugh Be sure you understand that .. and . are abbreviations. As our example illustrates, when you start a name with .. or . you are really specifying a full pathname. Unix is just helping you with the typing. The third pathname abbreviation is the ~ (tilde). You can use this symbol at the beginning of a pathname to stand for your home directory. For example, to use the ls program to list the names of all the files in your home directory, you can use: ls ~ To list the files in the subdirectory bin that lies within your home directory, you can use: ls ~/bin To refer to another userid's home directory, you can use a ~ followed by the userid. For example, to list the files in the home directory of userid weedly, you would use: ls ~weedly Let's say that weedly has a bin directory of his own and, within that bin directory, there is a program named mouse. To run the program, you must type the absolute pathname. You have two choices:
/home/weedly/bin/mouse
These last few examples raise an important question. Can any user look at other people's files and run their programs? For that matter, can a user change someone else's files? The answer is that all files (including directories) have "permissions". The permissions for a file dictate who can look at and modify the file. On many systems, the default is to let users look at other people's files, but not to modify them or run them. However, file permissions are under the control of the owner of the file. Thus, every Unix user can restrict or allow access to his files as he sees fit. We will discuss these issues in Chapter 25. — technical hint — There are three standard abbreviations you can use when specifying a pathname: . (current directory), .. (parent directory), and ~ (home directory). Although they seem similar, they are not implemented in the same way. The names . and .. are actual directory entries, created automatically by the filesystem. Every directory in the system contains these two entries. The name ~ is an abstraction provided by the shell, to make it convenient to refer to your home directory.
To display the name of your working directory, use the pwd (print working directory) command. The syntax is easy: pwd To change your working directory, you use the cd (change directory) command. The syntax is: cd [-LP] [directory | -] where directory is the name of the directory to which you want to change. If you enter the command without a directory name, cd will, by default, change to your home directory. If you enter the command with - (dash) instead of a directory name, cd will change to the previous directory. The -L and -P options have to do with symbolic links, which we will cover in Chapter 25. As a general rule, when a Unix name is short and has no vowels, we pronounce its name as separate letters. For example, the ls command is pronounced "L-S". Similarly, the pwd and cd commands are pronounced "P-W-D" and "C-D". Of all the Unix tools, cd and pwd are among the most useful. You will find yourself using them a lot, so read this section carefully. Here are some examples of how to use the cd command. When you practice using your own examples, remember to use the pwd command from time to time to check where you are. To change your working directory to /home/harley/essays, use: cd /home/harley/essays To change to /bin, use: cd /bin To change to / (the root directory) use: cd / For convenience, you can use relative pathnames as well as abbreviations. For example, say that your working directory is currently /home/harley. Within this directory, you have two subdirectories, bin and essays. To change to bin (that is, /home/harley/bin), simply enter: cd bin Because the directory name bin does not start with a /, Unix assumes it is a relative pathname, based on your working directory. Here is another example. Again, your working directory is /home/harley. This time you want to change to: /home/harley/essays/history Using a relative pathname, you can enter: cd essays/history When you use the cd command without a directory name, it changes your working directory to your home directory: cd Using cd in this way is the fastest way to return home when you are exploring a distant branch of the filesystem and you have lost your way.(*) For example, say that your working directory happens to be /etc/local/programs. You want to move to the bin directory within your home directory. Just enter:
cd
* Footnote Alternatively, if you happen to be wearing a pair of ruby slippers, you can tap your heels together three times and repeat "There's no place like home." The first command changes to your home directory. The second command changes to the bin directory within your home directory. To make it more convenient, recall that you can enter more than one command on the same line by separating the commands with a semicolon (see Chapter 10). Thus, no matter where you are in the filesystem, you can move to your own personal bin directory by entering: cd; cd bin Here are some examples showing how to use two standard pathname abbreviations we discussed earlier. We'll start with .., the abbreviation for the parent directory. Let's say that your working directory is: /home/harley/essays/history To change to the parent directory, /home/harley/essays, just go up one level in the tree: cd .. From the original working directory, you could use the following command to change to /home/harley/essays/literature by using: cd ../literature To go up more than one level, use the .. abbreviation more than once. For example, from the original working directory, you could change to /home/harley/bin by using: cd ../../bin Question: What happens if you are in the root directory and you enter: cd .. Answer: Nothing will happen. Your working directory will not change, and you will not see an error message. Why? Because Unix considers the parent directory of the root directory to be the root directory itself.(*) For example, as odd as it seems, the following two pathnames refer to the same file: * Footnote An assumption that has important theological implications. The other useful abbreviation is ~ (tilde) which, as we discussed, stands for the name of your home directory. Thus, the following two command lines have the same effect: they both set your working directory to the bin subdirectory of your home directory:
cd; cd bin
The first command makes the change in two steps; the second command does it all at once. At times, you will find yourself switching back and forth between two directories. In such cases, cd has a special abbreviation to make life easier. If you type - (dash) instead of a directory name, cd will change to the last directory you visited. At the same time, cd will display the name of the new directory, so you will know where you are. Here is an example you can try for yourself. To start, use cd to change to the /etc directory and the pwd to confirm the change: cd /etc; pwd Now change to /usr/bin: cd /usr/bin; pwd Finally, enter cd with a - character. cd - You are now back in /etc. — hint — At any time, you can find out where you are in the tree by using pwd to display the name of your working directory. However, there are two alternatives. First, it is possible to display the name of your working directory in your shell prompt. As you change from one directory to another, your prompt updates automatically to show you where you are. The details are covered in Chapter 13. Second, most GUI-based terminal windows display the name of your working directory in the title bar (at the top of the window). Take a moment to see if this is the case with your system. What's in a Name? pwd, cd In Chapter 3, we discussed how the early Unix developers used teletype terminals that printed output on paper. Over the years, Unix has retained the convention of using the word "print" to mean "to display information". Thus, the name pwd stands for "print working directory", even though it has been a long time since anyone actually printed the name of their working directory on paper. If you hang around Unix geeks, you will often hear them use cd as a verb. (When they do, the name cd is pronounced as two letters "C-D".) For example, someone might say, "To find the basic Unix tools, just C-D to the /bin directory and look around." This is consistent with the metaphor in which we imagine ourselves sitting on a branch of a tree, and we use cd to move to another branch and pwd to remind us where we are.
To make a directory, you use the mkdir program. The syntax is: mkdir [-p] directory... where directory is the name of a directory you want to make. Using this program is straightforward. You can name a new directory anything you want as long as you follow a few simple rules. I will go over the rules in Chapter 25 when I talk about naming files. (Remember, as I explained in Chapter 23, directories are really files.) Basically, you can use letters, numbers, and those punctuation symbols that do not have a special meaning. However, most of the time, your life will be easier if you stick to lowercase letters only. Here is an example. To create a directory named extra, within your working directory, use: mkdir extra When you specify a directory name, you can use either an absolute or relative pathname, as well as the standard abbreviations. As an example, let's say that you want to create the directory tree in Figure 24-2 (the directories I used as examples earlier in the chapter.) Within your home directory, you want to make two subdirectories, bin and essays. Within the essays directory, you want two more subdirectories, history and literature. |
| ||||||
|
To start, make sure that you are in your home directory: cd Now, make the first two subdirectories: mkdir bin essays Next, change to the essays directory and make the final two subdirectories:
cd essays
To illustrate the various ways to specify pathnames, let's take a look at two more ways to create the same directories. First, you could have done the whole thing without leaving the home directory:
cd
The first command changes to the home directory. The second command specifies all four names, relative to your working directory. In the following example, we don't even bother changing to the home directory: |
|
mkdir ~/bin ~/essays ~/essays/history ~/essays/literature |
|
Remember, the ~ (tilde) character is an abbreviation for your home directory. There are times when it is handy to use the .. abbreviation to indicate a parent directory. For example, say that you have changed to the essays directory: cd ~/essays You now decide to create a subdirectory named extra within the bin directory. Since the bin and essays have the same parent (the home directory), you can use: mkdir ../bin/extra When you create a directory, Unix makes you follow two sensible rules. First, within a directory, you cannot create two subdirectories with the same name. For example, you cannot have two directories named ~/essays/history. (How would you tell them apart?) However, you can have two directories with the same name if they are in different parent directories. For example:
~/essays/history
The second rule is that, by default, you cannot make a subdirectory if its parent directory does not exist. For example, you cannot make ~/homework/history unless you have already made ~/homework. When you specify more than one directory within a single command, mkdir will create the directories in the order you specify. Thus, the following command will work, because you are telling mkdir to create the homework directory before it creates the history directory: mkdir ~/homework ~/homework/history However, the next command will not work, because you can't create a subdirectory before you create the parent directory: mkdir ~/homework/history ~/homework Recall for a moment our analogy comparing the filesystem to a tree. The main trunk is the root directory, and each branch is a subdirectory. The two rules merely say: 1. You cannot create two identical branches. 2. You cannot create a new branch that has nowhere to attach to the tree. For convenience, you can override the second restriction by using the -p (make parent) option. This tells mkdir to create all the necessary parent directories automatically. For example, let's say you are researching how the early Romans used Unix, and you need to create the following directory structure to hold your files: ~/essays/history/roman/unix/research You can't create the research directory unless unix exists; you can't create unix unless roman exists; and so on. Thus, if none of the directories exists, you would have to use a sequence of five commands to create the full structure:
mkdir ~/essays
However, if you use -p, you can create everything with a single command: mkdir -p ~/essays/history/roman/unix/research — hint — When it comes to filenames, Unix is case sensitive, which means it distinguishes between upper- and lowercase (see Chapter 4). For example, the following three directory names are considered to be different:
bin
We'll talk about naming files in Chapter 25. For now, let me give you the following advice. When it comes to naming directories, unless you have a really good reason, use only lowercase letters. If you want to break up words, use a - (dash) or _ (underscore), for example:
backups-january
It is possible to use spaces within a directory name if you enclose the entire name in quotes. Don't do it, however: it only leads to trouble.
To remove (delete) a directory, use the rmdir program. The syntax is straightforward: rmdir [-p] directory... where directory is the directory that you want to remove. For example, to remove the directory extra from within the working directory, use: rmdir extra When you use rmdir, you can specify one or more directory names using absolute or relative pathnames. You can also use the standard abbreviations: .. for the parent directory, and ~ (tilde) for the home directory. Let's take a look at some examples using the sample directory tree we built in the previous section. (See Figure 24-2.) Within the home directory, we have two subdirectories, bin and essays. Within the essays directory, we have two more subdirectories, history and literature. Say that you want to delete all four of these directories. There are several ways to do the job. First, move to the essays directory: cd ~/essays From here, you can delete the two subdirectories: rmdir history literature Next, move to the parent directory (the home directory): cd .. Remove the two main subdirectories: rmdir bin essays An alternate method would be to move to the home directory and remove all four subdirectories in one command:
cd
As a final example, you could do all the work without moving to the home directory: |
|
rmdir ~/essays/history ~/essays/literature ~/essays ~/bin |
|
When you remove a directory, Unix makes you follow two sensible rules. First, as a safeguard, you cannot remove a directory unless it is empty. (A directory is not empty if it contains a subdirectory or a file.) Here is a real life example. It is late Sunday night, and you are working in the computer lab using Linux to complete a special project. Your home directory contains two subdirectories, data and olddata. The data directory contains 100 important files. The olddata directory is empty. You decide to remove the olddata directory. However, just as you enter the command, a meteorite smashes through the window hitting one of the geeks who is sitting beside you. In the confusion, you accidentally type: rmdir data Fortunately, Unix is prepared for just such an eventuality. You see the message: rmdir: data: Directory not empty Thanks to the built-in safeguard, your data directory is left untouched. If you want to remove a sequence of empty directories all at once, you can do so by using the -p (delete parent) option(*). This tells rmdir to remove all the necessary parent directories automatically. For example, let's say you have the following directory structure, and that all the directories are empty. ~/essays/history/roman/unix/research * Footnote Sometimes called the Oedipus option. You want to remove all five subdirectories. Without the -p option, you would have to start from the innermost subdirectory and work your way up the tree:
cd
With the -p option, however, you can change to your home directory and do the whole thing at once:
cd
None of these commands will work if the directories are not empty. As I mentioned, this is for your protection. There will be rare occasions, however, when you really do want to remove a directory that is not empty. To do so, you can use the rm program with the -r option. Using rm -r will also remove all subdirectories and their contents, so you need to be very careful. We will discuss the rm program in Chapter 25, so I will defer the details until then. A moment ago, I mentioned that there are two rules imposed by rmdir. First, you cannot remove a directory unless it is empty. The second rule is that you cannot remove any directory that lies between your working directory and the root directory. For example, say that your working directory is: /home/harley/essays/literature You cannot remove the essays directory or the harley directory, because they lie between you and the root directory. However, you can remove the directory: /home/harley/essays/history That is, you can use the command: rmdir ../history After all, the history directory does not lie between you and the root directory. If you want to remove essays, you must first move closer to the root directory, say to /home/harley. Now you can remove the directory:
cd /home/harley
Question: Your working directory is /etc. Can you remove a subdirectory that lies within your home directory? Answer: Yes, because your working directory (/etc) does not lie between the root directory and the directory you want to remove. To remember this rule, just recall our analogy to a real tree. The trunk is the root directory. Each branch is a subdirectory. At any time, you are sitting on some branch that is your working directory. Removing a directory is like sawing off a branch of the tree. The restriction on removing directories simply states that you cannot saw off a branch that is holding up the one you are sitting on. — hint — It is possible to remove your working directory. This is like cutting off the branch of the tree that you are sitting on. Probably Unix shouldn't let you do this, but it does. Removing your working directory will only cause you trouble. Don't do it.(*) * Footnote Even though I told you not to do it, I know you're going to do it just to see what happens. When you do, be sure to use a temporary subdirectory. Don't remove your home directory, or you really will be in trouble.
To move or rename a directory, use the mv program. The syntax is: mv directory target where directory is the directory you want to move or rename, and target is the target or new name. You use the mv program to "move" a directory from one place to another. If the new location is in the same directory, you have, in effect, renamed the original directory. That is why I say that mv both moves and renames. Let me show you a few examples. You have a directory named data in your working directory, and you want to change its name to extra. Assuming that a directory named extra does not already exist in the same directory, you can use the command: mv data extra The directory that used to be named data is now named extra. If the target directory does exist, mv will move the original directory into the target. For example, say that you have the following two directories:
/home/harley/data
You want to move the data directory to the storage directory. Use: mv /home/harley/data /home/harley/storage Of course, if your working directory is /home/harley, you can simplify the command: mv data storage The pathname of the data directory is now: /home/harley/storage/data When mv moves a directory, it also moves all the files and subdirectories that lie within that directory. For example, say that, before the move, you had a file named document within the data directory. Its absolute pathname was: /home/harley/data/document After the move, the absolute pathname becomes: /home/harley/storage/data/document If you had subdirectories — perhaps even a whole subtree — under data, they are moved as well. Thus, you can use the mv program for three purposes:
The mv program can be used to move or rename ordinary files, as well as directories. We will discuss how to do so in Chapter 25.
In Chapter 13, I explained that there are two types of Unix commands. External commands are separate programs. Builtin (or internal) commands are interpreted directly by the shell and are available only if your shell supports them. In this section, I am going to show you how to use three builtin commands, pushd, popd and dirs. These commands are available with Bash, the Tcsh and the C-Shell, but not with the Korn Shell. At this point, we have covered the fundamental operations you need to work with directories. You know how to create, delete, move and rename. You also know how to change your working directory and display its name. What we have yet to cover are the many variations of the very important ls program, the tool that enables us to look inside a directory and see what's there. Before we move on to ls, however, I'd like to take a moment to show you an advanced technique that will help you move around the tree from one directory to another. In Chapter 8, we talked about the idea of data structures, entities that are used to store and retrieve data according to a set of precise rules. So far, we have discussed three different data structures: the stack (Chapter 8), the queue (Chapter 23), and the tree (Chapters 9 and 23). We are about to use the stack again, so let's have a quick review. A STACK is a data structure in which elements are stored and retrieved one at a time such that, at any time, the next data element to be retrieved is the last element that was stored. This arrangement is sometimes referred to as LIFO or "last-in first-out". When you store a data element, we say that you PUSH it onto the stack. The most recently pushed data element is said to be at the TOP of the stack. When you retrieve a data element from the top of the stack, we say that you POP the element off the stack. Informally, you can think of a stack as being similar to a spring-loaded column of plates in a cafeteria. The plates are pushed onto the "stack", one at a time. When you want a plate, you pop the top one off the stack. You have no access to any of the other plates. The shell provides a similar facility to hold directory names. At any time, you can use the pushd command to push the name of a directory onto the DIRECTORY STACK. Later, you can use the popd command to pop a name off the stack. At any time, you can display the contents of the stack by using the dirs command. The syntax for these commands is as follows:
pushd [directory | +n]
where directory is the name of a directory, and n is an identifier. Note: when you use options with dirs, you must keep them separate. For example, you can use dirs -l -v, but not dirs -lv. In this section, we will cover the most important ways to use these three commands. There are a few more esoteric variations, which you can read about in the online manual. (Look on the man page that describes the builtin commands for your shell.) For reference, Figure 24-3 summarizes the commands we will be covering. Figure 24-3: Directory stack commands The directory stack is an advanced tool that enables you to maintain a list of directories and, whenever you want, change your working directory to a directory in the list. At all times, the name at the top of the stack is your working directory. Changing this name automatically changes your working directory. Similarly, changing your working directory automatically changes the top name on the stack. You control the stack by pushing names onto it, popping names off it, or selecting a name to move to the top. Each of these operations changes the top of the stack, thereby changing your working directory. See text for details. |
|
|
Learning how to use the directory stack takes a bit of practice, but it is worth the effort. Once you master the details, you will be able to zip around the filesystem like a VIP with a backstage pass running around a rock concert. The trick is to remember one simple rule: At all times, the top of the stack holds the name of your working directory. Whenever you change your working directory, the top of the stack changes automatically. Conversely, whenever you change the top of the stack, your working directory changes automatically. (Think about this for a moment, before you move on.) Here are some examples. Start by using cd to change to the /etc directory. Use pwd to confirm the change: cd /etc; pwd Now display the contents of the stack. To do so, use the dirs command with the -v (verbose) option. This option tells dirs to display each element on the stack on a separate line with a line number. The top of the stack is line #0. dirs -v The output is: 0 /etc Change to the /usr directory, and display the stack again: cd /usr; dirs -v Notice that the top of the stack has changed to point to your new working directory: 0 /usr Now, use pushd to push three new directory names onto the stack. You must do this as three separate commands. Then use dirs to display the stack:
pushd /lib
The output is:
0 /etc
The stack now contains four directory names. Now display your working directory: pwd The output is: /etc Notice that you didn't have to change your working directory explicitly. Whenever the top of the stack (#0) changes, your working directory changes automatically.(*) * Footnote You may have heard of the legendary magician Harry Houdini (1874�1926). Houdini used to perform a mystifying mind-reading trick in which he would guess someone's working directory without using the pwd command. The secret? When no one was looking, Houdini would use the dirs command and sneak a peek at the top of the stack. Next, use popd to pop a single name off the stack. Then display the stack and your working directory:
popd
The output of the dirs command is:
0 /var
The output of the pwd command is: /var The popd command popped /etc off the stack, which brought /var to the top of the stack. The instant this happened, /var became your working directory. We confirmed this by using pwd. If you look back at the syntax, you will see that there are several options you can use with dirs. With no options, dirs will display the directory stack in a compressed format with all the names on a single line. If any of the names involve your home directory, dirs will represent it with a ~ (tilde) character. With the -l (long) option, dirs displays the full name of your home directory. Finally, with the -v (verbose) option, dirs displays one name per line with line numbers. To experiment, push your home directory onto the stack. Then try each of the variations:
pushd ~
The dirs command has one more option, but it has nothing to do with displaying names. The -c (clear) option empties the stack. Use this option when you want to clear out the stack and start fresh. To experiment, use dirs -c (to clear the stack) followed by dirs -v (to display the stack). Before you enter these commands, see if you can answer the question: Will the second command show an empty stack?
dirs -c
The answer is you will never see a completely empty stack. This is because the top of the stack is the name of your working directory. Since you always have a working directory, the directory stack must always have at least one name on it. At this point, I can imagine you are thinking that all of this is interesting (or dull, depending on your point of view), but what good is it? How often, I hear you say, am I going to want to push directory names onto a stack and then pop them off, one at a time, just so I can change my working directory? Why not just use cd? If you are thinking along these lines, you are correct. Most of the time, only the real geeks use the directory stack.(*) Indeed, if all you want to do is switch back and forth between two directories, you can use cd - (described earlier in the chapter). Why should you learn more arcane commands and spend time messing around with a stack? * Footnote If you should happen to be someone who uses the directory stack a lot, you should know that I am using the word "geek" in the kindest possible sense. The reason I am teaching you all this is that there is one aspect of the stack that is extremely useful: you can use the pushd command to jump into the middle of the stack and "push" a directory name to the top. The moment you do, you change your working directory. It sounds complicated, but it isn't: it's quick, easy, and very powerful. Here is an example to show you how it works. Start by entering the following commands:
cd
The cd command changes to your home directory. The dirs -c command clears the stack. At this point, the stack is empty except for your working directory (which is ~, your home directory). The next three pushd commands push directory names onto the stack. The final dirs command displays the contents of the stack. The output of this command is:
0 /etc
There are now four names on the stack, and your working directory is the top one, /etc (#0). Let's say you have been working for a while in /etc and you want to change to /lib (#2). Just enter pushd, followed by a + (plus) character and the number 2: pushd +2 This tells the shell to move the #2 directory (/lib) to the top of the stack (#0). The moment /lib becomes #0, it also becomes your working directory. The net effect is to select the #2 directory from the middle of the stack and make it your working directory. At this point, if you use dirs -v to display the directory stack, it will look like this:
0 /lib
How did this happen? When you push a directory to the top, the directories above it are not lost. Instead, they are moved down the stack. In this case, when you moved directory #2 up to the top, directories #0 and #1 were rotated down towards the bottom. I have to admit, this example is contrived. After all, there's no point entering commands to build a directory stack, display the stack contents, and then push names to the top, when you can do the same thing by typing a simple command like: cd /lib However, what if the directories had longer names? For example, let's say you are in your home directory /home/harley. You now enter the following pushd commands to push four very long names onto the directory stack: |
|
pushd /home/harley/source/current/calculate/source/2-1.05
|
|
If you were going to do a lot of work with these directories, it would be a real bother to have to type the names over and over. Instead, you can push them on the stack once. Then, whenever you want, you can push whichever name you want to the top of the stack. For example, let's say you are working in the dict directory. After a while, you want to change to the nfsd directory. First display the stack to see what number you should push to the top: dirs -l -v The output is: |
|
0 /usr/share/dict
|
|
All you need to do is push directory #2 to the top of the stack: pushd +2 Later, when you need to change to another directory, just display the directory stack again and push another name to the top. (It is important to display the stack each time, as the numbers change whenever you push.) Deleting and adding to the directory stack is easy. To delete a name from the stack, use popd followed by the number. To add a name to the stack, use pushd as described earlier. For example, to remove name #2 from the stack, use: popd +2 To push /home/weedly/bin onto the stack, use: pushd /home/weedly/bin Something to ponder: In Chapter 13, when we discussed the history list, I showed you how to display a list of commands and then refer to a particular command by its event number. Can you see the similarity to using the directory stack? You display a list of directories and then refer to a particular directory by its number. (This similarity is not an accident.) To finish this section, let me show you something totally cool. To make it easy to work with the directory stack, you can create aliases (see Chapter 13) for dirs -v and pushd. The following commands will do the job for Bash. (Remember, the Korn shell does not support the directory stack.)
alias d='dirs -v'
For the C-Shell family, you would use:
alias d 'dirs -v'
Once you define these aliases, using the directory stack is simple. To display the stack, just enter: d To change your working directory by pushing a new name onto the stack, use a command like: p /usr/lib To change your working directory by pushing an existing name to the top of the stack, use a command like: p +4 If you have a moment right now, type in these aliases and experiment a bit. As you enter the directory names, be sure to use autocompletion (see Chapter 13) to keep your typing to a minimum. If you want the aliases to be permanent, just put them in your environment file (Chapter 14). For reference, the commands we have discussed in this section are summarized in Figure 24-3. — hint — If you plan on using the same set of directories over and over, put the appropriate pushd commands in your login file (see Chapter 14). That way, each time you log in, your directory stack will be built for you automatically.
Of all the Unix tools, the most important is the ls program (pronounced "L-S"), used to display information about the contents of a directory. Why is ls so important? To answer this question, we need to consider the fundamental nature of Unix. As I mentioned in Chapter 6, every object within a Unix system is either a file or a process. In simple terms, files hold data or allow access to resources; processes are programs that are executing. When you use Unix, we call you a user. However, Unix itself does not know about users; Unix only knows about userids (see Chapter 4). Indeed, inside a Unix system, only userids have a real identity. Thus, it is userids, not users, that log in, log out, own files, run programs, send email, and so on. For this reason, every Unix system has an inside and an outside, with a clear boundary between the two. The inside consists of all the files and processes, along with the userids that inhabit the ghostly environment. The outside is you, the user. The boundary is defined by the physical interfaces: your keyboard, mouse, monitor, speakers, and so on. Although the brains of the operation are inside you (the user), you can't enter the Unix environment. Thus, you have no way of sensing directly what exists on the inside and what is happening. To be sure, you are in charge, and your userid acts as your official representative. However, when you come right down to it you are flying blind, like a pilot in a fog who must depend on his or her instruments. You can't see any of the files or any of the processes. You can't even see your userid. The best you can do is enter commands and interpret the output. For this reason, the most important tools are the ones that act as your ears and eyes, the programs that display information about files and processes. To do so, these tools help you answer the questions: "What is there?" and "What is happening?" In Chapter 26, I will show you how to check on the status of your processes. (The principal tool we will be using is the ps program.) However, as important as processes are, most of the time you just let them do their job. Most of your effort is spent thinking about and manipulating files. Since files reside in directories, the tools that enable you to look inside a directory are particularly important and, by far, the most useful of these tools is ls. And that is why, out of the hundreds of command-line programs that come with every Unix and Linux system, ls is the most important program of them all.
To display information about the contents of a directory, you use the ls (list files) program. You will find that ls is one of the most frequently used Unix programs. As such, it has many options to control its output. For example, on one of my Linux systems, ls has 59 options. (That is not a misprint.) Non-Linux systems will have fewer options but even so, you will usually find more than 30. Obviously, no program actually needs 30 options, let alone 59. In our discussion, I will teach you the most important options. For more information, you can always look at the online manual (man ls). In this section, I am going to introduce the ls program and discuss the basic options. In the following sections, we will discuss the more advanced features of ls, at which time I will describe some of the more complex options. Considering only the most important options, the syntax for the ls program is: ls [-aCdFglrRs1] [name...] where name is the name of a directory or file. Before we move on, take a moment to look at the options and notice -l (the lowercase letter "l") and -1 (the number "1"). These are two different options, so don't confuse them. The -l (letter l) option is used a lot; the -1 (number 1) option is used rarely. The default behavior of ls is to display an alphabetical list of names of files in a directory. For example, to list the files in the /bin directory, use: ls /bin If you want to look at the contents of more than one directory, you can specify more than one name. For example, to list the files in the /bin and the /etc directories, use: ls /bin /etc If you don't specify a directory, ls will — by default — display the files in your working directory. Thus, to see the files in your working directory, just enter: ls This two-letter word is the most frequently used command in the world of Unix. As we discussed earlier, the . (dot) character is an abbreviation for the working directory. Thus, the following two commands are equivalent:
ls
More useful is the .. abbreviation, which stands for the parent directory. Thus, to list the files in the parent of the working directory, you would use: ls .. As you would expect, you can use .. more than once to move up the tree as many times as you want. For example, to list the files in the parent directory of the parent directory of the working directory, use: ls ../.. When ls sends its output to a terminal (which is usually the case), the output will be organized into columns. The number of columns will be chosen automatically so the names fit well on your screen or window. For example, here are the first seven lines of output of a directory listing of the /bin directory. (On this particular system, the actual output was 20 lines.) |
|
awk dmesg kill ping stty
|
|
Notice that the filenames are arranged alphabetically by column. That is, you read down, not across. As I explained in Chapter 23, the /bin directory contains many of the standard Unix programs, so the names in this directory should look familiar. When you redirect the output of ls to a file or to a pipeline, ls writes only one filename per line. This makes it easy to process the output of ls with another program. (Redirection and pipelines are explained in Chapter 15.) A common example is: ls | wc -l The wc -l command counts the number of lines of input it receives. Thus, this combination of ls and wc tells you how many files you have in your working directory. If, for some reason, you want to force ls to write columns to a file or pipeline, use the -C option (uppercase "C"), for example: ls -C | less If you want to force ls to write one line per filename to your terminal (instead of columns), use the 1 option (the number "1"): ls -1 By default, ls displays filenames in alphabetical order. (More precisely, ls uses the order of the characters within the collating sequence for your locale. See the discussion later in the chapter.) If you want to display the names in reverse order, use the -r (lowercase "r") option: ls -r The last ls option we will discuss in this section is -R which stands for "recursive" (explained in a moment). This option tells ls to list information about all the subdirectories and files that reside — directly or indirectly — within the directory you name. In other words, ls -R displays information about an entire directory tree. For example, let's say you want to take a look at all the files and subdirectories created by the users on your system. Just display all the descendants of the /home directory: ls -R /home Similarly, to list all the descendents of your working directory, you would use: ls -R Such listings tend to be very long, so you will probably want to pipe the output to less to display one screenful at a time. Because the output is going to a pipeline, you must include the -C option if you want columns:
ls -CR /home | less
When you want to use -R, remember that there is also a -r (reverse) option, so be sure type carefully. What's in a Name? Recursive In computer science, a RECURSIVE data structure is one that is built up from smaller data structures of the same type. Directory trees are recursive because they contain other, smaller trees. Some directory tools, such as ls, have an option to process an entire directory tree, that is, all the subdirectories and files descending from a specific directory. Because such trees are considered to be recursive, the options that process them are usually named -r or -R.
Earlier in the chapter, I mentioned that the default behavior of ls is to display an alphabetical list of names of files in a directory. The statement seems straightforward but, actually, it is not. This is because the definition of "alphabetical order" is not the same on all systems. It all depends on your collating sequence which, in turn, is defined by your locale. As we discussed in Chapter 19, a locale is a technical specification describing the language and conventions to be used when communicating with a user from a particular culture. For example, your locale might be set to American English, British English, Dutch, Spanish, and so on. For our purposes, the most important aspect of your locale is that it defines your collating sequence, the order in which characters are sorted (explained in Chapter 19). The default locale for your system was set at the time your system was installed. If you use American English, your locale will be either the C (POSIX) locale based on the ASCII code, or the en_US locale, part of a newer international system. To check your locale, you can use the locale command. This will show you the value of various environment variables. The one you want to look at is LC_COLLATE, which specifies the name of your collating sequence, because it is your collating sequence that determines the meaning of "alphabetical order" on your system. The C locale uses the same collating sequence as the ASCII code. In particular, all the uppercase letters are grouped together and all the lowercase letters are grouped together, with uppercase coming first: ABCDEF...abcdef... We call this the C collating sequence, because it is used with the C programming language. The en_US locale, however, uses the dictionary collating sequence, in which uppercase is mixed with lowercase: aAbBcCdDeEfF... When you list files with ls, the order in which they are displayed depends on your collating sequence. For example, let's say you have 6 files named A, a, B, b, C and c. If your locale is C and you list the files with ls, you will see: A B C a b c If your locale is en_US, you will see: a A b B c C Although this might seem like a small deal, it isn't. Your life will be easier if you use the C locale. You will see an important example of this later in the chapter when we discuss wildcards. So, here is what I want you to do. Take a moment right now and enter the locale command. This will show you the environment variables that define your locale. If the LC_COLLATE variable is set to C or POSIX, that is fine. If it is set to en_US, I want you to change it permanently to C. (This is what I do on my systems.) All you have to do is add the appropriate command to your login file. The first command is for the Bourne Shell family (Bash, Korn Shell); the second command is for the C-Shell family (C-Shell, Tcsh):
export LC_COLLATE=C
See Chapter 19 for detailed information about locales and collating sequence; see Chapter 14 for a discussion of the login file.
You will often want to know what types of files a directory contains. In such cases, you have three choices. You can use ls with the -F option; you can use ls with the --color option (Linux only); and you can use the file command. In the next three sections, we will discuss each of these techniques in turn. When you use ls with the -F (flag) option, it displays a FLAG after the names of certain types of files. These flags are summarized in Figure 24-4. The most important are / (slash), which indicates a directory, and * (star), which indicates an executable file (such as a program or a script). In most cases, there will not be a flag. This indicates an ordinary, non-executable file. Figure 24-4: Flags displayed by the ls -F command When you use ls with the -F option, it displays a flag after certain types of files. The most important flags are / (indicating a directory) and * (indicating an executable file). If there is no flag, the file is an ordinary, non-executable file.
For example, say that your working directory contains a directory named documents, text files named memo and essay, a program (binary file) named spacewar, and a named pipe tunnel. To display the names of the files with flags, you would use: ls -F The output is: documents/ essay memo spacewar* tunnel|
If you use Linux, you have an alternative to -F. You can use the --color option to use colors to indicate the various file types.(*) (We discussed options that start with -- in Chapter 10.) The syntax is as follows: ls --color[=always|=auto|=never] [name...] where name is the name of a directory or file. * Footnote With FreeBSD-based systems, including OS X (Macintosh), you can use the -G option in a similar way. When --color is turned on, ls uses colors to indicate the various types of files. For example, the following command displays the names of the files in your working directory: ls --color When you use the --color option, there are three variations. The first variation is --color= always, which is the default. If you like, you can also use yes or force. Thus, the following four commands are equivalent. They all tell ls to use color to indicate the various types of files.
ls --color
The second variation is --color=never. This tells ls not to use color. You would use this if, for some reason, color is turned on and you want to turn it off. If you like, you can also use no or none. Thus, the following three commands all tell ls not to use color:
ls --color=never
At this point, you are probably wondering, why are there so many ways of making what is, essentially, a yes or no choice? The answer is that the programmers who added color support to ls decided that users should be able to specify either never or always, or yes or no. The other two values, force and none, were added for compatibility with other versions of ls.(*) * Footnote In Chapter 2, I explained that Linux is open source software, which means that anyone can look at (or even modify) the source code. It happens that the variations for the --color option are not well documented. However, I was able to figure out the nuances by reading the source code for the ls program. If you are ever really stuck trying to understand how a program works and the documentation is inadequate or confusing, remember that nothing is magic. If you can understand even a little C, try reading the source code. It's not that hard to get the gist of what is happening, and reading other people's code is one of the best ways to improve your own programming. Normally, the special codes that create the color are mixed in with the output. This works okay when it is displayed on your monitor, but can look like gibberish when you send the output to a pipe or save it to a file. To avoid this, you can use the final variation of the --color option by setting it to auto. This tells ls to use colors only when the output is going to a terminal. If you like, you can also use tty or if-tty. Thus, the following three commands are equivalent:
ls --color=auto
To see this for yourself, try the following two commands. The first command forces the use of color, which generates special codes that look like gibberish when viewed within less. The second command detects that the output is not going to a terminal, so it does not generate the color codes, avoiding the problem with less.
ls --color=yes /bin | less
Similarly, if color is on, you will want to turn it off when you save the output to a file: ls --color=auto > filelist Many people like to display colors every time they use ls. Indeed, it is so common that, on some systems, an alias for ls is created automatically with the --color option turned on. If you are a Linux user and you always see colors when you use ls, even if you do not specify --color, chances are you are using an alias without knowing it. To check if this is the case, you can tell the shell to ignore any aliases by typing a \ (backslash) command before the command (see Chapter 13). If the output is now devoid of color, you can conclude you were using an alias. \ls If you want to turn off the color permanently, just create an alias of your own as a replacement, for example:
alias ls='ls --color=no'
The first alias is for the Bourne Shell family: Bash, Korn Shell; the second is for the C-Shell family: Tcsh, C-Shell. To make the alias permanent, put it in your environment file. (For help with aliases, see Chapter 13. To read about the environment file, see Chapter 14.) If you want to turn on color permanently, use one of the following aliases instead in your environment file:
alias ls='ls --color=yes'
Personally, I like flags better than colors, so I suggest that you use -F as well as --color:
alias ls='ls -F --color=yes'
— hint — When you use ls with the --color option, a variety of different colors are used to indicate different types of files. These colors are set by an environment variable called LS_COLORS. You can customize the colors by changing this variable. If this sounds like fun to you, start by reading about the dircolors program:
man dircolors
The idea is to use dircolors to generate a command that will set LS_COLORS the way you want. You can then put this command in your environment file.
So far, we have discussed two ways to find out what types of files a directory contains. You can use ls with -F to display a flag after the file name, or you can use ls with --color to use colors to indicate different file types (or both). A much more sophisticated way to check file types is by using the file command, which knows about several thousand different types of files. The syntax is: file [name...] where name is the name of a file or directory. There are a large number of options, but you won't need them. (If you are curious, see the man page.) Using file is straightforward. Simply specify the name of one or more files or directories, for example: file /etc/passwd /bin / ~/elmo.c /bin/ls Here is some typical output: |
|
/etc/passwd: ASCII text
|
|
The output for the first four files is easy to understand. The first file (the password file) contains plain ASCII text. The second and third files are directories. The fourth file contains C source code. The last file is an executable program. As such, file gives us a lot of technical information, which is useful to programmers and system administrators. In case you are interested, here is what it all means. ELF: Executable and Linking Format, a standard file format for executable files. 32-bit: The word size. LSB: Compiled with Least Significant Byte word ordering, used with x86 processors. executable: An executable file. Intel 80386: Processor architecture for which the file was compiled. version 1 (SYSV): The version of the internal file format. GNU/Linux 2.6.9: The version of the operating system and kernel under which the program was compiled. dynamically linked (uses shared libs): Uses shared libraries, not statically linked. stripped: Executable file has had the symbol table removed. This is done by the strip program in order to reduce the size of the executable file. In our example, we had two directories, /bin and / (the root directory). Notice that file gave us information about the directory itself. If you want file to analyze the files within a directory, you need to specify their names. To specify all the files in a directory, you use what are called "wildcards". We will discuss wildcards later in the chapter. For now, let me give you an example. The following command uses file to analyze all the files in the /etc directory. Because the output is rather long, we display it one screenful at a time by piping it to less: file /etc/* | less
There are three programs you can use to find out how much disk space your files use: ls -s, du and quota. We'll discuss each one in turn. The first program is ls with the -s (size) option. This tells ls to preface each filename with its size in kilobytes. If you specify a directory name, ls will also show a total for the entire directory. Here is an example: ls -s /bin Below is some of the output from this command. (The actual output was 21 lines.) |
|
total 8176
|
|
On the top line, you can see that the total space used by all the files in the directory is 8,176 kilobytes. The other lines show how much space the various files require. The cat file, for example, uses 28 kilobytes. With Linux, you can use the -h (human-readable) option to display the units along with the numbers. For example: ls -sh /bin/cat The output is: 28K /bin/cat The next program you can use to display file size is du (disk usage). The syntax is: du [-achs] [name...] where name is the name of a directory or file. When you specify the name of one or more files, du will show you the amount of storage used by those files. Here is an example that displays the size of the password file (described in Chapter 11): du /etc/passwd On most systems, the output will be shown as 1K units. For example, the following output tells you that the password file takes up 8K bytes of disk space: 8 /etc/passwd To display the units along with the number, use the -h (human-readable) option: du -h /etc/passwd This changes the output to: 8.0K /etc/passwd You might be wondering, why does the password file — which is a usually small file — use 8K of disk space. After all, 8K can hold up to 8,192 (8 x 1024) characters, a lot more than the data within the password file. It happens that, for this particular filesystem, storage space on the disk is allotted in chunks of 8K. Thus, even though the file is small, it takes up 8K on the disk. (See the discussion on allocation units later in the chapter.) As I mentioned, most versions of du display output in terms of 1K units. Some systems, however, use 512-byte units. (The unit size is documented on the du man page.) This is the case, for instance, with Solaris. On such systems, there will usually be a -k option to force du to use 1K units. For example, on a Solaris system, you can use either of the following commands to use 1K units to display the disk space used by the password file:
du -k /etc/passwd
So far, we have used du to display the disk space used by specific files. Most often, however, du is used to find out how much space is used by all the files in a particular directory tree. If you do not specify a name, du will assume you want your working directory. For example, the following command starts from your working directory and displays the name of each subdirectory, sub-subdirectory, sub-sub-subdirectory, and so on. Beside each name du shows the total disk space taken up by the files in that directory. At the very end there is a grand total. (Because the output is lengthy, I have piped it to less to display one screenful at a time.) du -h | less To see how much disk space is used by all your files, specify your home directory: du -h ~ | less The following commands show how much disk space is used by all the files under /usr/bin and all the files under /etc: du -h /usr/bin /etc | less If you use the -s (sum) option, du will display only the total, which cuts out a lot of extraneous output. This is, in my opinion, the most useful way to use du. Here are two examples. The first example displays the total disk space used by your personal files (starting from your home directory): du -hs ~ The second example does the same for the /usr/bin, /bin, and /etc directories. The first command is for the Bourne Shell family (Bash, Korn Shell). The second command is for the C-Shell family (Tcsh, C-Shell).
du -hs /usr/bin /bin /etc 2> /dev/null
These commands are a bit complicated, so let's take a moment to discuss them. You will notice that I have thrown away the standard error by redirecting it to the bit bucket (see Chapter 15). I did this because, as du processes the directories, it may find subdirectories it does not have permission to read. Each time this happens, du will display an error message. Throwing away standard error keeps these messages from being displayed. The exact method used to redirect standard error depends on which shell you are using. Hence, there is one command for the Bourne Shell family and another command for the C-Shell family. (All the details are explained in Chapter 15.) Moving on, the -c (count) option displays a grand total at the end of the output. This option is most useful when combined with -s and -h. Here is an example. Once again, the first command is for the Bourne Shell family; the second is for the C- Shell family: |
|
du -csh /usr/bin /bin /etc 2> /dev/null
|
|
This combination of options (-csh) is particularly easy to remember because, coincidently, it happens to be the name of the C-Shell program. Finally, if you use the -a (all) option, du shows the size of every directory and file it processes. This can make for a very long listing, but it gives you an exact description of how your disk space is being used. For example, to display all the information about disk storage for your personal files, specify your home directory: du -ah ~ | less The next disk storage program is df. (The name stands for "disk free-space"). This program shows you how much disk space is used by each filesystem, and how much is available. The df program has various options but, generally, you won't need them. The only option I want to mention is -h, which displays human-readable output by using storage units of kilobytes, megabytes and gigabytes instead of blocks. Try each of these commands on your system and see which you prefer:
df
Here is some typical Linux output from the first command. In this example, the root file system (/), which contains almost all the data on the system, has used only 9% of its allocated space. A smaller filesystem, /boot, has used 16% of its space. |
|
Filesystem 1K-blocks Used Available Use%
So you can compare, here is the output from the second command:
Filesystem Size Used Available Use%
|
|
The final disk storage program is quota. If you share a Unix or Linux system, there is a good chance your system administrator has imposed a quota on how much disk space each userid is allowed to use. If you exceed your quota, you will not be allowed to use any more disk file space until you delete some files. If your system has such a quota, you can use the quota program to check on your usage and limits: quota To display extra information, use the -v (verbose) option: quota -v Note: The three programs ls -s, du, df and quota estimate storage usage in different ways, so don't be surprised if the numbers vary somewhat. — hint — If you are using a shared system, it is important to remember that you are sharing. From time to time, use du to see how much disk space you are using. If you have files that you do not need, especially large files, be considerate and remove them. Don't think of it as being forced to live within your quota. Think of it as being a good neighbor.
Disk storage is measured in kilobytes, megabytes and gigabytes. One KILOBYTE (1K) is 1,024 (210) bytes; one MEGABYTE is 1,048,576 (220) bytes; one GIGABYTE is 1,073,741,824 (230) bytes. Within a text file, one byte holds a single character. For example, 100 characters require 100 bytes of disk storage. We have already discussed how to use ls -s and du to display the amount of disk space used by a file. Before we move on, there is an important point I want you to understand. The amount of disk space used by a file is not the same as the amount of data in the file. Here is why. Within a filesystem, space is allotted in fixed-size chunks called BLOCKS, which are either 512 bytes, 1K, 2K or 4K depending on the filesystem. The minimum amount of space that can be allocated for a file is a single block. Let's consider a filesystem that uses 1K (1024-byte) blocks. (This is typical for Linux.) A file that contains only 1 byte of data requires a full block. If the file grows to become a single byte larger than one block, it will require a second block. Thus, a file containing up to 1024 bytes of data will require 1 block. A file containing 1025 bytes of data will require 2 blocks. Question: How many blocks will a 1,000,000-byte file require? Answer: Assuming the block size is 1024 bytes, 1,000,000 divided by 1024 is a bit less than 976.6. Thus, a 1,000,000-byte file will take up 977 blocks. (This works out to 1,000,448 bytes.) So far, we have talked about how data is organized within a filesystem. But what happens when the files are written to a disk or other storage medium? For reasons of efficiency, disk storage space is also allotted in fixed-size chunks, which are called ALLOCATION UNITS or CLUSTERS. The size of an allocation unit depends on the filesystem and the storage device. For example, on one of my Linux systems, the block size is 1K. However, disk allocation units are 8K. Thus, a file that requires a single byte actually takes up 8K of disk space. Question: A file contains 8,500 bytes of data. How many blocks does it require? How much disk space will it take up? Answer: The file contains 8500/1024 = 8.3K bytes of data. Assuming the block size is 1K, the file will require 9 blocks. Assuming disk space is allotted in allocation units of 8K, the file will take up 2 allocation units, or 16K bytes of disk space. How do you determine the size of a block and an allocation unit on your system? We'll start with allocation units because the method is simpler. Our strategy is to create a very tiny file and then see how much space it takes up on the disk. This will be the size of a single allocation unit. The first step is to create a very small file. The following commands will do the job:
cat > temp
To start, enter the cat command (Chapter 16) to read input from the keyboard and redirect it to a file named temp. Note: If temp does not exist, the shell will create it for you. If temp already exists, the shell will replace it. Next, type a line that consists of a single character. In this case, I typed the letter "X" and pressed <Return>. This data will be written to the file temp. Finally, press ^D (Ctrl-D) to indicate the end of the data by sending the eof signal (see Chapter 7). We now have a very small text file consisting of two characters: an "X", followed by a newline. Enter the ls -l command (explained later in the chapter) to display the amount of data contained in the file: ls -l temp The output is: -rw-rw-r-- 1 harley staff 2 Aug 10 11:45 temp The file size is displayed just before the date. As you can see, the file contains 2 bytes of data. Now use the du program (discussed earlier in the chapter) to see how much disk space the file takes up: du -h temp Here is the output: 8.0K temp As you can see, in our example, the sample file takes up 8K of storage space on the disk, even though it contains only 2 bytes of data. Thus, we can conclude that the allocation unit for this system is 8K. To conclude our experiment, use the rm program (Chapter 25) to remove the temporary file: rm temp Finding the block size for the filesystem is tricky. Although some file programs, such as df, will display a "block size", this is not the official block size of the filesystem: it is just a convenient unit used by the program. The exact method for finding the definitive block size depends on which operating system you are using. With Linux, you use the dumpe2fs program; with Solaris, you use fstyp -v; and with FreeBSD, you use dumpfs. As an example, I'll show you how it works with Linux. (If you need more details on any of these programs, check with the online manual.) As I explained above, all the data within a filesystem is organized into blocks. One of the blocks, called the SUPERBLOCK, is a special data area that holds crucial information about the filesystem itself. With Linux, you can examine the contents of the superblock by using the dumpe2fs program. In particular, it is possible to display the block size used by the filesystem. Here is how to do it. 1. Find out the name of the special file that represents the file system, for example, /dev/hda1. To do so, you can use the df command (discussed earlier in the chapter). 2. To run dumpe2fs, you must be superuser. Use the su command to change to superuser (see Chapter 6). 3. Enter the dumpe2fs command, followed by the name of the special file. This command will display a lot of data from the superblock. The number you want is on a line that contains the string "Block size". So all you have to do is run the dumpe2fs command and grep the output for "Block size". Here is an example: dumpe2fs /dev/hda1 | grep "Block size" Note: If the shell can't find the dumpe2fs program, you will have to specify the full pathname. The program will be in /sbin: /sbin/dumpe2fs /dev/hda1 | grep "Block size" Here is some sample output. In this case, you can see that the filesystem block size is 1K (1024 bytes): Block size: 1024 If you want to take a minute to look at all the information from the superblock, pipe the output of dumpe2fs to less: dumpe2fs /dev/hda1 | less When you are finished, use the exit command to log out as superuser (see Chapter 6).
Whenever you type a command that uses filenames as arguments, you can specify multiple filenames by using certain metacharacters referred to as WILDCARDS. As you may remember from Chapter 13, a metacharacter is any character that is interpreted by the shell as having a special meaning. Wildcards have a special meaning when you use them within a filename. Here is an example. Let's say you want to list the names of all the files in your working directory that start with the letter "h". You can use: ls h* In this example, the * (star) is a metacharacter that matches any sequence of zero or more characters. At first glance, wildcards look a lot like the regular expression metacharacters we discussed in Chapter 20. In fact, wildcards are simpler. Moreover, they are used for only one purpose: to match a set of filenames when you type a command. Figure 24-5 shows the basic wildcards and their meanings. Before you move on, take a moment and compare this table with the ones that summarize regular expressions in Chapter 20. Figure 24-5: Summary of wildcards used to specify filenames Whenever you type a command that uses filenames as arguments, you can use wildcards to match multiple filenames. This table shows the various wildcards and how they are used. Note: When you type a pathname, you cannot match a / character; it must be typed explicitly.
When you use a wildcard, the shell interprets the pattern and replaces it with the appropriate filenames before running the command. For example, let's say you enter: ls h* The shell replaces h* with all the filenames in your working directory that begin with the letter h. Then the shell runs the ls command. For instance, let's say your working directory contains the following six files: a data-old data-new harley h1 h2 z If you enter the command above, the shell changes it to: ls h1 h2 harley You can, of course, use more than one pattern in the same command: ls h* data* In our example, the shell would change the command to: ls h1 h2 harley data-old data-new Using wildcards to specify files is known formally by different names, depending on which shell you are using. With Bash, it is called PATHNAME EXPANSION; with the Korn shell, it is called FILENAME GENERATION; with the C-Shell and Tcsh, it is called FILENAME SUBSTITUTION. When the shell performs the actual substitution, it is called GLOBBING. Sometimes, the word GLOB is used as a verb, as in, "Unless you set the noglob variable, the C-Shell globs automatically." As I mentioned, when wildcards are globbed by the shell, the wildcards are changed to actual filenames before the arguments are passed to the program. If you use a pattern that does not match any files, the shell will display an appropriate message. For example, let's say your working directory contains the files listed above, and you enter the following command: ls v* This command lists all the files that begin with the letter "v". Since there are no such files, ls displays an error message: ls: v*: No such file or directory Now that you understand the main concepts, let's cover the wildcards in detail, one at a time. The most important wildcard, * (star), matches zero or more characters. The * wildcard will match any character except / (slash) which, as you know, is used as a delimiter within pathnames. (If you want to specify a /, you must type it yourself.) For example, the following wildcard specifications match patterns as indicated:
The ? (question mark) wildcard matches any single character except /. For example:
You can specify a list of characters by using [ and ] (square brackets) to enclose the list. This represents a single instance of any of the specified characters. For example:
To match any character that is not in a list, put a ^ (circumflex) at the beginning of the list. (With the Tcsh, you use ^ instead.) For example, the following commands display the names of all the files in your working directory that do not begin with the letters "H" or "h": ls [^Hh]* With POSIX, you would use: ls [!Hh]* Within square brackets, you can specify a range of characters by using a - (dash). For example, the pattern [0-9] matches any of the digits 0 through 9. Using a range with letters works the same way, but you must be careful: ranges of letters are expanded according to the collating sequence that is used with your locale. (See the discussion earlier in the chapter.) Consider the following two examples: |
|
|
If you are using the C collating sequence (C locale), the order of the letters is ABCDEF...abcdef... Thus, the examples above will work the way you expect. However, if you use the dictionary collating sequence (en_US locale), the examples will not work properly because the order of the letters is aAbBcCdDeEfF...zZ. More specifically, with the C collating sequence, [a-z] matches any of the lowercase letters, which is what you would want. With the dictionary collating sequence, [a-z] matches any of the upper- or lowercase letters except "Z", not at all what you want. Similarly, with the C collating sequence, [A-Z] matches any of the uppercase letters. With the dictionary collating sequence, [A-Z] matches any upper- or lowercase letter except "a", again not what you want. For this reason, I strongly suggest you use the C collating sequence, not the dictionary collating. To do so, you must make sure the LC_COLLATE environment variable is set to C not en_US. (There are instructions earlier in the chapter.) If, for some reason, you do decide to stick with the dictionary collating sequence, you won't be able to use [a-z] or [A-Z] as wildcards. However, there are several predefined character classes you can use instead. I have listed the most important ones in Figure 24-6. For a detailed discussion of predefined character classes, see Chapter 20. Figure 24-6: Wildcards: Predefined character classes Wildcards can use ranges to match any character from a specific set. The most common ranges are [a-z] to match a lowercase letter, and [A-Z] to match an uppercase letter. As explained in the text, these ranges work with the C locale, but not with the en_US locale. As an alternative, you can use predefined character classes, the most important of which are listed in this table. For more details, see Chapter 20.
Here is an example. You want to display the names of the very oldest Unix programs. Most of these names consist of two lowercase letters, like ls and rm. The best places to look for such programs are /bin and /usr/bin (see Chapter 23). If you use the C locale, you can use the following command. Try it on your system and see what you find. ls /bin/[a-z][a-z] /usr/bin/[a-z][a-z] If you use the en_US locale, you will get spurious results if there happen to be any 2-letter names that contain an uppercase letter. In this case, the correct command would be: |
|
ls /bin/[[:lower:]][[:lower:]] /usr/bin/[[:lower:]][[:lower:]] |
|
You can see why I recommend always using the C collating sequence. So far, we have talked about the three different types of wildcards we use with filename expansion: * to match zero or more characters, ? to match any single character, and [ ] to define a list. The final wildcard pattern we need to discuss allows you to specify more than one character string and then match each of the strings in turn. To do so, you use { and } (brace brackets) to enclose a list of patterns, separated by commas. For example: {harley,weedly} Important: Do not put spaces before or after the commas. When you use brace brackets in this way, it tells the shell to form a separate filename using each pattern in turn. We call this BRACE EXPANSION. Brace expansion is available only with Bash, the Tcsh and the C-Shell (not with the Korn Shell or the FreeBSD Shell). When a command is processed, brace expansion is done before filename expansion. Here is an example. Say that you want to list the names of all the files in the directories /home/harley, /home/weedly and /home/tln. You could specify all three directory names explicitly: ls /home/harley /home/weedly /home/tln With brace expansion, the command is simpler: ls /home/{harley,weedly,tln} Here is a second example. You want to combine the contents of the files olddata1, olddata2, olddata3, newdata1, newdata2 and newdata3, and store the output in a new file named master. Use any of the following commands: |
|
cat olddata1 olddata2 olddata3 newdata1 newdata2 newdata3 > master
|
|
(The cat program, which combines files, is discussed in Chapter 16. The > character, which redirects the standard output, is discussed in Chapter 15.) Brace expansion is important because it can be used in two ways. First, as you have seen, it will match a set of files that have common names. Second, when you are creating new files, it can also be used to describe file names that do not exist. For example, let's say your home directory contains a subdirectory named work. The following two mkdir commands both create four new subdirectories in the work directory. Notice how convenient it is to use brace expansion: |
|
mkdir ~/work/essays ~/work/photos ~/work/bin ~/work/music
|
|
One last example. In Chapter 25, you will learn how to use the touch command to create empty files quickly. Let's say you want to create the following five new files: dataold datanew databackup datamaster datafinal Using brace expansion, the command is: touch data{old,new,backup,master,final} What's in a Name? Wildcard, Globbing The term "wildcard" comes from poker and other card games in which certain cards are designated as being "wild". In a poker game, wild cards can take on a variety of different values. "Globbing" refers to expanding a pattern with wildcards into a list of filenames. The term "glob" dates back to the very first Unix shell, even before the Bourne Shell (see Chapter 11). At the time, wildcard expansion was performed by a separate program (/etc/glob) called by the shell. No one knows why the program was named glob, so you can make up your own reason. Within the Unix community, the idea of globbing is so common that the idea of globbing is used by geeks in everyday discourse. For example, say that one geek text messages to another geek, "Which is your favorite Star Trek show, ST:TOS, ST:TNG or ST:DS9?" The second geek might reply, "I don't watch ST:*". In a similar vein, you will sometimes see the name UN*X used to represent any type of Unix or Linux. This dates back to the 1970s, when AT&T was claiming that UNIX was a registered trademark, and no one could use the name without their permission. For example, the AT&T lawyers said that UNIX was an adjective, not a noun and that one must never refer to "UNIX", only "the UNIX operating system". In response to such silliness, many Unix geeks started to write UN*X to refer to any type of Unix.
By default, the ls program will not display any filenames that begin with a . (dot) character. Thus, if you use a file that you don't want to see each time you use ls, all you have to do is give it a name that begins with a dot. As we discussed in Chapter 14, such files are called DOTFILES or HIDDEN FILES. Most of the time, dotfiles are used by programs to hold configuration data or initialization commands. For example, all shells use dotfiles, as does the vi/Vim editor (see Figure 24-7). Figure 24-7: Dotfiles used by the shells and by vi/Vim Any file whose name begins with a . (dot) is called a dotfile or a hidden file. The ls program does not display the names of dotfiles unless you use the -a option. Dotfiles are most often used by programs to hold configuration data or initialization commands. Here, as examples, are the dotfiles used by the various shells and by the vi/Vim text editor.
To display the names of hidden files, you use ls with the -a (all files) option. For example, to see the names of your hidden files, change to your home directory and use ls -a:
cd
Most likely, you will also see some directory names that start with a dot. Such directories are also hidden and you will not see them with ls unless you use the -a option. When you use -a, you see all your files. Unfortunately, there is no option to display only dotfiles. However, by using wildcards, you can restrict the list of filenames to show only the dotfiles. For example, the following command displays the names of all the files in the working directory whose names begin with a . followed by a letter: ls .[a-zA-Z]* The following command is a bit complex but much more useful. It also displays dotfiles. However, it omits both . and .., as well as the contents of any hidden directories: ls -d .??* Figure 24-7 lists the names of the standard dotfiles we have already covered (Chapter 14 for the shell, Chapter 22 for vi and Vim). These are files that, one day, you may want to change. Most likely you will find a lot of other dotfiles in your home directory. Unless you know what you are doing, however, you should leave them alone. — hint — Many of the dotfiles in your home directory are important. Before you edit one of these files, it is a good idea to make a copy. To do so, use the cp program (Chapter 25), for example: cp .bash_profile .bash_profile.bak If you accidentally ruin the file, you will be able to restore it. To do so, use the mv command (also Chapter 25), for example: mv .bash_profile.bak .bash_profile
When you use the ls program, there are several options that will display a variety of information along with the names. The most useful of these options is -l, which stands for "long listing": ls -l If the listing is so long that it scrolls off your screen, you can pipe it to less: ls -l | less Here is some sample output, which we will analyze: |
|
total 32
|
|
On the far right you see the names of the files. In this case, there are four files: application, bin, music and partylist. On the far left, at the beginning of the line, there is a one-letter indicator showing you the type of file. We'll talk more about this in a moment. For now, I'll mention that a - (dash) indicates a regular file; a d indicates a directory. Thus, application and partylist are regular files; bin and music are directories. To the left of the filenames there is a time and date. This is called the MODIFICATION TIME. It shows when the file was last changed. In our example, the file application was last changed on April 2 at 9:52 PM. (Remember, Unix uses a 24-hour clock; see Chapter 8 and Appendix F.) As an alternative, you can use -u with -l to display the ACCESS TIME instead of the modification time. The access time shows the last time the file was read. For example: ls -lu application The output is below. As you can see from the output above, the file application was last changed on April 2 at 9:52 PM. However, as you can see from the output below, the file was last read on April 11 at 3:45 PM: |
|
-rw-rw-r-- 1 harley staff 2255 Apr 11 15:45 application |
|
If you want to display the files sorted by time, use the -t option:
ls -lt
Here is the output from the first command, displaying the files from newest (most recently modified) to oldest (least recently modified): |
|
total 32
|
|
If you combine -t with the -r (reverse) option, ls displays the files from oldest to newest:
ls -lrt
For example: |
|
total 32
|
|
— hint — Let's say your working directory has a great many files, and you want to display information about the most recently modified files. The easiest way is to display the files in reverse, time-sorted order: ls -lrt To display the most recently accessed files, use: ls -lrtu Because you are working in a large directory, most of the file names will scroll off the screen. However, it doesn't matter, because all you care about is the last few lines. Returning to our discussion, at the very top of the listing, ls shows the total number of filesystem blocks used by all the files being listed. In this case, the two files and two directories use a total of 32 blocks. (For an explanation of filesystem blocks, see the discussion earlier in the chapter.) To the left of the date, you see the size of each file in bytes. If the file is a text file, each byte will hold a single character of data. For example, the file partylist is a text file that contains 663 characters, including the newline at the end of each line of text. Similarly, the file application contains 2,255 bytes of data, including newlines. It is important to realize that the number you see here shows the actual amount of data contained in the file, not the amount of storage space taken up by the file. If you want to find out how much space the file occupies, you must use the du or ls -s commands, discussed earlier in the chapter. By default, ls displays file sizes in bytes, which can be confusing when the numbers are large. To display larger numbers in units of kilobytes (K) or megabytes (M), use the -h (human-readable) option: ls -hl For example, the following output shows the same files as above: |
|
total 32
|
|
Notice that the two directories each use 4,096 bytes, which is exactly 4K. This is because this particular system uses allocation units of 4K, and every directory starts out with a minimum of 1 allocation unit. (Allocation units are discussed earlier in the chapter.) It is important to remember that the number 4K refers to the size of the directory itself, not the contents of the directory. Although we often talk about a directory as if it "contains" a number of files, it's only a metaphor. Directories take up only a small amount of storage space because they contain information about files, not the files themselves. At the far left of each line, the first character shows you the type of file. There are several possibilities, which are summarized in Figure 24-8. As I mentioned, the most important characters are - (dash) which indicates an ordinary file and d which indicates a directory. Although the - character identifies an ordinary file, it doesn't tell you anything about the file. If you want more information, you can use the file command (described earlier in the chapter). For example, in the listing above you can see that partylist is an ordinary file. If you want more information, enter: file partylist The output is: partylist: ASCII text Figure 24-8: File type indicators used by ls -l When you use ls with the -l (long listing) option, information about each file is displayed on a separate line. At the far left of the line, ls displays a single character indicating the type of file. Here is a list of the most important indicators.
Returning to the file indicators, the less common characters are l (lowercase letter "l") for a symbolic link (Chapter 25), p for a named pipe (Chapter 23), and b and c for special files (Chapter 23). When it comes to special files, Unix distinguishes between two types of devices. Devices such as terminals that process one byte of data at a time are called CHARACTER DEVICES. Devices such as disks that process a fixed number of bytes at a time are called BLOCK DEVICES. The letter c identifies special files that represent character devices; b identifies special files that represent block devices. To the left of the file size are two names, the userid and group of the owner of the file and the group to which that userid belongs. In our example, all the files are owned by userid harley, which is in the group named staff. (Some versions of Unix do not show the group unless you use the -g option.) To the left of the userid is a number that shows how many links there are to this file. Finally, the string of nine characters at the far left (just to the right of the initial character) shows the file permissions. We will discuss these four concepts — file ownership, groups, links, and permissions — in Chapter 25, at which time we will look at the output of the ls -l program in more detail. When you specify the name of a directory, ls lists information about the files in that directory. For example, to display a long listing about all the files in the /bin directory, you would use: ls -l /bin | less If you want information about the directory itself, use the -d (directory) option. This tells ls to consider directories as files in their own right. For example, to display information about the /bin directory itself, not the contents of /bin, you would use: ls -dl /bin Here is some sample output: drwxr-xr-x 2 root root 4096 Dec 21 2008 /bin This is a handy option to remember when you are listing a number of files, some of which are directories, and ls displays unwanted information about the contents of every directory. When you use -d, it tells ls not to look inside any of the directories. The information displayed by the -l option can be used in many imaginative ways by piping the output to a filter (see Chapters 16-19). Here are two examples to give you some ideas. To list the names of all the files that were last modified in September, you can use: ls -l | grep Sep To count how many files were last modified in September, use: ls -l | grep Sep | wc -l
The ls program is used a lot. Indeed, as I mentioned earlier, I consider ls to be the most useful program in the entire Unix toolbox. For this reason, it is common to define aliases to make it easy to use ls with the most commonly used options. Once you find aliases you like, you can make them permanent by putting them in your environment file. (For a detailed discussion of aliases, see Chapter 13; for information about the environment file, see Chapter 14.) There are two types of aliases you can use with ls. First, there are aliases that redefine ls itself. For example, let's say that, whenever you use ls, you always want the -F and --color options. Just use one of the following aliases. The first one is for the Bourne shell family; the second one is for the C-Shell family:
alias ls='ls -F --color=auto'
The second type of alias makes up a new name for a particular variation of ls. Here are the aliases for the Bourne Shell family:
alias ll='ls -l'
For the C-Shell family:
alias ll 'ls -l'
These aliases make it easy to display a long listing (ll), a list of all files (la), a long listing of all files (lla), and a listing of only dotfiles (ldot). For example, once you have defined the ll alias, you can display a long listing of the /bin directory by using: ll /bin To display a long listing of your working directory, including dotfiles, use: lla To display only your dotfiles, use: ldot My suggestion is to put these aliases in your environment file and spend some time using them. Once you get used to these aliases, you won't want to do without them.
If you use Linux, there is a powerful tool called tree that will draw you a picture of any part of the filesystem. The syntax is: tree [-adfFilrst] [-L level] [directory...] where level is the depth to descend into the tree, and directory is the name of a directory. To see how it works, list the tree for the entire filesystem. Because the tree will be huge, you will need to pipe it to less. When you get tired of reading, press q to quit. tree / | less Most of the time, you would use tree to visualize your own files. To display your part of the filesystem, use: tree ~ | less Here is some typical output:
/home/harley
In this example, the home directory has two subdirectories, bin and essays. The bin directory contains two files. The essays directory contains two subdirectories of its own, history and literature, both of which contain two files. The tree program has a lot of options. I'll explain the most important ones, so you can experiment. To start, some of the options are the same as we use with ls. The -a option displays all files, including dotfiles; -s displays the size of each file as well as the name; -F displays a flag showing the type of file; -r sorts the output in reverse order; -t sorts the output by modification time. In addition, tree has its own options. The most useful is -d which displays directories only, for example: tree -d ~ | less Using the same tree structure as above, the output is:
/home/harley
The -f option displays full pathnames, for example: tree -df ~ | less The sample output is:
/home/harley
The -i option omits the indentation lines. This is useful when you want to collect a set of pathnames: tree -dfi ~ | less The sample output is:
/home/harley
To limit the depth of the tree, you can use the -L (limit) option, followed by a number. This tells tree to only descend that many levels into the tree, for example: tree -d -L 2 /home Finally, the -l option tells tree to follow all symbolic links (see Chapter 25) as if they were real directories. To conclude this section, here is an example of how you can use tree to find all the directories named bin in the entire filesystem. The idea is to start from the root directory (/), limit the search to directories only (-d), display full pathnames (-f), omit indentation lines (-i), and then send the output to grep (Chapter 19) to select only those lines that end with /bin. The command is: tree -dif / | grep '/bin$' Here is some sample output:
/bin
In this chapter, we have discussed the basic operations you can use with directories: creating, deleting, moving and renaming. We have also discussed how to change your working directory and how to use ls to display the contents of a directory in various ways. In Chapter 25, we will cover analogous topics with respect to ordinary files. In particular, I will show you how to create, copy, rename, move and delete files, and how to use ls to display information about files. In both chapters, we use text-based commands that we enter at the shell prompt, the standard Unix CLI (command-line interface) we first discussed in Chapter 6. As powerful as the directory and file commands are, there is an alternative I want you to know about. Instead of typing commands, you can use a FILE MANAGER, a program designed to help you manipulate directories and files. File managers use the entire screen or window to display a list of files and directories. By pressing various keys, you can perform any of the common operations quickly and easily. Each file manager works in its own way, so I won't go into the details: you will have to teach yourself. Typically, it can take awhile to master a file manager, but once you do, using it becomes second nature. To start, read the built-in help information. The classic file manager was the Norton Commander, an extremely popular tool, first written in 1986 by programmer John Socha for the old DOS operating system. Over the years, the dual-panel design developed by Socha has been cloned and extended many times. If you are a Windows user, you probably have some experience with a different type of design, as implemented by Windows Explorer, the default Windows file manager. In general, we can divide file managers into two families, GUI-based and text based. The GUI-based file managers are designed to be used with a graphical desktop environment, such as Gnome or KDE (see Chapter 5). Most desktop environments come with a default file manager: for Gnome, it is Nautilus; for KDE it is Konqueror (see Figure 24-9). However, there are a variety of other graphical file managers available for free if you want more choice. The text-based file managers are for use within a text-based environment, for example, when you use a virtual console (Chapter 6) or when you access a remote Unix host with a terminal emulator (Chapter 3). |
|
|
For reference, here is a list of selected file managers you may wish to try.
Graphical File Managers:
Text-Based File Managers:
Finally, there is one more tool I want to mention. You can use the Vim text editor (Chapter 22) to perform file operations. Just start Vim with the name of a directory, and Vim will let you perform basic operations on the files within that directory. Try it when you get a chance. Note: This feature will not work when you start Vim in compatibility mode, that is, with the -C option (see Chapter 22).
Review Question #1: What is a pathname? What is the difference between an absolute pathname and a relative pathname? Review Question #2: What is the working directory? What is another name for it? Which command displays the name of your working directory? Show another way to display the same information. Which three commands are used to change your working directory? Suppose you want a constant reminder of the name of your working directory. How would you arrange that? Hint: Think about your shell prompt. Review Question #3: What program do you use to list the names of the files in a directory? Which options do you use to display:
• All files, including dotfiles (hidden files)
When you look at a directory listing, what do the entries . and .. mean? Review Question #4: What is globbing? What are wildcards? What are the five different wildcards? What does each one match? How is globbing different from using regular expressions? Review Question #5: What program do you use to draw a diagram of a directory tree? Which is the most useful option for this program? Applying Your Knowledge #1: Starting from your home directory, using as few commands as possible, create the following directories :
temp/
Display a diagram of the directory tree starting from temp that shows only directories. (Note: You may not have the program to do this if you are not using Linux.) Applying Your Knowledge #2: Starting with the directories from the the previous question, and using commands that are as short as possible, create the following empty files. (Hint: Use the touch command to create the files. It is explained in Chapter 25, and there is an example in this chapter.)
• In the harley directory: create notes, questions, answers.
Display a diagram of the directory tree starting from temp showing all files and directories. Applying Your Knowledge #3: Clear the directory stack. Now push the following two directories onto the stack:
~/temp/books/unix/harley
Display the contents of the stack so that each element is on a separate line with a line number. Using the stack, change to the harley directory. Applying Your Knowledge #4: Create two versions of a command to display the access times of all the files in your working directory with a name that consists of the characters "backup", followed by a single character, followed by 2 digits. The first command should use predefined character classes. The second command should use ranges. For Further Thought #1: You are teaching a Unix class, and it is time to explain how to create directories and how to think about the working directory. You have two choices. First, you can explain the concepts abstractly: we create directories as needed, and we use the cd command to change the value of the working directory. Alternatively, you can introduce the metaphor of a tree: directories are like branches of a tree, and using cd moves us from one branch to another. Which approach do you think is better? Why? For Further Thought #2: To display file types, you can use either ls -F and file. Why is it necessary to have two such commands?
List of Chapters + Appendixes
© All contents Copyright 2026, Harley Hahn
|