Harley Hahn's Guide to
Unix and Linux
|
|
Harley Hahn's Guide to
|
|
A Personal Note
Chapters...
Command
INSTRUCTOR |
Chapter 9...
Documentation:
Within the world of Unix, there are many different documentation systems, each with its own characteristics. Some are used widely; some serve a particular niche. In general, all such systems have two common goals: to make it easy for programmers to document their work, and to make it easy for users to learn how to use the tools created by the programmers. In this chapter, I am going to teach you how to use the two most important Unix documentation systems: the online Unix manual, a facility that comes with every Unix system; and Info, the official documentation system of the GNU project. Both of these tools are designed to be used with the Unix CLI (command line interface). The reason is that graphical programs are self-documenting, in the sense that they almost always have their own built-in help facility. Thus, when you want help with a GUI-based program, you don't use the online manual or Info. You look within the program itself, usually by pulling down a Help menu.
As we discussed in Chapter 2, Unix was developed in the early 1970s in New Jersey, at Bell Labs (then a part of AT&T). Soon after Unix was created, it became popular with programmers and researchers, first within Bell Labs and later in the computer science departments at a handful of research universities. As Unix grew in popularity, more and more people needed to learn how to use the system. However, the Bell Labs programmers were busy people who did not have the time, nor the inclination, to teach new users how to use Unix. Moreover, the prevailing culture encouraged anyone to create new tools and share them with other users. Thus, from one month to the next, the amount of material that one might need to learn increased, as did the number of new users. In response to these needs, the Unix developers adopted a two-part solution. First, they created an online manual, built into Unix itself, which contained information regarding every Unix tool. Since the Unix manual was itself part of Unix, it was available to all users all the time. This meant, for example, when a user at a far-away location had a question in the middle of the night, he or she would be able to turn to the manual for help. The second part of the solution was to encourage a work environment in which all Unix users — both new and experienced — were expected to try to answer their own questions before they asked for help. To be precise, what we might call the Unix tradition requires you to teach yourself and try to solve your own problems. However, if you have tried your best and you still have a problem, other Unix people will be glad to help you. The converse of this is that, once you are experienced, you are expected to help others. This Unix tradition was important for two reasons. First, it provided an efficient way for Unix to spread. Since people would only ask for help if they really needed it, experienced people were not called upon to waste their time helping others unnecessarily. Second, by making people responsible for teaching themselves, the Unix developers encouraged the type of independent thinking and personal creation that caused Unix to flourish. In fact, the Unix tradition bred a generation of users who were smart, independent, and willing to help others (when necessary), all working within an atmosphere of cooperative creativity. For example, if a programmer wanted a new tool, he was encouraged to create it for himself. Once the program was finished, it would be added to the general Unix system. The programmer would then write the relevant documentation, which would be added to the online manual. The new tool would be announced to the general Unix community, with the understanding that anyone who wanted to learn how to use it would read the online manual, experiment, and teach himself. If a user found a bug or had a serious problem, he or she was free to contact the author of the program. Thus, you can see the Unix tradition is based on two main ideas: Try your best to teach yourself before you ask for help; when others ask you for help, give willingly of your time. These ideas proved to be so important that they become embodied in a single, very odd word: RTFM. What's in a Name? Online In the old days, the word ONLINE was used to describe the idea of being connected to a specific computer system. For example, when you were logged into a system, we would say you were online. When we talk about the online Unix manual, we are using the word in this way. The manual is "online" because it is available to all the users of a particular Unix system. Today, we also use the term "online" to indicate that a resource or a person is connected to the Internet, not to a specific computer system. For example, once you are connected to the Net, you can use online banking, online bill paying, and even participate in an online relationship. Thus, as a Unix user, you are online in two different ways: you are logged into a particular Unix system, and you are connected to the Internet.
The word RTFM is unique in several ways. First, it is the longest verb in the English language without vowels. Second, it is usually spelled with all uppercase letters. Finally, because RTFM has no vowels, the word is pronounced as four distinct letters ("R-T-F-M"), even though it is not an acronym. As I mentioned, RTFM is a verb. (I'll explain its origin in a moment.) We use it to embody the idea that, before you ask for help or information, you must try to solve the problem or find the information for yourself. The word RTFM can be used in two ways. First, First, you can tell someone not to bother you for help until he has tried to help himself. For example, if someone says to you, "Can you show me how to use the whatis command?" you might reply, "RTFM." In this case, RTFM means, "Don't ask for help until you have checked with the online Unix manual." Second, you can also use RTFM to indicate you have tried to solve a problem on your own before asking for help. For example, you might email a message to a friend: "Can you help me get my Linux system to share files with a Windows PC? I have RTFM'd for two days now, and I still can't get it to work without having to reboot Windows every few hours." Since the early days, the idea of RTFM has been an integral part of the Unix culture. Today, its use is also widespread on the Internet, especially within Usenet and the open source community. (See Chapter 2 for a discussion of the open source movement.) As the use of RTFM has expanded, so has its meaning. Today, the doctrine of RTFM requires you to look for information — not only in the online Unix manual — but on the Internet as well. Thus, it is a good idea not to ask for help until you have at least used a search engine, such as Google, to look for relevant Web sites. With respect to Usenet, if you are a newcomer to a discussion group, it is expected that you will read the FAQ (frequently asked question list) for that group before you send in your first posting. This too is considered RTFMing. — hint — When you are looking for solutions to Unix problems, don't forget Usenet, the worldwide system of discussion groups. The easiest way to search Usenet is to use the Google Usenet archive, called Google Groups. I have often found answers to even the most obscure questions by searching the Usenet archive. If after all your searching, you can't find what you want, you can post a request in the appropriate discussion group. If you do, be sure to mention that you have already RTFM'd. What's in a Name? RTFM, RTFM'd RTFM is a verb, indicating the idea that, when you need information or you are working on a problem, you should spend some time trying to find what you need on your own before you ask someone else for help. When we talk about already having performed such actions, we use the past participle of the verb, which is spelled RTFM'd, not RTFMed. Thus, you might say, "I have RTFM'd for the last two hours, and I can't figure out how to connect my cat to the Internet." Like many technical words, RTFM started life as an acronym. In the early days of Unix, RTFM stood for "Read the fucking manual,"(*) referring, of course, to the online Unix manual. Today, however, RTFM is not an acronym, but a legitimate word in its own right. This is not unusual. The same can be said for many other technical words, such as radar ("radio detection and ranging"), laser ("light amplification by stimulated emission of radiation"), and scuba ("self-contained underwater breathing apparatus"); as well as various proper nouns, such as Nato ("North Atlantic Treaty Organization"), and collective nouns, such as yuppie ("young urban professional"). The biggest difference between RTFM and other such words is that RTFM is normally spelled with uppercase letters. This only makes sense as RTFM is much more important to our culture than radar, laser, scuba, Nato or yuppies. * Footnote Sometimes you will see RTFM explained by using the euphemism "Read the fine manual". However, as you know, it is my practice within this book to explain things as they really are. In this case, as you can see, the original meaning of RTFM used profanity, and I think you should know the truth. Thanks for not being offended.
The UNIX MANUAL, often referred to as the ONLINE MANUAL or, more simply, the MANUAL, is a collection of files, each of which contains documentation about one specific Unix command or topic. The manual is available on every Unix system, where it is accessible to any user at any time. To use the manual, you enter a simple command (which we will discuss in a moment). The information you requested is then presented to you, one screenful at a time. In the olden days (of mainframe computers), most computer systems came with a large amount of highly technical, printed documentation, which was kept in a central location, such as a computer room or a terminal room. Not only was the documentation awkward to use, it was often out of date, and it was common to have to deal with a stack of printed updates. For this reason, the old-time computer manuals were stored in large, unwieldy holders that could be opened to insert new pages, but were generally awkward to use or to move from one place to another. Unix was different. From the beginning, the documentation was always online, which meant that it was convenient for any user to read whatever he needed, whenever he wanted, on his own terminal. Moreover, because the online manual was stored as a collection of disk files, it was a simple matter to add new material by adding a new file, or update existing material by modifying a file. In the very early days,Unix systems did have a printed manual as well as the online manual. However, the information in the printed manual was the same as what was already available online. Accessing the Unix manual is easy. All you need to do is type the word man, followed by the name of the command you want to know about. Unix will display the documentation for that command. For example, to display the documentation about the cp (copy a file) command, enter: man cp Suppose you want to learn about the man command itself. Just enter: man man — hint — The man command is the single most important Unix command, because you can use it to learn about any other command. If you want to learn about more than one command name, just enter all the names on the same line. For example: man cp mv rm Unix will display the documentation for each command in turn. These three commands, by the way, are used to copy, rename [move], and delete [remove] files. We will meet them more formally in Chapter 25. What's in a Name? The Manual Unix manuals have always been important. Indeed, at one time, when Unix was primarily a product of AT&T's Bell Labs, successive versions of Unix were named after the current edition of the manual: Unix Sixth Edition, Unix Seventh Edition, and so on. Although there are many Unix books and references, when a Unix person refers to "the manual", you can assume that he or she is talking about the one and only online Unix manual. For example, say you are reading an email message from your system administrator describing a new program he has just installed on the system. At the end of the message, he says, "For more information, check the manual." You can assume, without asking, that he wants you to use the man command to read the appropriate entry in the online manual. To a Unix user, there is never any doubt as to which manual is The Manual.
In the very early days, Unix users used slow terminals that printed output on paper. Since there were no monitors, when someone wanted to learn about a command, he or she would have to print the relevant pages of the online manual. This wasn't as inconvenient as it might sound because, at the time, there weren't that many entries in the manual, and many of them were designed to fit on a single page. Today, the Unix manual has a large number of entries, many of which are much longer than a printed page. Still, it is the custom to refer to a single entry, no matter how long it is, as a PAGE or, more formally, as a MAN PAGE. For example, the documentation for Bash, the default Linux shell (which we will meet in Chapter 12), runs to well over 4,500 lines. Still, it is considered to be a single man page. Consider this example of word usage. You are in a Unix bar, quaffing down a glass of caffeinated chocolate milk, and you happen to overhear two programmers talking. The first one says, "I can't decide what to get my girlfriend for Valentine's Day. Do you have any ideas?" to which the other programmer replies, "Why not print her a copy of the Bash man page?"
Virtually all the entries in the online manual are longer than the number of lines on your screen. If an entry were displayed all at once, most of it would scroll off the screen so fast that you would not be able to read the text. This is a common situation for which Unix has a good solution: send the output to a program that displays the output more carefully, one screenful at a time. There are three such programs, called paging programs, that are commonly used on Unix systems. Their names are less, more and pg. The best — and most widely used — paging program is less, which we will talk about in detail in Chapter 21. For now, I will give you a brief overview, so you will know enough to be able to read the online manual. If you want to practice as you are reading, enter one of the following commands, each of which displays information about a particular shell: Bash, the Korn shell, or the C-Shell:
man bash
My suggestion is to display the man page for the shell that you plan on using or that most people use on your system. If you are not sure, just pick one — it's only for practice. The job of a paging program is to display data one screenful at a time. After each screenful, the program pauses and displays a prompt at the bottom left-hand corner of the screen. The prompt differs depending on what paging program is being used. The less and pg programs display a colon: : On some systems, less displays a message instead of the colon. For example: byte 1357 In this case, less is telling you that it has just displayed character number 1357. (Each byte holds one character.) As you page through the file, this number will increase, giving you a rough idea of how far you are from the beginning. The more program displays a prompt that contains the word "More". For example, you might see: --More--(10%) This means that there is more to come and that you are 10 percent of the way through the page. Once you see the prompt, you can display the next screenful of information by pressing the <Space> bar. (With pg, you press <Return>.) When you are finished reading, press q (the letter "q") to quit. As you are reading a man page, there are many commands you can use. Normally, however, you won't need them. Most of the time, you will simply press <Space>, reading one screenful after another. When you reach the end of the page, or when you find what you want, you will press q to quit. From time to time, you may want to use some of the other commands, so I'm going to take a moment to describe the ones that I find most useful. These commands are summarized in Figure 9-1. As I mentioned, there are many others, more than you will ever need. Note: The commands in Figure 9-1 are for systems that use less. If your system uses more or pg, there will be some differences. If you have a problem, use the h command for help.
With any program, the most important command is the one that displays the help information. In this case, all you need to do is press h (the letter "h"). When you do, the man page information will be replaced by a summary of all the paging commands. When you are finished reading the help information, press q to quit and return to the man page. Note: The summary is quite long and, just as with the man page itself, you will have to press <Space> to work your way through the information. However, the most important commands will be near the top of the summary. The commands I am about to discuss are for the less paging program, because it is used with most Unix systems. If your man command uses either more or pg, all you have to do is press h, to get the help summary for that particular paging program. My suggestion is that, as you read, follow along at your computer, trying the various commands. To start, if you are looking for a specific pattern, press the / (slash) character, type the pattern, and then press <Return>. For example: /output<Return> This example tells the paging program to skip forward to the next line that contains the word "output". Once you have specified a pattern, you can search for it again by entering the / character by itself: /<Return> If you search for a pattern, but it's not the line you want, you can keep searching for the same pattern, over and over, until you find what you do want. Just keep pressing /<Return>(*). * Footnote This feature is taken from the vi editor, which we will meet in Chapter 22. Alternatively, you can press n (next) to search for the same pattern, either once or more than once. To search backward, use ? instead of /. For example: ?output<Return> To search backward for the same pattern, use ? by itself: ?<Return> Alternatively, you can press N to search backward for the same pattern. To move down one screenful, as you already know, you press <Space>. You can also press f (for forward). To move up one screenful, press b (for backward). Alternatively, you can move down and up by pressing <PageDown> and <PageUp>. To move down one line at a time, press the <Return> key or the <Down> key (that is, the down-arrow key). To move up one line at a time, press the <Up> key (that is, the up-arrow key). To jump to the top of the page, press g ("go to top"). To jump to the bottom of the page, press G ("go to bottom").
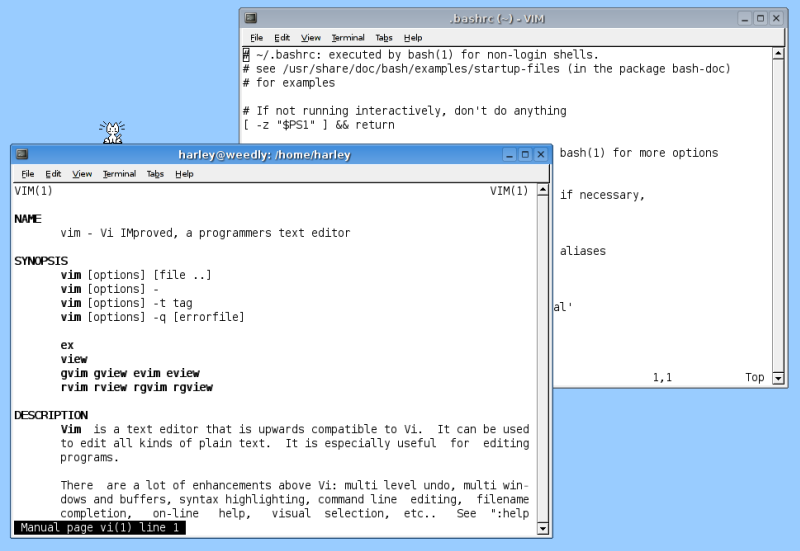
The way in which you read man pages — so far as we have discussed it — is conceptually simple. You use the man command to display information about a particular topic. You then look at the information, one screenful at a time, until you find what you want. This is the common way to read man pages using the standard Unix CLI (command line interface). However, if you put the man command together with the Unix working environment, you can access man pages in a more sophisticated way. As we discussed in Chapter 6, you can use the CLI in two ways, with a terminal window or with a virtual console. My suggestion is to learn how to use two terminal windows at the same time, one for doing your work and the other for displaying man pages. For example, let's say you are working within one terminal window, editing a file with the vi text editor (see Chapter 22). You need some help, so you decide to look at the vi man page. If you do so by displaying the page in a second terminal window, you can look at both the man page and the original window at the same time. You can see this in Figure 9-2. | |||||||||||||||||||||||||||||||||||||||||||||||||||||||||||||
|
To become a skillful Unix user, you need to master the skill of using more than one window at a time. More precisely, you must be able to answer the questions: When should I use a single window? When should I use two windows? When should I use more than two windows? When do I want to forget about windows and use virtual consoles? The answers to these questions aren't obvious, and you will find your skills growing with your experience. The trick is to never allow yourself to get into a rut. For example, don't always use one window, or don't always use two windows in the exact same way. To further add to your bag of tricks, I'd like to teach you one more tool to use while reading a man page. As you are reading a man page, if you type an ! (exclamation mark), you can follow it with a shell command. The man program will send the command to the shell, which will run it for you. When the command is finished, you can press <Return> to go back to the man program. To see how this works, display a man page and type: !date<Return> In this case you are entering the date command from within the man program. The result is that you see the time and date. Once the date command is finished, simply press <Return> and you will be back where you were within the man program. As you might imagine, being able to enter a shell command whenever you want can be very useful. What is particularly handy is that you can use this technique to display one man page while you are reading another, without having to switch to a separate window. Here is how it works. Let's say that you are reading the man page about the man command: man man As you are reading the page, you see that there are several other related commands, among them whatis (which we will discuss later in this chapter). At this point, you decide that you'd like to pause what you are doing and read about whatis. Just enter: !man whatis<Return> When you are finished reading about whatis , press q to quit. You will then be asked to press <Return> and, once you do, you will be back in the original man program, reading about the man command. What's in a Name? Bang As a Unix user, you will, from time to time, use the ! (exclamation mark) character in a special way. Usually it will change the mode of what you are doing, so you can pause the current program and send a command to the shell. (See Chapter 6 for a discussion of the idea of modes.) As an example, as you are reading a man page, you can display the time and date by entering: !date<Return> When the ! character is used in this way — as a command and not as a punctuation symbol — it is given a special name. We call it a BANG CHARACTER or, more simply, a BANG. Thus, a Unix person might say, "If you are reading a man page and you want to display the time and date, just type 'bang-d-a-t-e' and press <Return>." The name "bang" is a slang term that has been used within the printing and typesetting professions for a long time. Its origins are unknown.
As I have explained you can use the man command to display pages from the online Unix manual. Aside from this command, there are two alternatives I want you to know about. First, the man pages for most Unix systems are available as Web pages on the Internet. This means that, whenever you want, you can use your browser to find and display a specific page. The advantage to reading man pages on the Web is that they will often have links that allow you to jump from one page to another. Regular man pages (using the man command) are plain text with a bit of highlighting, not hypertext with links. The easiest way to find the man page you want on the Web is to use a search engine such as Google to search for "man" followed by the name of a command, for example: "man whatis" Be sure to include the quotation marks. Alternatively, you can find a more general resource by searching for "man pages" followed by the name of your type of Unix, for example:
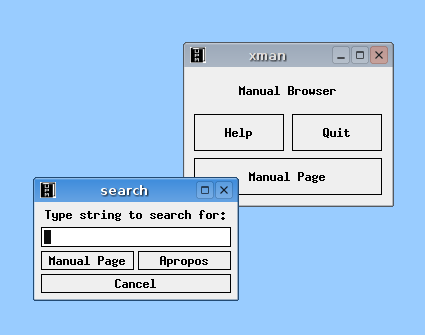
"man pages" Linux
Again, don't forget the quotation marks. — hint — When you get a moment, find some Web sites that offer the man pages for the type of Unix or Linux you are using. Choose one site that you particularly like, and save the URL (Web address) so you can access it quickly whenever you want. My suggestion is to save the URL as a button on the Links bar within your browser. That way, it will always be visible and easy to use. However, you can also save the URL as an icon on your desktop or as an entry in your Bookmarks/Favorites list. See what works best for you. An alternative to using Web-based man pages is xman, a GUI-based program that acts as a man page browser. (The "x" indicates that the program is written for X-Window based GUIs; see Chapter 5.) If xman is available on your system, it is well worth your while to take a few moments to experiment and learn how to use it. To start xman, type the following at the command line: xman& Using the & (ampersand) character tells the shell to start the program running on its own in the background. When xman starts, it displays a simple window with three large buttons labeled Help, Quit, and Manual Page (see Figure 9-3). It is much easier for you to read the instructions than for me to explain the full complexity of the program, so I'll restrict myself to giving you only two hints.
First, to get started, just click on the Help box and read the instructions. Second, any time the focus is on an xman window, you can press ^S (<Ctrl-S>) to display a small search box. This makes it easy to find what you want (see Figure 9-3). Try it, so you can see what I mean.
The best way to think about the online manual is to imagine a gargantuan reference book that lives somewhere inside your Unix system. The book is like an encyclopedia in that it contains many entries, in alphabetical order, each of which covers a single topic. You can't turn the pages of this book; hence, there are no page numbers and no formal table of contents or index. However, there are several layers of organization that are appropriate to an electronic book. Traditionally, the entire manual is divided into eight sections, numbered 1 through 8. These classic divisions are shown in Figure 9-4. From one system to another, the actual names may vary but, for the most part, all Unix manuals tend to follow the same general organization. Although the manual on your system may be a bit different, it should be close enough so that, when you read the following discussion, it will make sense to you. Figure 9-4: Eight sections of the online Unix manual
The most important part of the manual is section 1. This section contains the man pages for the bulk of the Unix commands. In fact, unless you are a programmer or a system administrator, you can probably get by with just this section of the manual. If you are a programmer, you will also be interested in Sections 2 and 3. Section 2 contains the man pages for system calls, used within programs to request the kernel to perform a specific action. Section 3 documents library functions, sometimes called subroutines. These are standardized tools, not involving the kernel directly , that are used within programs to perform specific tasks. Section 4 discusses special files, a type of file that usually represents a physical device. You will also find information about device drivers (programs that act as an interface to a device). This section is used primarily by programmers. Section 5 describes the important file formats used by the system, including configuration files. This section is used by both programmers and admins. Section 6 contains man pages for whatever games are installed on the system. In the olden days, there were lots of text-based games and diversions that users could use from the command line. An example is the the game of Rogue that we discussed in Chapter 7. In those days, Section 6 was an important part of the manual. Today, most systems omit the text-based games and, more often than not, this section of the manual will be empty. To be sure, there are many GUI-based games but, as I mentioned at the beginning of the chapter, such programs have their own built-in help, so they don't need man pages. This doesn't mean there are no Unix text-based games. There are many of them, including a variety of wonderful diversions, and you can install them on your system if you want. If you are using a shared system and the system administrator has not installed the games (or if he has removed them), Section 6 of the manual may be empty. This is because most admins do not want to handle complaints from users who can read about the games, but can't use them (sort of like Moses standing on Mount Pisgah, gazing down wistfully at the Promised Land). Section 7, the Miscellaneous Information section, contains a grab-bag of information. The contents of Section 7 vary greatly from one system to another, so there's not a lot I can say about it, except that, like most of the other sections, it is primarily of interest to programmers and admins. Finally, Section 8 contains the man pages for all the special commands that system administrators use to carry out their work. In other words, these are the commands that can be used only by the superuser. (See Chapter 4 for a discussion of system administration and the superuser.) If you use a shared system, you probably won't care about Section 8 of the manual, because someone else is doing the system administration. However, if you are running Unix on your own computer, you are the admin and, from time to time, you will need to use some of the commands from this section of the manual. — hint — Except for Section 1 (Commands) and Section 6 (Games), the bulk of the Unix manual is of interest only to programmers and system administrators. The idea of organizing the Unix manual into these specific eight sections was derived from the earliest Unix implementations and has, for the most part, remained intact over the years. However, the modern manuals cover much more material than their venerable ancestors. Thus, on your system, you may see different, more comprehensive sections, possibly with different names. You may also find that a particular section contains specialized sub-sections. For example, on some Linux systems, if you look within Section 3 (Library functions), you will find several sub-sections: Section 3c, for standard C functions; Section 3f for Fortran functions; Section 3m for mathematical functions; Section 3s for standard I/O functions; and Section 3x for special functions.
So far, we have seen how to use the Unix manual by typing man followed by the name of a command. For example, to learn about the kill command (see Chapter 26), which can stop a runaway program, you would enter: man kill This command displays the man page for kill from Section 1 of the manual. However, it happens that there is also an entry for kill in Section 2 of the manual (System Calls). If this is what you really want, you can specify the section number before the name of the command: man 2 kill This tells Unix that you are only interested in a particular section of the manual. If the section you are referencing is divided into subsections, you can be as specific as you want. If you are using a type of Unix that is derived from System V (see Chapter 2), the form of the command is a bit different: you have to type -s before the section number. This is the case, for example, with Solaris: man -s 2 kill If a section is divided into subsections, you can be as specific as you want. For example, on some systems there is an entry for kill in Section 3f, the part of the manual that documents Fortran subroutines. To display this man page, enter: man 3f kill As I mentioned earlier, you can ask for more than one part of the manual at a time. For instance, if you want to see all three entries for kill, you can enter: man 1 kill 2 kill 3f kill When you do not specify a section number, Unix starts at the beginning of the manual (Section 1) and works its way through until it finds the first match. Thus, the following two commands have the same result:
man kill
— hint — Most of the time, you will be interested in Section 1 of the manual (Commands), so it is not necessary to specify a section number. You only need to use a section number when you are looking for information related to programming (sections 2, 3, 4, 5 and 7) or system administration (sections 4, 7 and 8). To orient you to the various parts of the manual, each section and subsection contains a page called intro that acts as a brief introduction. A good way to become familiar with the contents of a section is to read its intro page. Here are some examples of commands that display such pages:
man intro
As you know, man will assume, by default, that you want to reference Section 1; thus, the first two examples are equivalent. — hint — If you are a beginner, the best way to learn about the online manual is by using the following two commands:
man intro
When you read about Unix, you will often see the name of a command followed by a number in parentheses. This number tells you what section of the manual to look in for information about that particular command. For example, here is part of a sentence taken from a BSD (Berkeley) version of the man page for the chmod command (which you will meet in Chapter 25). For now, don't worry about what the sentence means, just look at the reference: "...but the setting of the file creation mask, see umask(2), is taken into account..." The citation "umask(2)" tells us that the man page for umask can be found in Section 2 of the manual. To read it, you would use: man 2 umask Since we know that Section 2 describes system calls, we can guess that we would only care about this reference if we were writing a program. At the end of the same chmod man page, however, are the following two lines:
SEE ALSO
Here is a reference to five other commands related to chmod. As you can see, three of the references are in Section 2 and are for programmers. The last reference is in Section 8 and is for system administrators. The first reference, however, refers to a command, ls whose man page lies in Section 1. Since Section 1 describes general commands, there is a good chance that this reference will be of interest. To display this man page, we can use either of the following commands:
man ls
(By the way, the purpose of ls is to display the names of files. We will meet this command in Chapter 24.) — hint — When you are looking for information or working on a problem, and you see a reference to a command in Section 1 of the manual, you should take the time to follow up the reference. Even if the information is not exactly what you need at the moment, it will come in handy later. If you see references to other sections, however, you can ignore them, unless the information looks particularly interesting.
Each man page explains a single topic, most often a command, system call or library function. Some pages are short, while others are quite long. For example, the man pages that describe the various shells are long enough to be reference manuals in their own right. To see what I mean, try one of the following commands:
man bash
For convenience, every man page, regardless of size, is organized according to a standard format, in which the page is divided into a number of parts, each with its own heading. The most common headings are shown in Figure 9-5. Interestingly enough, these headings are the same ones that were used many years ago in the original Unix manual as it was developed at Bell Labs. (Of course, the content has changed radically since then.) Figure 9-5: Standard headings used in a man page.
Not all man pages have each of these headings, and some man pages have other headings not in this list. Some of the others I have encountered have been Examples, Reporting Bugs, Copyright, History and Standards. However, regardless of the actual design, the basic format is always the same from one man page to another. Indeed, every man page I have ever seen has started with the same three headings: Name, Synopsis and Description. To help you, Figure 9-6 contains a sample man page. This man page is actually from an older Unix system, and it's likely that the equivalent page on your system will be a lot longer. I have used this particular example, however, because it is short enough to print, easy to understand, and contains all the important elements of a typical man page. Note: As you read the man page in Figure 9-6, remember that, the word "print" usually refers to displaying text on your terminal, not actual printing (see Chapter 7). |
|
Figure 9-6: Sample page from the Unix manual
 MAN(1)                        USER COMMANDS                        MAN(1)

 NAME
      man - display reference manual pages; find reference pages
      by keyword

 SYNOPSIS
      man [-] [section] title ...
      man -k keyword ...
      man -f filename ...

 DESCRIPTION
     Man is a program which gives information from the programmer's manual.
     It can be asked for one-line descriptions of commands specified by
     name, or for all commands whose description contains any of a set of
     keywords. It can also provide on-line access to the sections of the
     printed manual.

     When given the option -k and a set of keywords, man prints out a
     one-line synopsis of each manual section whose listing in the table
     of contents contains one of those keywords.

     When given the option -f and a list of names, man attempts to locate
     manual sections related to those files, printing out the table of
     contents lines for those sections.

     When neither -k or -f is specified, man formats a specified set of
     manual pages. If a section specifier is given man looks in that
     section of the manual for the given titles. Section is either an
     Arabic section number (3 for instance), or one of the words "new",
     "local", "old" or "public". A section number may be followed by a
     single letter classifier (for instance, 1g, indicating a graphics
     program in section 1). If section is omitted, man searches all
     sections of the manual, giving preference to commands over subroutines
     in system libraries, and printing the first section it finds, if any.

     If the standard output is a teletype, or if the flag - is given, man
     pipes its output through more(1) with the option -s to crush out
     useless blank lines and to stop after each page on the screen. Hit a
     space to continue, a control-D to scroll 11 more lines when the
     output stops.

FILES
     /usr/man          standard manual area
     /usr/man/man?/*   directories containing source for manuals
     /usr/man/cat?/*   directories containing preformatted pages
     /usr/man/whatis   keyword database

SEE ALSO
     apropos(1), more(1), whatis(1), whereis(1), catman(8)

BUGS
     The manual is supposed to be reproducible either on a photo-typesetter
     or on an ASCII terminal.  However, on a terminal some information
     (indicated by font changes, for instance) is necessarily lost.
|
|
To begin our discussion, let's take a quick tour of each of the basic headings. As I mentioned, you may see other headings from time to time, but once you get a bit of experience you won't have any trouble understanding the variations. Name: This is a one-line summary of the command or feature. Be aware that some summaries are vague; if you are confused, you may have to do a bit more RTFMing. Synopsis: This section shows the syntax of the command. This is the official explanation of how to enter the command. I describe command syntax in detail in Chapter 10, so we'll leave most of the discussion till then. For now, I just want to draw your attention to one point. In general, when you enter a command, you type a name, followed by options, followed by parameters. We'll discuss the technical details in Chapter 10, so don't worry about them for now. All I want you to understand is that you will see two variations of how the Synopsis section shows the options. First, you may simply see the word OPTION. In this case, the actual options are listed and explained in the Description section below. Here is an example, taken from the Linux man page for the ls command: ls [OPTION]... [FILE]... This convention is used with the man pages that come with the GNU utilities (see Chapter 2). Since the GNU utilities are used with virtually all Linux systems, this is what you will see on many of the Linux man pages. Here are two more examples. The first is taken from the FreeBSD manual; the second is from the Solaris manual.
ls [-ABCFGHLPRTWabcdfghiklmnopqrstuwx1] [file...]
In this case, the actual options are specified. (This is also the case with the sample man page you see in Figure 9-6.) As with the example above, the details are explained in the Description section. The job of the Synopsis is to provide a quick summary of the command. Description: This section is the largest one and usually takes up the bulk of the man page. Its purpose is to explain most of the details you need to know, including how to use the options. On some systems, the full explanation is divided into two separate sections: Description and Options. As you read, it helps to remember that you are looking at a reference manual, not a teaching guide. Be prepared to find that many descriptions are difficult to understand until you know what you are doing. This is normal. If you have trouble, keep reading until you run out of patience: some of what you read will stick. When you learn more, you can try again. Realize also that there are some descriptions (such as those for the various shells) that you will probably never understand completely. If this bothers you, remind yourself that the people who do understand everything in the Unix manual are much less attractive and socially adept than you. Files: This section shows the names of the files that are used by this command. If the information in this section makes no sense to you, you can ignore it. (We will discuss file names in detail in Chapter 23.) See also: This is an important section. It shows you other places to look in the manual for more information. In particular, you will see commands that are related in some way to the command under discussion. Following up these references is a good way to learn. Concentrate on the references to the Section 1 man pages. Environment: Before I can explain this section, I need to lay a bit of groundwork with respect to the idea of variables. A variable is an entity with a name and a value. Within Unix, there are certain variables whose values are available to all programs and shell scripts. (A shell script is a file containing a list of commands that can be executed automatically.) Such variables are known by several different names depending on the context: environment variables, global variables, or shell variables (see Chapter 12). By convention, environment variables and global variables are given names consisting of all uppercase letters. This section of the man page describes the environment variables that are used by the program. For example, the man page for the date command refers to an environment variable named TZ, which shows what time zone should be used. Author: The name of the person or persons who worked on the program. You will often see this section when you are looking at a man page for one of the GNU utilities. This is because the Free Software Foundation, which runs the GNU Project (see Chapter 2), likes to give credit to programmers. Diagnostics: This section can contain two types of information. First, there may be an explanation of possible error messages. Second, there may be a list of error codes that a command can return upon completion. Error codes are important for programmers who want to call upon a command from a program or shell script and then test to see if the command completed successfully. If the command was successful, the error code will have the value 0 (zero). Otherwise, the error code will be non-zero. Bugs: All programs have two kinds of bugs: the ones you know about and the ones you don't know about. The original developers of Unix recognized that no program is perfect and users deserve to know about the imperfections, Thus, many man pages contain a section devoted to documenting known problems. Some commercial Unix vendors have decided that a section named Bugs gives the paying customers the wrong idea. Thus, you may see this section living under an assumed name, such as Notes or Limitations. Don't be fooled, bugs are bugs and, if you use the program, you have a right to know about them.
When you enter the man command, Unix displays the entire manual page. Sometimes, however, you only want a quick description. In such cases, you have an alternative. As I explained above, the Name section of a man page contains a one-line description. If all you want to see is this single line, type man -f, followed by the names of one or more commands. For example: man -f time date In this form of the man command, the -f is called an option. (We will discuss options in Chapter 10.) The letter f stands for the word "files". Each man page is stored in a separate file; when you use the -f option, you are telling man which files to look at. As a convenience, you can use the command whatis as a synonym for man -f. For example, if you want to display the time, but you are not sure whether to use time or date, enter either of these commands:
whatis time date
You will see something like this:
date (1) - print or set the system date and time
You can ignore the last two lines as they do not refer to Section 1 of the manual. Looking at the first two lines, you see that the command you want is date. The time command actually measures how long it takes for a program or command to execute. As you know, when you enter the man command, you can specify a particular section number (such as man 1 date). With man -f or whatis, you cannot be so specific. Unix will always search the entire manual. Thus, a good way to find out what your manual contains is to enter: whatis intro You will see quick summaries of each of the intro pages. (Try it.) Note: For the whatis command to work properly, the man pages must be preprocessed in a certain way. This involves collecting all the one-line descriptions and storing them in certain files. It is these files that whatis searches, not the actual manual (that would be far too slow). If the preprocessing has not been carried out, whatis will not return useful information. If this is the case on your system, talk to your system administrator.
When you want to learn about a specific command, you can use man to display the man page for that command. What if you know what you want to do, but you are not sure which command to use? The solution is to use man with the -k option. This searches for commands whose NAME sections contain specified keywords. (The letter k stands for "keyword".) For example, say you want to find all the entries in the manual that have something to do with the manual itself. Enter: man -k manual As a convenience, you can use the single word apropos as a synonym for man -k: apropos manual Note: When you pronounce apropos, the accent is on the last syllable, and the "s" is silent: a-pro-poe'. This is because the name comes from a French expression and, in French, an "s" at the end of the word is normally not pronounced(*). * Footnote French people are good at spelling, but bad at pronouncing. The apropos command searches through all the one-line command descriptions, looking for those that contain the same string of characters you specified. To make the command more powerful, Unix does not distinguish between upper- and lowercase. Here is some sample output from the previous example.
catman (8) - create the cat files for the manual
Notice that there are two commands of interest, man and whereis, as they are the only ones in Section 1. Notice also that the route command was cited because the characters "manual" happened to appear in its description. You might ask, why don't apropos and whatis appear in this list? After all, both commands help you access the online manual. To answer this question, enter: whatis apropos whatis You will see that the word "manual" does not appear in these descriptions:
apropos (1) - locate commands by keyword lookup
The lesson here is: The apropos command is not magic — all it can do is search blindly for character strings — so if you can't find what you want, try asking in a different way. — hint — Most commands are actually programs. For example, the man command is really a program named "man". However, some of the most basic commands, called builtin commands, are carried out by the shell itself. These commands will be documented within the man page for the shell. They will not have their own separate entries in the manual. If you are looking for a command that you know exists, but you cannot find it under its own name, check the man page for your shell:
man bash
If you are a Bash user, there is a special man page that will list all the builtin commands: man builtin What's in a Name? Apropos In Unix, the apropos command is a synonym for man -k. The word comes from the French expression � propos meaning "related to". In English, "apropos" is a preposition meaning "concerning" or "with reference to". For example, you might read the following passage in a novel: "...Amber raised her eyebrows and reached over to touch the tall, handsome programmer lightly on the lips. As she shook her long blond hair, she felt a frisson of desire travel through her lean, lissome body. 'Apropos to your proposal,' she cooed seductively, batting her eyelashes, 'I'd love to be the Mistress of Ceremonies at your Unix bachelor party. But does Christine know about the invitation?'..."
There are two marvelous words you will see from time to time: FOO and BAR. These words are used as generic identifiers by programmers. You will see them, not only throughout the world of Unix and Linux, but on the Web and in Usenet discussion groups. The idea is that whenever you want to refer to something without a name, you can call it "foo"; when you want to refer to two things without a name, you call them "foo" and "bar". Nobody knows for sure how this tradition got started, but it is used a lot. For example, here is an excerpt from the Linux man page for the exec command. (Don't worry about the meaning.) "...Most historical implementations were not conformant in that foo=bar exec cmd did not pass foo to cmd..." From time to time, you will also see the word FOOBAR used in the same way. For example, the following is a question written by a well-known Unix professor for one of his final exams. (Again, don't worry about the meaning.) "...Give a Unix command, and the equivalents in sed and awk to achieve the following: Print the file named foobar to standard output, but only lines numbered 4 through 20 inclusive. Print all the lines in file foobar, but only columns numbered 10 through 25 inclusive..." What's in a Name? Foo, Bar, Foobar In the world of Unix and on the Internet, the words foo, bar and foobar are commonly used as generic terms to represent unnamed items within a discussion or exposition. Where do these strange words come from? The word "foobar" derives from the acronym FUBAR, which was popular during World War II. FUBAR means "fouled up beyond all recognition"(*). The word "foo", seems to have a more robust history. No doubt foo owes much of its popularity to foobar. Nevertheless, foo seems to have been used on its own even earlier. For example, in a 1938 cartoon, Daffy Duck holds up a sign that reads "Silence is Foo" (which is absolutely correct). Some authorities speculate that foo might have roots in the Yiddish "feh" and the English "phoo". * Footnote Actually, the F in fubar doesn't really stand for "fouled". However, I thought it might be offensive to use the word "fuck" twice in the same chapter (see the discussion on RTFM). I'm sure you understand.
Info is an online help system, separate from the Unix manual, which is used to document the GNU utilities (explained in Chapter 2). Since many types of Unix — including virtually all Linux systems — use the GNU utilities, most people find it useful to understand how to use both the online manual and Info. Indeed, you will find that many of the Linux man pages refer you to Info for more information. Superficially, Info is a bit like the online manual. Information is stored in files, one topic per file, just like man pages. The files are called Info FILES and, to read them, you use the info program. Just type info followed by the name of a command. Consider the following two examples. The first displays the man page for the date command. The second display the Info file for the same command:
man date
Like the online manual, info will show you information one screenful at a time. As is the case with the manual, you press <Space> to move from one screenful to the next, and you press q to quit. However, as you will see in a moment, that is where the similarity ends. If you have trouble starting Info, you can check to see if it is on your system by looking for the info program. Any of the following commands will do the job (see Chapter 7):
which info
Alternatively, you can look for an info man page: man info If your system does not have the info program or an info man page, you can assume that you don't have Info (which means you can skip the rest of this chapter secure in the knowledge that your life is not passing you by). As you know, all Unix and Linux commands have a man page. However, many commands do not have an Info file. For this reason, if you try to display the Info file for a command that doesn't have one, Info will simply show you the man page instead. For example, the man command does not have an Info file. See what happens when you enter: info man There are three main differences between Info and the online manual. First, Info files contain not just information, but links to other Info files. Thus, reading an Info page is similar to reading a Web page in the sense that you can use a link to jump to another file.(*) This is not the case with man pages. * Footnote Unlike Web pages, Info files contain only plain text with very little formatting and no pictures. Thus, as you use Info, you can see what it was like to use the Web in its early days, when it was a primitive, text-based system. Second, as you are looking at an Info file, there are a lot of commands you can use, many more than are available with the online manual. This makes for a much more powerful environment. For this reason, some people prefer to look at man pages using info instead of man. Finally, as I described at the beginning of the chapter, the online manual was designed by the original Unix programmers at Bell Labs. Their goal was to keep things simple, both for the programmers who would create documentation and for the users who read it. Info was created by the people who developed the Emacs text editor. The chief architect was Richard Stallman, the founder of the Free Software Foundation and the GNU Project (see Chapter 2). Stallman trained at the MIT Artificial Intelligence Lab in the early 1970s, where there was a much different environment than Bell Labs. One of the most important differences was that MIT tended to build large, complex powerful systems, while the Unix programmers (who had a much smaller budget) valued simplicity. Compare, for example, Multics vs. Unix (see Chapter 1). Although Stallman was not your typical MIT programmer, he did tend to write programs that were very powerful, idiosyncratic, and had a great many esoteric commands. To a large extent, you can see these characteristics within both Emacs and Info. So, as you read the rest of this chapter and as you practice with Info, remember that it was brought to you by the same people who created Emacs. If you feel a bit confused, take solace in the fact that everyone else did the first time they tried to use Info. As complex as Info is, it is actually part of something larger called TEXINFO, the official documentation system for the GNU project. Texinfo is a sophisticated set of tools that allows you to use a single information file to generate output in a variety of formats: Info format, plain text, HTML, DVI, PDF, XML and Docbook. For our purposes, all we need to know is that GNU documentation starts life as Texinfo files, which are then used to generate Info files. For this reason, you will sometimes see Info referred to as Texinfo. For example, if you ask someone a question and he asks, "Have you checked with Texinfo?" he is telling you to use Info. Since Info is so complex, we can't cover everything, nor would we want to. Instead, I will confine myself to three main goals, showing you: how to use Info to display what you want, how to maneuver around the Info system, and how to display the Info help information. Once you have these three skills, you can RTFM as necessary, and teach yourself whatever you need to know. What's in a Name? Texinfo When you first look at the name Texinfo, you might think that it should be Textinfo. After all, it is the name of a text-based information system. Actually, the spelling of Texinfo is correct: it comes from TeX, a typesetting system created by the eminent computer scientist Donald Knuth (pronounced "kuh-NOOTH"). The name TeX comes from the Greek word techni, from which we get the English word "technical". Techni refers to an art, a craft or, more generally, the end result of someone's effort. Thus, the letters TeX are not the English letters T-E-X; they are actually the Greek letters Tau, Epsilon and Chi, the first three letters of techni. If you want to be pedantically accurate, you should pronounce the Chi as the "ch" in the Scottish word "loch" or the name "Bach". Most computer people, however, pronounce the Chi as a "K". So how should you pronounce Texinfo? You have four choices. First, if you like being pedantically accurate you should say "Te[ch]info", where [ch] is the funny sound I described above. If you are a programmer and you want to look like an insider, say "Tekinfo". If you want to fit in with the non-technical crowd, say "Texinfo", which is what most people do who read the word literally. Finally, if you want to be a leader within your social circle, tell everyone that it is obvious the name should really be "Textinfo". Explain that the second "t" must have been left out accidentally, and it is about time someone fixed the mistake. (Actually, you might be correct: just because someone invents something, doesn't mean he has the right to give it a foolish name just to show how clever he is.)(*) * Footnote In my time, I have met both Donald Knuth, who named TeX, and Richard Stallman, who named GNU. If you put them in a room together, probably the only point they would agree on is that both TeX and GNU are good names.
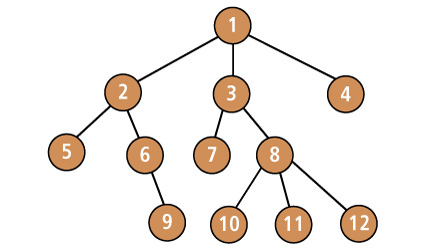
You may remember that, in Chapter 8, we discussed the idea of data structures, a basic concept of computer science. A data structure is an entity used to store and retrieve data according to a set of precise rules. At the time, I mentioned that the most common types of data structures are lists, linked lists, associative arrays, hash tables, stacks, queues, deques (double-ended queues), as well as a variety of tree-based structures. In Chapter 8, we discussed stacks, so you could understand how the dc calculator handles reverse Polish notation. In this section, we are going to discuss trees, because that is the data structure Info uses to store and retrieve Info files. Once you understand trees, you can make sense out of the commands you use to control Info. If you don't understand what a tree is, you can certainly use Info, but it won't be fun and it won't be easy. When a computer scientist talks about a tree, he is referring to a family of complex data structures. So, to make life simple, let's start with a simple metaphor. Let's say you decide to go on a hike. You start at the trailhead and find there are several possible paths to follow. You choose one of them. You follow that path until you come to a fork, at which point you have a choice of several new paths. Again, you make a choice and keep walking until you come to another fork and are forced to make another choice. And so on. Once in a while, you follow a path that leads to a dead end. When this happens, you need to go back to a previous fork and make a different choice. In the language of computer science, we call each fork a NODE. The main node (the trailhead in our example) is called the ROOT. The path that joins one node to another is called a BRANCH. When a branch leads to a dead end, it is a special type of node we call a LEAF. Here is the technical definition: To a computer scientist, a TREE is a collection of nodes, leaves, and branches, organized in such a way that there is, at most, one branch between any two nodes.(*) * Footnote The ideas behind computer trees are taken from a part of mathematics called graph theory. Mathematical trees are similar to computer trees. However, the terminology is different. Within graph theory, a node is called a "vertex" (plural "vertices"), and a branch is called an "edge". Thus, if you ever meet a graph theorist, you can expect him to say things like, "Strictly speaking, the Info system uses a data structure that isn't a real tree. Since some vertices are joined by more than one edge, you should really describe it as a connected graph in which tree-like objects are embedded." (Now you see why Unix people tend to not invite graph theorists to parties.) Although all of this sounds a bit complicated, it is similar to what we see when we look at a real tree. As an example, look at the sample tree in Figure 9-7. Notice that, unlike a real tree, a computer tree is usually drawn with the root at the top.
Within computer science, there are a variety of different types of trees, each with its own characteristics. The type of tree I have just described is the data structure Info uses to store information. Each Info file is broken into parts and stored as a series of nodes. As you read a file, you move from one node to another. This allows you to read an entire file from beginning to end, one node at a time. As you are looking at a particular node, we say that you are VISITING that node. Many nodes also contain LINKS that allow you to jump to other, related files (just like links on a Web page). Using Info requires three basic skills. You need to understand how to:
We will now discuss each of these skills in turn.
To start the Info system, you use the info command. There are two variations. First, if you want to display information about a specific command, type info followed by the name of the command. For example:
info date
If you are not sure which command you want to learn about, or if you want to browse the system, enter the info command by itself: info When you start Info in this way, it displays a special node called the DIRECTORY NODE. The Directory Node contains a list of major topics, so you can consider it to be the main menu for the entire Info system.
Info has a fair amount of help information you can read to get started. Before you do, be sure to read to the end of this chapter. The place to begin your journey is the info man page. Either of the following commands will do the job:
info --help | less
Notice that, in the first command, there are two hyphens and no spaces before the word help. We will discuss what this means in Chapter 10. Once you have read the man page, you can display a short introductory Info file, by entering the command: info info Next, you should read the Info tutorial. To do so, start Info and press the h (help) key. It may be a bit confusing, but if you have read this chapter, you'll do okay. Once you have finished the tutorial, take a moment to display the Info command summary and skim the list of commands. You can display this summary by pressing the ? (question mark) key. — hint — At any time, from within any Info file, you can display the built-in tutorial (by pressing h) or the command summary (by pressing ?). As you read these files, don't worry about understanding everything. Just learn the basic commands, and add to your repertoire as the need arises. When it comes to Info, no one knows (or needs to know) everything. As you are using Info, you are always looking at a node. If you want to leave that node and return to the last node you were reading, press l (the letter "L"). For example, say you are reading the node that contains help for the date command. You press ? to display the command summary (a new node). To return to the date node, all you need to do is press l. Don't press q, or you will quit Info completely and end up back at the shell prompt. As you read the command summary, you will see <Ctrl> keys referred to using the notation C-x, instead of ^X or <Ctrl-X>. (This is an Emacs convention.) You will also see the notation M-x. The M- stands for Meta key, a very important concept in Emacs. For now, I'll just say that to use the Meta key, you can either hold down the <Alt> key while you press the second key; or press <Esc>, let it go, and then press the second key. For example, let's say you want to press M-x. You can use either <Alt-X>, or press <Esc> followed by <X>.
There are a great many commands you can use within the Info system. I have summarized the most important commands in Figure 9-8, and I will discuss them in the next few sections. As you read, it will help a lot if you start Info and follow along by testing the commands as we discuss them. When you are finished reading, you can use Figure 9-8 as a reference.
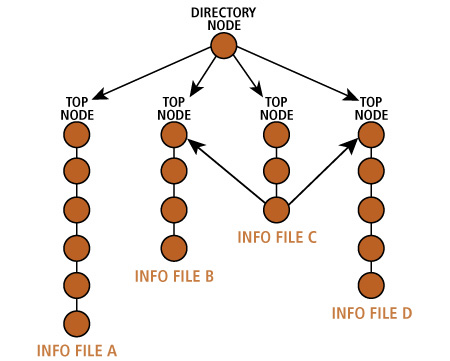
Each Info file is structured as a small tree consisting of a linear series of nodes. The purpose of each file is to cover one main idea, such as how to use a particular command; each node covers a single topic. When you start reading a file, you are placed at the root of the tree for that file. Within Info, the root of a tree is called the TOP NODE. As a general rule, the Top Node contains a summary of the topic under discussion, as well as a list of the topics covered in the file. The list is in the form of a menu. You can read the file in two ways. First, you can read the nodes in order, one after the other, from the Top Node to the last node. Alternatively, you can use the menu to jump directly to a particular node, if you want to read about a specific topic. The simplest way to read a file is to start with the Top Node and read the entire file straight through. All you have to do is press <Space>, which will display one screenful of information after another. When you get to the end of a node, pressing <Space> will take you to the beginning of the next node in the tree. Thus, you can traverse an entire tree by starting at the Top Node and pressing <Space> repeatedly. To move backwards one screenful at a time, press either <Backspace> or <Delete>. If you are at the beginning of a node and you press one of these keys, you will be taken to the previous node. (Try it.) As a convenience, you can also use <PageDown> and <PageUp> to move within a node. However, unlike the other keys, <PageDown> and <PageUp> will move only within a node, they will not move to the next or previous mode. Thus, they are handy when you want to move up and down without leaving the current node. As a convenience, you can jump to the beginning of the current node whenever you want by pressing the b key. Finally, for small movements, you can use the arrow (cursor) keys. <Down> moves the cursor down one line; <Up> moves the cursor up one line. Similarly, <Right> and <Left> move the cursor one position to the right or left respectively. To help you visualize how Info nodes and files are connected, take a look at Figure 9-9, which shows how the Info tree is organized. At first, the organization may seem complicated. However, taking a moment to understand the connections will make your work with Info a lot easier. | ||||||||||||||||||||||||||||||||||||||||||||||||||||||||||||||||||||||||||||||||||
|
|
— hint — The simplest way to read an Info file is to start at its Top Node and press <Space> repeatedly. In this way, you will work your way through the file, one node at a time.
As you are reading an Info file, there are several commands you can use to jump from one node to another, either within the same file or in a completely different file. To jump to the next node in the current file, press n; to jump to the previous node, press p. To jump to the Top Node (the beginning) of the current file, press t. Many nodes, especially Top Nodes, contain a list of topics in the form of a menu. Each topic is actually a link, which you can follow. Some links jump to another node within the file; other links jump to a completely different file. You will recognize links because they have a specific format: an asterisk (*), followed by the name of the topic, followed by a colon (:). After the colon, you will see a short description of the topic. Sometimes, there will also be an informative comment. Here are two examples taken from the Info tutorial I discussed above. The examples were designed to show what typical menu items look like(*):
* Foo: Help-FOO. A node you can visit for
fun.
* Footnote These examples, taken directly from the Info tutorial, show how the words "Foo" and "Bar" are used as generic names. See the discussion earlier in the chapter. The actual link is the part of the menu item between the asterisk and the colon (inclusive). It is similar to a link on a Web page. To follow a link, just move your cursor to it and press <Return>. The easiest way to do so is to press <Tab>, which moves down to the next link in the node; or M-<Tab>(*), which moves up to the previous link in the node. Alternatively, you can use the arrow keys (<Down>, <Up>, <Right> and <Left>). * Footnote As I explained earlier, M- refers to the Meta key. To use M-<Tab>, you can use either <Alt-Tab>, or press <Esc> followed by <Tab>. Regardless of how you get to a link, once you are there, all you have to do is press <Return> to make the jump. Aside from following a link, there are two other ways to jump. As we discussed earlier, each Info file is organized as a simple tree consisting of a sequence of nodes. The entire Info system, in fact, is actually one huge tree, with branches that reach — directly and indirectly — to every file and every node in the system. You can jump to the root of this very large tree — the directory node — by pressing d. Since the Directory Node acts as the main menu for the entire system, the d command is worth memorizing. The last way to jump is to press l (the letter "L") to leave the current node and return to the last node you visited. For example, let's say you have followed a link to jump from file A to file B. If you press l, you will jump back to file A. The l command is useful, because you can press it repeatedly to retrace all of your steps throughout the tree. This allows you to move backwards, one step at a time. Like the d command, the l command is worth memorizing. — hint — Although the Info system is complicated, there are only seven really important commands:
1. <Space>: display next screenful
If you memorize these seven commands and commit yourself to learning more as the need arises, you will do just fine.
Review Question #1: What are the two principal Unix documentation systems? What commands do you use to access each system? Review Question #2: When you are reading a man page, how do you enter a single shell command? Review Question #3: When you are looking at an Info node, which commands do you use to:
• Display the help tutorial
Applying Your Knowledge #1: Use the man command to display the man page for your default shell (man sh). Once the page is displayed, perform the following operations:
• Display the next screenful of information
Applying Your Knowledge #2: If you are using Linux or FreeBSD, use the info command to display information about the Info system itself (info info). Once the first node is displayed, perform the following operations:
• Display the next screenful of information
For Further Thought #1: The doctrine of RTFM requires people to try to help themselves by reading the documentation before asking for help. What are two advantages of this guideline? What are two disadvantages?
List of Chapters + Appendixes
© All contents Copyright 2026, Harley Hahn
|