Harley Hahn's Guide to
Unix and Linux
|
|
Harley Hahn's Guide to
|
|
A Personal Note
Chapters...
Command
INSTRUCTOR |
Chapter 22... The vi Text Editor
A TEXT EDITOR — often referred to as an EDITOR — is a program used to create and modify text files. When you use such a program to modify a file, we say that you EDIT the file. It is important that you learn how to use a Unix editor well, as you will need it whenever you want to work with plain text. If you are a programmer, you will need an editor to write your programs. For non-programming tasks, you will need an editor to create and modify configuration files, shell scripts, initialization files, Web pages, simple documents, and so on; in fact, you will need an editor when you work with any file that contains text. Unlike a word processor, an editor works only with plain text, that is, data consisting of printable characters: letters, numbers, punctuation, spaces and tabs (see Chapter 19). As a general rule, editors use one simple monospaced font. Thus, you do not use an editor when you want to prepare a document that has more than one font, or that uses various font sizes, colors, italics, boldface or other attributes. For such work, you use a word processor. In this chapter, we will cover vi, the most important of the Unix editors. Although I will not be able to explain everything — that would take at least several chapters — I will show you most of what you need to know most of the time. (Note: the name vi is pronounced as two separate letters: "vee-eye".) Throughout this chapter, we will be talking about editing "files" even though, strictly speaking, I have not yet explained what a file actually is. I'll do that in Chapter 23, when we discuss the Unix file system. For now, we'll just use the intuitive idea that a file has a name and contains information. For example, you might use vi to edit a file named essay, which contains the text of an essay you have written. When you first learn vi, it will seem awkward. There is no getting around that. If you feel frustrated, remember that, at one time, everyone has felt the same way. However, once you become experienced, everything will make sense, and vi will seem natural and easy to use. This suggests the following hint which, in Chapter 1, we applied to Unix in general: — hint — vi is easy to use, but difficult to learn.
There are many different Unix/Linux text editors, including the simple ones we discussed in Chapter 14 (kedit, gedit, Pico and Nano). However, the two principal Unix text editors are vi and Emacs, both of which have been around for a long time. They are powerful, mature, full-featured programs, by far, the mostly widely used editors. Either one of them will meet your needs. The vi and Emacs editors are vastly different from one another and, as you might expect, it is common to find people disagreeing about which one is better. Indeed, the Unix community has been arguing the question for many years. The truth is vi and Emacs represent totally different ways of approaching the activity of text editing. As such, there are vi people and there are Emacs people and, when it comes to editing, they see the world differently. Eventually, when you become experienced enough, you yourself will have to make a choice: will you be a vi person or an Emacs person? For now, all you need to understand is that vi and Emacs are very complex, and they both take a long time to learn. In this chapter, I will teach you how to use vi because it is the more important of the two editors. Later, you can teach yourself Emacs if you so desire. Regardless of which program you end up choosing for your primary editor, you must learn vi. The reason is that, unlike any other editor, vi is ubiquitous. It has been used by so many people for so long that you will find it on almost every Unix and Linux system in the world. More formally, vi is part of the two principal Unix specifications: POSIX (see Chapter 11) and the Single Unix Specification (the standards that must be met to call something "Unix"). Thus, by definition, vi must be available on every Unix system, no matter how esoteric. This means that, once you know how to use vi, you will be able to edit text on any Unix or Linux system you may encounter, which means you will always be able to edit a configuration file, create an initialization file, or write a simple shell script. This is particularly important when you work within an environment that provides limited tools. For example, if you have problems with your system and you boot from a rescue disk, you will probably find that vi is the only available text editor. Similarly, vi is often the only editor available on embedded systems (computerized devices such as mobile phones, DVD players, appliances, and so on). Personally, I have been using Unix since 1976, and I have never seen a system that did not have vi.(*) Indeed, the vi editor is used so widely and is so important that, if you ever apply for a job working with Unix or Linux, it will be assumed that you know vi. * Footnote Some Linux distributions do not automatically install either vi or Emacs. The most common reason is that the creators of the distributions did not want to take sides in the never-ending vi/Emacs debate. As an alternative, one of the simpler text editors, such as Nano (see Chapter 14) will be installed by default. Rest assured, if you ever encounter such a system, it is very easy to install vi.
The vi editor was created by Bill Joy, while he was a graduate student at U.C. Berkeley in the late 1970s (Figure 22-1). Joy, an astonishingly skillful programmer, was one of the most prolific and important contributors during the early days of Unix (see Chapter 2). In addition to vi, Joy was also responsible for the original BSD (Berkeley Unix), the C-Shell, and the first robust implementation of TCP/IP, the protocols that support the Internet. In 1982, he co-founded Sun Microsystems, where he contributed significantly to the development of NFS (Network File System) and the SPARC microprocessor architecture. To understand how, in the late 1970s, Joy came to write vi as a grad student, it is necessary to go back to the early days of Unix.
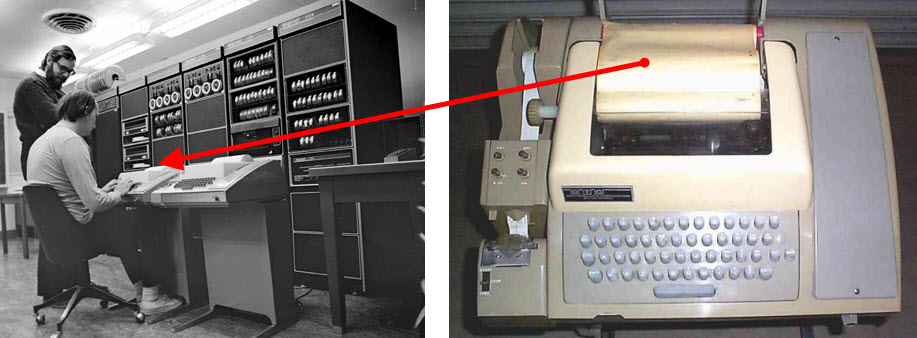
The first important Unix editor was ed (pronounced as two separate letters, "ee-dee"). It was written at Bell Labs in 1971 by Ken Thompson, one of the two original creators of Unix (the other being Dennis Ritchie; see Chapters 1 and 2). The ed editor was a LINE-ORIENTED EDITOR or LINE EDITOR, which meant that it worked with numbered lines of text. For example, you might enter a command to print lines 100 though 150, or to delete line 17. Such an approach was necessary because of the slowness and limited capabilities of the early terminals (described in Chapter 3). In the fall of 1975, Bill Joy left the University of Michigan to become a graduate computer science student at U.C. Berkeley. He had planned to study computing theory, which is quite mathematical. His work, however, led him into programming and, serendipitously, to Unix. The reason was that Ken Thompson happened to be at Berkeley at the same time. Thompson, who was taking a sabbatical from Bell Labs, had decided to spend a year at Berkeley, his alma mater, as a visiting professor. He arrived at a time when the Berkeley Computer Science department had just acquired a brand new PDP 11/70 minicomputer. Working with two students, Thompson installed the latest version of Unix (Version 6) on the new computer. He then installed a Pascal system to run under Unix. (Pascal is a programming language, created in 1970 by the Swiss computer scientist, Niklaus Wirth, to teach structured programming.) Joy and another student, Charles Haley, were intrigued with Thompson's Pascal implementation, and they decided to use it to work on general context-free parsing algorithms (methods used to analyze the structure of source programs). Joy and Haley soon found, however, that the Pascal system had significant limitations. They started to fix the problems, which brought them smack up against the primitive ed editor. Joy and Haley found ed so frustrating, they decided to create a better editor. At the time, another visitor, George Coulouris from Queen Mary College (London), had brought his own software to Berkeley: in this case, an editor called em ("ee-em"). Coulouris had created em as a backward compatible replacement for ed. He chose the name em to mean "editor for mortals" (the idea being that ed was not fit for regular human beings). Joy and Haley took parts of em and put them into ed to create a hybrid, which they named en ("ee-en"). The en editor was far from perfect. Both Joy and Haley spent a lot of time working on it, creating one new version after another. Eventually, they came up with something that worked reasonably well, which they called ex ("ee-ex"). Compared to ed, ex was a vastly improved editor. Still, it was a line-oriented editor, the type of program that was appropriate for very old terminals and slow modems. But now it was 1976, and Joy and Haley had access to a newer type of terminal, the Lear Siegler ADM-3A. The ADM-3A was much more sophisticated than the old Teletype ASR33 on which ed had been developed at Bell Labs (see Chapter 3). Where an ASR33 printed output on paper, one line at a time, the ADM-3A had a monitor and was able to display text anywhere on the screen. You can see a photo of an Lear Siegler ADM-3A in Figure 22-2. Compare this to the photo of the Teletype ASR33 you see below in Figure 22-3.
|
|
To take advantage of the increased capabilities of the ADM-3A, Joy enhanced ex by creating a separate screen-oriented interface, which he called vi ("vee-eye"). The new vi editor supported all of the ex commands as well as a large number of new commands that allowed the use of the full screen. For example, unlike the older line-oriented editors, vi allowed you to jump visually from one place to another as you edited a file. You could also insert, modify or delete text anywhere you wanted without having to worry about line numbers. In this way, vi was a SCREEN-ORIENTED EDITOR or SCREEN EDITOR. To this day, the vi editor is still based on an amalgam of screen-oriented commands and line-oriented commands. Thus, as you learn vi, you must teach yourself two different types of commands. As you might expect, this means it can take awhile to learn how to use vi well. Still, as you will see, being able to edit your data in two different ways at the same time makes for a particularly powerful tool. Interestingly enough, vi and ex are actually the same program. If you start the program in the usual way, using the vi command, you see the screen-oriented interface. If you start the program with the ex command, you get the older line-oriented interface. What's in a Name? ed, ex, vi In the early days of Unix, many commands were given short, two-letter names. The convention was to pronounce these names as two separate letters. For example, ed is "ee-dee"; ex is "ee-ex"; and vi is "vee-eye". It is incorrect to pronounce vi as a single syllable "vye". The meaning of the name ed is simple: it stands for "editor". The name ex is less straightforward. Many people think it was chosen to mean "extended editor". In one sense, this is true, as ex greatly extended the power of ed. Although the details are a bit fuzzy, the name was actually a continuation of the pattern ed... en... ex. Charles Haley, the co-author of ex explained it to me thus: "I think there was an en. I don't remember an eo. I think we went from en to "e-whatever" or ex". Bill Joy made a similar comment once in an interview: "I don't know if there was an eo or an ep, but finally there was ex. I remember en, but I don't know how it got to ex." Regardless, when Joy extended ex by adding screen-oriented commands, he chose a new 2-character name, vi, meaning "visual editor". There were two practical reasons why so many commands were given such small names. First, smart people tend to prefer short, easy-to-use abbreviations. Second, the old terminals were agonizingly slow, and it was convenient to use short command names that were easy to type correctly. If you are interested in seeing which two-letter command names are still in use, look at the end of Chapter 20, where I show how to use the grep program to find these names on your own system. If you have a few moments, you might look up these commands in the online manual: you will find some forgotten gems.
The vi editor was created by Bill Joy in 1976 and distributed as part of 2BSD (the second version of Berkeley Unix) in mid-1978. Eventually, the editor became so popular that AT&T included it in System V, making vi the de facto Unix editor. Over the years, many people worked on vi, as the responsibility for maintaining it passed from Joy to other programmers. With so many people using and modifying the program, you would expect vi to be enhanced, as indeed it was. Until 1992, however, the enhancements were relatively minor. This was because Joy's original design was so good that, for a long time, there was no pressing need for major improvements. Indeed, to this day, when you use vi, what you see in front of you is almost exactly what BSD users were using in the late 1970s. This is not to say that vi cannot be improved. It's just that such changes would be so fundamental as to turn vi into a significantly different program. In fact, that is exactly what happened. In the late 1980s, an open source vi-clone named STvi (often written as STevie) was created for non-Unix systems. In 1988, a Dutch programmer named Bram Moolenaar took STvi and used it to create a new program he called VIM, the name meaning "vi imitation". For several years, Moolenaar worked on Vim, fixing bugs and adding new features until, in 1992, he released the first Unix version of the program. By now, there were so many enhancements, that Moolenaar changed the meaning of the name. Although the program was still called Vim, Moolenaar declared that, from now on, the name should stand for "vi improved". Throughout the 1990s, Vim grew in popularity, particularly within the more geeky part of the Linux community: the programmers, system administrators, network managers, and so on. By the early 2000s, Vim was so popular that it became the editor of choice for most such users and, by 2005, many Linux distributions had replaced vi with Vim. Indeed, if you are using Linux right now, chances are that your system has only Vim and not vi. If so, when you enter the vi command or when you display the vi man page (man vi), what you will get will be Vim, not vi. This is not the case for most non-Linux systems. In fact, with many types of Unix, it is likely that your system will not have Vim unless you have installed it yourself. In this chapter, we will not talk much about Vim. Rather, we will cover standard vi: the canonical program that has been the text editing workhorse for so many years. I have chosen to do this for two reasons. First, Vim is not really a new version of vi or even an extension of vi. Vim is a completely different program that is backward compatible with vi. The distinction is important. When you run Vim, you are using an editor that has many sophisticated features that do not exist in vi. Of course, because Vim is backwards compatible, you can use all the standard vi commands. However, the new features that Vim offers are so far-reaching that they make using Vim a much different experience than using vi. As difficult as vi can be for beginners, Vim can be more difficult, because it requires you to learn, not only all the vi and ex commands, but all the additional Vim commands. Moreover, when you use the special features of Vim, your minute-to-minute strategies for solving problems are significantly different from when you use vi. For this reason, if you want to learn Vim, the best strategy is to learn vi first. Although this sounds complicated, it actually isn't. Because Vim is crafted so artfully, you can use it exactly as if it were vi. Later, once you are comfortable with vi, you can expand your horizons and teach yourself how to take full advantage of Vim's power. To help you, at the end of the chapter I will take a few moments to talk about the extra features Vim has to offer and to show you how to get started. The second reason we are going to concentrate on standard vi is that it is a standard. No matter what type of Unix or Linux you use, no matter how small your system, vi is the only comprehensive text editor that is likely to be available. As such, even if your personal editor-of-choice is Vim, Emacs, Nano, Pico, or something else, using vi is a basic skill you need to master. — hint — How do you know if your system uses Vim instead of vi? Enter the command to display the vi man page: man vi If you see the Vim man page, you know your system uses Vim instead of vi.
To start vi, the basic syntax is: vi [-rR] [file...] where file is the name of a file you want to edit. The vi program is very complex and, as you might imagine, it has many options. Most of the time, however, you won't need any of them. Indeed, under normal circumstances, you only need to know about two options, -r and -R, both of which we'll talk about later in the chapter. To use vi to edit an existing file, just specify the name of the file, for example: vi essay To create a new file, you have two choices. First, you can specify a file name. If the file does not exist, vi will create it for you. For example, to use vi to create a brand new file named message, you would use: vi message Alternatively, you can create an empty file by entering the vi command by itself without a file name: vi This tells vi to create a new file without a name. You can specify the name later, when it comes time to save your data. — hint — If you ever forget what file you are editing (easier than you might imagine), press ^G(*). This displays the name of the file, as well as your position within the file. * Footnote As we discussed in Chapter 7, it is a Unix convention to write the ^ (circumflex) character as an abbreviation for <Ctrl>. Thus, ^G refers to the single character <Ctrl-G>.
As we discussed earlier, on some systems, especially Linux systems, vi has been replaced by Vim. If this is the case on your system, my goal is for you to use Vim as if it were vi. Later, once you are comfortable with vi, you can teach yourself how to use the extended features offered by Vim. (We'll talk about this more at the end of the chapter.) For now, all you have to know is how to start Vim so it acts like vi. In general, starting Vim is just like starting vi. If you specify the name of an existing file, Vim will open it for you. If the file does not exist, Vim will create it for you. If you don't specify a file name, Vim will create an empty file that you can name later, when you save your work. The basic syntax is: vim -C [-rR] [file...] The -r and -R options work the same way as with vi: we'll talk about them later in the chapter. For now, the only option I want to talk about is -C. Within both vi and Vim, there are many internal settings you can use to affect the behavior of the program. When you start Vim with -C, it changes the settings so as to make Vim act as much like vi as possible. When you use Vim in this way, we say that it runs in COMPATIBILITY MODE(*). Until you have mastered vi and are ready to switch to the full Vim, it is a good idea to always start Vim in compatibility mode. For example:
vim -C essay
* Footnote On some systems, Vim will not start in compatibility mode when you use the -C option. If this is the case on your system, you can force Vim into compatibility mode by turning on the compatible option in your Vim initialization file (explained later in the chapter). The first command tells Vim you want to work with a file named essay. If the file exists, Vim will open it for you; if not, Vim will create it. The second command tells Vim to create a brand new, unnamed file. This is the command to use when you want to create a new file but you haven't yet decided what to name it. If Vim has replaced vi on your system, the vi command will have the same effect as the vim command. On such systems, the following two commands are equivalent to the previous commands:
vi -C essay
Whenever you start Vim without specifying a file name, the program will display some helpful information (see Figure 22-4). This information is only for your convenience. Vim will remove it as soon as you begin to enter data. Figure 22-4: Vim Startup Screen When you start Vim without specifying the name of a file, you will see a startup screen with helpful information. The information is displayed for your convenience: it will disappear as soon as you begin to enter data.
               VIM - Vi IMproved

                 version 7.0.42
            by Bram Moolenaar et al.
       Modified by <bugzilla@redhat.com>
   Vim is open source and freely distributable

            Sponsor Vim development!
    type  :help sponsor<Enter>    for information

    type  :q<Enter>               to exit
    type  :help<Enter>  or  <F1>  for on-line help
    type  :help version7<Enter>   for version info

          Running in Vi compatible mode
    type  :set nocp<Enter>        for Vim defaults
    type  :help cp-default<Enter> for info on this
— hint — Here is a simple test you can run to see if your system uses Vim instead of vi. Enter the vi command with no file name: vi If you see a mostly empty screen, you are using standard vi. If you see the special help information shown in Figure 22-4, you are using Vim. (Once you have run the test, quit the program by typing :q, a colon followed by a lowercase "q".) — hint — To use Vim as if it were vi, you start the program in compatibility mode by using the -C option. For convenience, you can create an alias using one of the following commands. The first command is for the Bourne shell family (Bash, Korn Shell); the second is for the C-Shell family (Tcsh, C-Shell):
alias vi="vim -C"
To make the alias permanent, put the command in your environment file (see Chapter 14). Once you do this, you can use the vi command to run Vim in compatibility mode, and the vim command to run Vim in its native mode.
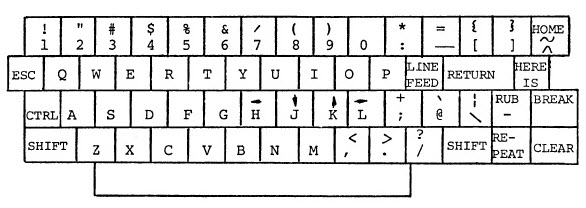
As you work with vi, your data is kept in a storage area called an EDITING BUFFER. When you tell vi that you want to edit a file, vi copies the contents of the file to the editing buffer, so you work with a copy of your data, not with the original. Understanding the editing buffer is crucial to using vi, so hold on to the concept as you continue reading. Take a moment to think about what it is like to use a word processor. You can move the cursor to any place you want and just start typing. When you need to move from one place to another within the file, you can use your mouse or the special navigation keys on your keyboard. With a PC, these would be <PageUp>, <PageDown>, <Home>, <End>, and the cursor control (arrow) keys. When you need to use a command, you select an item from a pull-down menu or use a special key combination. In 1976, when Bill Joy was developing vi, terminals did not have navigation keys. Nor did they support GUIs with a mouse, pull-down menus, function keys, or even an <Alt> key. There were only the letters of the alphabet, the numbers, punctuation, and a few miscellaneous keys such as <Shift>, <Ctrl>, <Return> and <Esc>. Without a mouse or navigation keys, there was no simple way to move the cursor from one position to another. Without pull-down menus or special keys, it was not obvious how the user might specify commands, such as insert, change, delete, copy or paste. The solution Joy chose was to design vi to work in two different modes. In COMMAND MODE, whichever keys you type are interpreted as commands. For example, in command mode, the single letter x is the command to delete a character; the combination dd is the command to delete an entire line. There are many such 1- and 2-character commands and, in order to master vi, you are going to have to learn many of them. This may sound difficult but, with a bit of practice, the vi commands are actually quite easy to use. The second mode is INPUT MODE. In this mode, everything you type is inserted directly into the editing buffer. For example, in input mode, if you type "Hello Harley", these 12 characters are inserted into the editing buffer. If you press the x key, an "x" is inserted; if you press dd, the letters "dd" are inserted. The beauty of this system is that it does not require anything special, such as navigation keys or a mouse. As such, you can use vi with any type of terminal, even over a remote connection. The only special keys you need are <Ctrl> and <Esc>, which were available on every terminal in general use in the late 1970s. Of course, for the system to work, there must be a way to switch from command mode to input mode and back again. When vi starts, you are in command mode. To change to input mode, you use one of several commands (which you will learn in due course). Once you are in input mode, changing back to command mode is easy: just press the <Esc> (Escape) key. If you are already in command mode and you press <Esc>, vi will beep. If you are wondering why the <Esc> key was chosen for this task, take a look at Figure 22-5: a drawing of the keyboard layout of the ADM-3A terminal taken from the ADM-3A Operators Manual. As we discussed earlier, this was the terminal Bill Joy was using when he developed vi. Notice the position of the <Esc> key on the left side of the keyboard, just above the <Ctrl> key. This is a good location for such an important key, as it is easy to reach with the fourth or fifth finger of your left hand. |
|
|
Now, take a look at your own keyboard. Notice that the <Esc> key has been moved to a much less convenient location, the very top left-hand corner of the keyboard. The old position of the <Esc> key was where your <Tab> key is right now, just above the <Caps Lock> key. Take a moment to compare what it is like to press the <Tab> key compared to the <Esc> key. When Bill Joy picked <Esc> as the means of changing from input mode to command mode, the key was easy to reach, which made changing modes fast and easy. Now pressing the <Esc> key requires a long, awkward stretch, making it slower and less comfortable to change modes. Such is life. To continue, at first it will seem strange to have to change to a special mode just to start typing data. Don't worry. When it comes to vi, practice not only makes perfect, but it also brings a kind of comfort and ease that lets you work as fast as you can type. If you are a touch typist, you will find that vi is very easy to use once you have memorized the basic commands, as you will be able to do anything you want without taking your hands off the keyboard. To give you a feeling for what it is like to work with modes, consider the following scenario. (Don't worry about the details. We'll discuss them later in the chapter.) You want to add some data to the middle of a file named schedule. To run vi, you enter the command: vi schedule As vi starts, it does three things. First, it copies the contents of schedule to the editing buffer. Next, it positions the cursor at the beginning of the first line of the buffer. Finally, it puts you in command mode. You begin by using the appropriate commands to move the cursor to the place where you want to add the new data. You then type a command to change to input mode and start typing. At this point, everything you type is inserted directly into the editing buffer. When you are finished typing, you press <Esc> to change back to command mode. You then save the contents of the editing buffer back to the original file and quit the program. — hint — Notice that, although it is vi that changes from one mode to another, it is common to talk as if it were you, the user, who were making the change. For example, I might say "There are many commands you can use when you are in command mode." Or, "To add text to the editing buffer, you must first change to input mode." When it comes to computers, this way of speaking is very common. This is because sentient beings tend to identify with their tools more than they like to admit.
Traditionally, vi did not do anything to tell you what mode you were in. You were just expected to know. I realize this sounds terribly confusing but, actually, it isn't. Once you have some experience, your mind will keep track of what is happening and, from moment to moment, you will just know what mode you are in. If you ever do lose your way, remember this: if you are in command mode and you press <Esc>, vi will beep at you. Thus, if you are not sure what mode you are in, just press <Esc> twice. This is guaranteed to leave you in command mode and to beep at least once. (Because if you are in input mode, the first <Esc> will change to command mode, and the second <Esc> will beep. If you are already in command mode, both <Esc>s will beep.) Still, you might ask, why doesn't vi do something to show you what mode you are in? Actually, some versions of vi will help you in this way, if you set an internal option named showmode. (We'll talk about vi options later in the chapter.) The command to use is: :set showmode Once you set this option, vi will display a message on the bottom line of the screen showing the current mode. (The actual message can vary from one version of vi to another, but you won't have any trouble figuring it out.) If you decide that you always want to set showmode, you can place the command in your vi initialization file, so the option will be set automatically whenever you start vi. (We'll discuss initialization files later in the chapter.) If you are a Vim user, you don't even have to set an option. By default, whenever you enter input mode, Vim will display the following reminder in the bottom left-hand corner of the screen: -- INSERT -- As nice as it might be to see a visual reminder, the truth is, it just isn't necessary. As I mentioned earlier, once you get used to vi and you have some experience switching from command mode to input mode and back again, you will always know what mode you are in. For this reason, most experienced vi users do not even bother to set the showmode option, even if it is available. They don't really need it and — after a little practice — neither will you. — hint — No matter how smart you are, vi will make you smarter.
There may be times when you want to use vi to look at an important file that should not be changed. There are two ways to do this. First, you can start the program with the -R (read-only) option. This tells vi that you do not want to save data back into the original file. (This option works with both vi and Vim.) Second, you can start the program by using the view command. There is really no difference between vi -R and view. You can use whichever is easier to remember. Thus, the following two commands are equivalent:
vi -R importantfile
Both commands start vi using a file named importantfile for reading only. Using vi in this way protects you from accidentally modifying important data. You may be wondering, why would anyone would want to use vi to work with a file that cannot be changed? If all you want to do is display the file, why not simply use less (Chapter 21)? The answer is that vi is very powerful and when it comes to displaying a file, many people prefer to use the vi commands instead of less. Once you master vi, you will feel the same way, especially when you need to examine large, complex files.
Once in a while, it may happen that the system will go down or you will lose your connection while you are in the middle of editing a file. If so, vi will usually make it possible for you to recover your data. You will remember that, when you use vi, the data you are editing is kept in the editing buffer. From time to time, vi saves the contents of the editing buffer to a temporary file. Normally, vi deletes this file when you are finished editing. However, if the program terminates abnormally, the temporary file will still exist, and you can use it to recover your data. To recover a file, start vi with the -r (recover) option: vi -r This will show you all the files that are available for recovery. You can now restart vi using -r followed by the name of the file. For example: vi -r test.c This will recover your file, hopefully leaving you where you were when the system went down. Note: Be careful not to confuse the -r (recover) option with the -R (read-only) option. — hint — Vim maintains an excellent recovery facility by saving your editing buffer in a SWAP FILE, stored in the same directory as the file you are editing. (We'll discuss directories in Chapters 23 and 24.) The swap file is updated automatically each time you type 200 characters or whenever you have not typed anything for four seconds. To recover a file, you must use the rm command (see Chapter 25) to delete the swap file; Vim will not do it for you. The name of the swap file consists of a . (dot), followed by the name of the original file, followed by .swp. For example, if you are editing a program called test.c, the swap file will be .test.c.swp. If you do not delete the swap file, the next time you edit the original file, Vim will create a new swap file with a slightly different name, for example, .test.c.swo.
There are two ways to stop vi. Most of the time, you will want to save your work and quit. However, if you accidentally mess up the data, you may want to quit without saving in order to preserve the original contents of the file. In either case, you must be in command mode to enter a quit command. If you are in input mode, you must first press <Esc> to change to command mode. To save your work and then quit, the command is ZZ. (I'll explain the name in a moment.) Hold down the <Shift> key and press <Z> twice. You do not need to press <Return>: ZZ To quit without saving your work, the command is :q!. After you type this command, you do need to press <Return>: :q!<Return> Before you use the :q! command, think at least twice. Once you quit without saving your data, there is no way to get it back. Later in the chapter, I'll explain why the second command starts with a colon and why you need to press <Return>. Rest assured, it all makes sense. (ZZ is a vi command; :q! is an ex command.) For now, all I will mention is that in Unix, the ! (bang) character is sometimes used to indicate that you want to override some type of automatic check. In the case of :q!, the ! tells vi not to check if you have saved your data. — hint — If you use Vim, it is possible to get stuck in limbo if you mistype the :q! command. The reason is that, with Vim, typing q is the signal to record a macro. (We'll talk about macros later in the chapter.) If this happens to you, you'll see the message "recording" on the bottom line of your window. Don't panic. To stop the macro recording facility, all you have to do is type q (for quit) until the message goes away. What's in a Name? ZZ It makes sense that there should be a quick way to save your work and stop vi, but why ZZ? Let's say the command had a simpler name such as s (for "save"). That would be convenient, but what would happen if you thought you were in command mode, and you were really in input mode? You would start typing data and, before you knew it, you would type an "s" and stop the program. The name ZZ was chosen because, although it is easy to type, it is unlikely you would ever type it by accident.
At this point, I'd like to take a moment to discuss a few short topics related to how vi uses the screen. The bottom line of the screen is called the COMMAND LINE. This line is used by vi in two different ways: to display messages and to display certain commands as you type them (see the next section). All the other lines on the screen are used to display data. If your editing buffer contains only a small amount of data, there may not be enough lines to fill up the screen. For example, say that your terminal or window contains 25 lines. The bottom line is the command line, leaving 24 lines to display data. Let's say the editing buffer contains only 10 lines of data. It would be confusing if vi displayed 14 empty lines as being blank. After all, you might actually have blank lines as part of your data. Instead, vi marks the beginning of each empty line with a ~ (tilde) character. You can see an example of this in Figure 22-6. As you add new lines to the editing buffer, they will take up more and more of the screen, and the tildes will disappear. Figure 22-6: How vi Displays Empty Lines The bottom line on your screen, the command line, is used by vi in two ways: to display messages and to display certain commands as they are being typed. All other lines are used to display data. When the editing buffer does not contain enough data to fill up all the lines, vi marks the empty lines by displaying ~ (tilde) characters. In this example, you can see 17 empty lines, each of which is marked by a single tilde. As more lines of data are inserted into the editing buffer, the empty lines will be used and the tildes will disappear. 1. This window has 25 lines. 2. The bottom line is the command line. 3. The other 24 lines are used to display data. 4. 5. 6. 7. Below are 17 empty lines, marked with tildes. ~ ~ ~ ~ ~ ~ ~ ~ ~ ~ ~ ~ ~ ~ ~ ~ ~ "harley" [New file] Most of the time, the data you edit with vi will consist of plain text: characters, letters, numbers, punctuation and so on. However, if the need arises, you can insert control characters (see Chapter 7) into the editing buffer. To do so, press ^V followed by the control character you want to enter. For example, if you want to type an actual ^C character, press ^V^C. If you actually want to enter a ^V, type ^V^V. When vi displays control characters, you will see a ^ character followed by a letter, for example, ^C. Remember that you are looking at a single character, even though it takes up two spaces on your screen. As I explained in Chapter 18, the tab character is ^I. The vi editor, like Unix in general, assumes that tabs are set for every 8 positions. (You can change the positioning, but most people don't bother.) If you insert a tab in the editing buffer, you will not see ^I. Rather, vi displays as many spaces as necessary to make it look as if your data is aligned according to the tab. This is just for your convenience: the extra spaces do not really exist. In reality, there is only one single character (^I) for each tab. Finally, if at any time your screen becomes garbled — for instance, if you are working remotely and there is noise on the line — you can tell vi to redisplay all the lines on your screen by pressing ^L.
I explained earlier that vi and ex are really different faces of the same program. This means that as you use vi, you have access to both the vi and ex commands. Most vi commands are one or two letters. For example, to move the cursor forward one word, you use the w command. (Just type "w" in command mode.) To delete the current line, you use the dd command. (Just type "dd".) Since vi commands are so short, they are not echoed as you type. With most vi commands, you do not press <Return>. For example, as soon as you type "w", the cursor moves forward one word. As soon as you type "dd", the current line disappears. If you make a mistake and type a bad vi command, you will hear a beep. However, there will not be an error message. (What would be the point?) The ex commands are longer and more complex than the vi commands. For this reason, they are echoed on the command line as you type. All ex commands start with : (colon). For example, the following command deletes lines 1 through 5: :1,5d This next command changes all occurrences of "harley" to "Harley". (Don't worry about the details for now.) :%s/harley/Harley/g As soon as you type the initial colon, vi moves the cursor to the command line (the bottom line of your screen). As you type the command, each character is echoed. When you finish typing the command, you must press <Return>. If you make a mistake before you press <Return>, you have two choices. First, you can press <Esc> to cancel the command completely. Or you can correct the command using the special keys shown in Figure 22-7 (see Chapter 7 for details). You can also use these same keys in input mode to make corrections as you type. Figure 22-7: Keys to Use to Make Corrections While Using vi As you are typing with the vi editor, there are three standard Unix keys you can use to make corrections. See Chapter 7 for details.
On some systems, when you make a correction, the cursor will move backwards, but the characters will not be erased from the screen. For example, say that you enter: :1,5del Before you press <Return>, you realize that you did not need to type "el" at the end of the command. So, you press <Backspace> twice. The cursor moves back two positions, but you still see the two characters. Don't worry about it: they are gone. Just press <Return>.
The vi editor has a large variety of commands. For convenience, we can group them as follows:
• Commands to move the cursor
My goal is for you to learn enough commands from each group so that you are able to form moment-to-moment strategies to carry out any editing task you require. Here is an example to show you what I mean. As you work, the cursor shows your current position within the editing buffer. To insert new data into the buffer, you would use the following strategy:
1. Make sure you are in command mode.
Once you learn the basic vi commands, you will find that there are a variety of ways to implement any particular strategy. How you choose to do it depends on the specific situation and your level of skill. One thing that may surprise you is the large number of commands vi has to offer. For example, there are 12 different commands just to enter input mode; in command mode, there are 40 different commands just to move the cursor (and these are just the simple cursor commands). As you might guess, no one needs to know 12 ways to enter input mode or 40 ways to move the cursor. However, I do want you to learn as many vi commands as possible because, believe it or not, that is what makes vi so easy to use. For example, let's say you want to move from the top left corner of the screen to a position halfway down the screen and several words to the right. You could move the cursor one position at a time, which would be slow and awkward. But if you knew all 40 cursor movement commands, you could choose the best ones for the situation and, by typing just three or four keys, you could instantly move the cursor to the exact location you want. In this chapter, I will cover all the basic vi and ex commands. For a more comprehensive reference, you can use Appendix C, which contains a summary of all the important commands. My advice is to keep teaching yourself until you know all the commands in Appendix C. From time to time, take a moment to teach yourself a new command; then practice it. All the commands are useful, and they are all worth practicing. As you read the rest of the chapter, I want you to work in front of your computer and follow along. As we discuss each new command, I want you to take some time to experiment with it. Finally, near the end of the book, you will find a special vi index, just for this chapter. This is the place to look when you want to find a vi-related topic. (Take a moment right now to find the index.) — hint — The art of using vi well is being able to select the best commands to carry out a task as simply and as quickly as possible.
As you read this chapter, you will need a text file to practice editing. You can create one by using either of the following commands:
cp /etc/passwd temp
The first command creates a small file by copying the system password file. The second command creates a large file by copying the vi man page. (The cp command is explained in Chapter 25; the password file in Chapter 11, the online manual in Chapter 9, and the redirection of standard output using > in Chapter 15.) Both of these commands will leave you with a file named temp, which you can use for practice. Once you have such a file, you can edit it by entering the command: vi temp When you are finished, you can remove (delete) the file by using the command: rm temp (The rm command is explained in Chapter 25.)
At all times, the cursor is on one of the lines on your screen. This line is called the CURRENT LINE. Within the current line, the cursor will be on or under one particular character, called the CURRENT CHARACTER. Many of the vi commands perform an action on either the current line or the current character. For example, the x command deletes the current character; the dd command deletes the current line. Whenever you move the cursor, the new position becomes the current character. Similarly, if you move the cursor to a new line, that line becomes the current line. Whenever you move the cursor to a line that is not currently on the screen, vi will display a different part of the editing buffer, so that the new current line is visible. In other words, to jump from one part of the editing buffer to another, you simply move the cursor. Within vi, there are many different commands that move the cursor, which means there are many different ways to jump from one place to another within the editing buffer. My goal is to teach you most of these commands. Then, whenever you need to jump to a different part of the editing buffer, you will be able to figure out which sequence of commands will work best. Before long, choosing the fastest cursor movement commands will become second nature. In some cases, there are several ways to make the exact same cursor movements. For example, there are three different commands to move the cursor one position to the left. In such cases, there is no need to learn all of the equivalent commands. Just pick the one you like the best and practice it. Now, let's get started. To move the cursor one position, you have a lot of choices. The best commands to use are h, j, k and l. They work as follows:
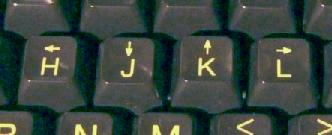
Why such an odd choice of keys? There are two reasons. First, if you are a touch typist, these four keys will be close to the fingers of your right hand on the home row, making it very easy to move the cursor. (Take a look at your keyboard.) Second, as we discussed earlier in the chapter, vi was developed in 1976 by Bill Joy using an ADM-3A terminal. Take a look at Figure 22-8 where you will see a close-up photo of an ADM-3A keyboard showing these four keys. Notice the arrows above the letters. The ADM-3A was designed to use these four keys as cursor control keys, so it was natural for Joy to use them the same way.
If you are a touch typist, using H, J, K and L to move the cursor is especially convenient. However, there are other keys you can use that are easier to remember. If your keyboard has cursor control keys (arrow keys), you can use those. (I will call them <Left>, <Down>, <Up> and <Right>.) You can also use <Backspace> to move left and the <Space> bar to move right.
Another way to move up and down is to use the - (minus) and + (plus) commands. Pressing - moves to the beginning of the previous line; pressing + moves to the beginning of the next line. As an alternative, pressing <Return> also moves to the beginning of the next line.
Within the current line, the 0 (number zero) command moves to the beginning of the line; the $ (dollar sign) command moves to the end of the line. If the current line is indented, you can use the ^ (circumflex) to move to the first character in the line that is not a space or tab.
Aside from moving the cursor by character or by line, there are several commands you can use to move from word to word. (Within vi, a WORD is a string of letters, numbers, or underscore characters.) To move forward, use the w or e commands. The w command moves to the first character of the next word; e moves to the last character (end) of the current word. To move backwards, use b to move to the first character in the previous word. You will find that using w, e or b is often a fast way to move the cursor exactly where you want, saving a lot of keystrokes.
All three commands stop at each punctuation character, which is okay if your data does not contain many such characters. However, if your data has a lot of punctuation, moving in this way is necessarily slow. Instead, you can use the W, E and B commands. These work the same way except they recognize only spaces and newlines as ending a word.
For example, say that the cursor is at the beginning of the following line: This is an (important) test; don't forget to study. If you press w several times, you will stop at each parenthesis, the semicolon, the apostrophe (single quote), as well as at the beginning of each word. That is, you will have to press w 13 times to reach the last word of the line. If you use W, you will stop only after each space. You will have to press W only 8 times to reach the last word of the line. (This would be a good time to take a moment to try these commands for yourself.) For larger movements, the parentheses commands jump from sentence to sentence:
Similarly, the brace bracket commands jump from paragraph to paragraph:
Again, these are commands you should try for yourself to make sure you understand exactly how they work. As you do, notice how handy it is being able to jump around by word, sentence and paragraph. Then take a moment to consider the following question: English prose is built from words, sentences and paragraphs. Why is it that, except for vi, almost no other text editors and no word processors allow you to work directly with words, sentences and paragraphs? Within vi, the official definition of a SENTENCE is a string of characters, ending in a period, comma, question mark or exclamation mark, followed by at least two spaces or a newline character. (The newline character marks the end of a line; see Chapter 7.) In other words, for vi to recognize a sentence, it must either be followed by two spaces or be at the end of the line. The reason for this requirement is that using two spaces allows vi to distinguish sentences from words (which are separated by single spaces). Consider the following example, which consists of two sentences, separated by a period and two spaces: Meet me at the Shell Tower at 6pm. Is this okay with you? A PARAGRAPH is defined as a section of text that starts and ends in a blank line. In other words, putting a tab at the beginning of a line is not enough to indicate a new paragraph. — hint — In general, it behooves you to form the habit of typing two spaces between sentences and a blank line between paragraphs. This will do three things: First, your writing will be easier to read. Second, when you use vi, it will be easy to move from one sentence to another (using ( and ) ) and to move from one paragraph to another (using { and }). Third, if you send text to someone who may need to edit it, that person will find your text a lot easier to manipulate. For example, let's say you email a message to someone who is polite enough to edit your text when he replies. It is a lot easier for him to delete whole sentences or paragraphs if the original message was formatted nicely. This may seem like a minor point, but it really isn't. Prediction: Once you are comfortable with vi, you will find yourself annoyed at people who use only a single space between sentences when they write plain text. There will be times when you will want to make a large move from one part of your screen to another. To start such a move, you can use the H, M or L commands. They jump to the top, middle or bottom of your screen respectively ("high", "middle" and "low").
In general, the art of moving the cursor is to get to where you want in as few keystrokes as possible. Here is an example. Say that your cursor is on the top line of the screen. The last line of data on the screen contains: today if you can. Otherwise give me a call. You want to move to the "c" in "call" so you can insert the word "phone". You could press <Down> many times to move to the line you want, and then press <Right> many times to move to the word you want. However, you can do the whole thing in three keystrokes: L$b
1. Move cursor to last line of screen (L).
To increase the power of the cursor movement commands, you can repeat a movement by typing a number, called a REPEAT COUNT, before the command. For example, to move forward 10 words, type: 10w Notice you do not put a space after the number. Here are two more examples. To move down 50 lines, type any of the following commands: 50j 50<Down> 50+ 50<Return> To move back three paragraphs, use a repeat count with the { (left brace) command: 3{ As a general rule, you can use a repeat count with any vi command, as long as doing so makes sense. — hint — Whenever you need to move the cursor from one place to another, challenge yourself to do it in as few keystrokes as possible(*). * Footnote This may help you work your way through college. Hang around the Student Center with your laptop, betting people that you can move the vi cursor from one point to another faster than anyone else. Start by using a lot of short movement commands like <Up> and <Down>. After you have lost a few bets and the odds increase, you can clean up by using H, M and L, followed by sentence and word commands with a repeat count.
At all times, vi displays as much of the editing buffer as will fit on your screen. When you work with a large amount of text, you will be able to see only part of it at once. For example, if your terminal or window has 25 lines, vi will be able to display only 24 lines of text at a time. (Remember, vi does not display text on the bottom line of the screen, which is used as the command line.) When you want to see another part of the text, you will need to move the cursor to that location within the editing buffer. There are several commands you can use. First, you can use the ^F (forward) command to move down one screenful. (Remember, ^F refers to <Ctrl-F>.) The opposite command is ^B (backward), which moves up one screenful. There are also two variations: ^D moves down a half screenful, and ^U moves up a half screenful. You use ^F and ^B when you want to move through the file quickly. You use ^D and ^U when you want to make smaller jumps.
As a general rule, if you type a number in front of a cursor movement command, the number acts as a repeat count. For example, to move down 6 screenfuls all at once, type: 6^F To move up 10 screenfuls, use: 10^B Since you can use ^F and ^B to jump a long distance in this manner, you do not need to be able to use a repeat count with the ^D and ^U commands. Thus, when you type a number in front of ^D or ^U, the number has a different meaning: it sets the number of lines that both of these commands should jump. For example, consider the following commands:
10^D
Either of these commands tells vi to jump 10 lines and all subsequent ^D and ^U commands should also jump 10 lines (until you reset the count). If you'd like, you can set the number of lines to a large amount. For example, if you want to jump 100 lines at a time, use either:
100^D
Until you change this number, all ^D and ^U commands will jump 100 lines.
There will be many times when you will move the cursor a long way and, a moment later, want to move it back. Sometimes, such a move is deliberate. For instance, you might jump to the end of the editing buffer, add a single line, and then want to return to what you were doing. The situation can also arise accidentally, when you make a mistake and suddenly find yourself a long way from where you were working. In such cases, you can return to your previous location by using the `` command (that is, by typing two backquotes in a row). To test this command, start vi with a large file. Then use the G command with a repeat count to jump to line 10: 10G Now move to the 8th character on the line by using the l (lowercase "l") command: 8l Next, use the G command to jump to the end of the editing buffer by typing: G To return to your previous location (the 8th character in line 10), type two backquotes in a row: `` A variation of this command is to use '' (two single quotes) instead of two backquotes. This jumps to the beginning of the line, rather than within the line. To test this, move the cursor again to the 8th position in line 10, and then jump to the end of the file:
10G
Now, type two single quotes in a row: '' Notice the cursor is at the beginning of the line. A more powerful version of this command allows you to mark any line with an invisible name. You can then use that name to jump to the line whenever you want. To mark a line in this way, type m followed by a single letter. The letter is now the name of that line. For example, to mark the current line with the name "a", type: ma To jump to a marked line, type a ` (backquote) or ' (single quote) followed by the name of the line, for example:
`a
The first command (backquote) jumps to the exact position within the marked line. The second command (single quote) jumps to the beginning of the marked line. — hint — When you mark a line, you can use any letter you want. In principle, this allows you to mark up to 26 lines ( a through z). In practice, you will rarely need to mark more than one or two lines at a time. The easiest way to mark one line is to type mm. You can then jump to this line by typing 'm. (If you use two marks, use ma and mz.) Once you get used to typing these combinations, it will become second nature for you to mark a line, move the cursor to do something else, and then jump back to the original line, all without taking your hands off the keyboard. (Take a moment to appreciate the power of vi.)
One way to move around the editing buffer is to jump to a line that contains a particular pattern. To do so, you use the / (slash) and ? (question mark) commands. As soon as you press the </> key, vi will display a / character on the command line (at the bottom of the screen). You can now type any pattern you want and press <Return>. This tells vi to search for the next occurrence of that pattern. If you want to search again for the same pattern, just type / again and press <Return>. Here is an example. You are editing a list of people to whom you want to send money, and you wish to find the next occurrence of the pattern "Harley". Type: /Harley Now press <Return>. The cursor will jump to the next line that contains the pattern. To repeat the search and jump once more, type a slash by itself, followed by <Return>: / Since you did not specify a new pattern, vi assumes you want to use the same one as the previous / command. By default, vi searches are case sensitive. Thus, the following two commands are not the same:
/Harley
When vi looks for a pattern, it starts from the cursor location and searches forward. If it gets to the end of the editing buffer, vi wraps around to the beginning. In this way, vi can search the entire editing buffer, regardless of your starting location. To search backwards, you use the ? command. For example: ?Harley This works the same as / except that vi searches backwards. Once you use ? to specify a pattern, you can search backwards for the same pattern again by using ? by itself: ? If vi gets to the beginning of the editing buffer, it will wrap around to the end and continue to search backwards. In this way, vi can search through the entire editing buffer backwards. Once you have specified a pattern with / or ?, there are two convenient ways to continue searching for the same pattern. The n (next) command searches in the same direction as the original command. The N (uppercase "N") command searches in the opposite direction. For example, say that you have just entered the command: /Harley You now want to find the next occurrence of the same pattern. All you have to do is press n. (Do not press <Return>.) This is the same as if you had entered /<Return> with no pattern. To search repeatedly for the same pattern, press n as many times as you want. If you press N, vi will repeat the same search backwards. As with the other search commands, n and N will wrap around the end (or beginning) of the editing buffer if necessary. The exact meaning of n and N depends on your initial search direction. For example, say that you enter a backwards search command: ?Harley Pressing n will repeat the search backwards (the same direction). Pressing N will repeat the search forwards (the opposite direction). — hint — Although the / and ? search commands were developed for vi, you will find them used with other programs. For example, you can use the exact same commands while displaying a file with less (see Chapter 21). For flexibility, you can use a regular expression (regex) to specify a pattern. (Regular expressions are discussed in detail in Chapter 20; you can look there for a lot of examples.) For reference, Figure 22-9 shows the various metacharacters that have special meanings within a regular expression. Figure 22-9: Using regular expressions when searching with vi When you use the / and ? commands to search with vi, you can increase the power of the search by using a regex for the search pattern. For reference, here are the most useful metacharacters you can use with such expressions. For details, see Chapter 20.
Here are a few examples showing the power of using a regex. To search for the next occurrence of an "H", followed by any two characters, use: /H.. To search for an "H" followed by any two lowercase characters, use: /H[a-z][a-z] To search for an "H", followed by zero or more lowercase characters, followed by "y", use: /H[a-z]*y To search for the next line that begins with "Harley", use: /^Harley To summarize:
Internally, vi keeps track of each line in the editing buffer by assigning it a line number. If you would like to see these numbers, you turn on the number option. (We'll talk about vi options later in the chapter.) The command to use is: :set number For example, say that you are using vi to write your Applied Philosophy dissertation. The editing buffer contains:
I have a little shadow that goes
If you enter the command :set number, you will see:
1 I have a little shadow that goes
It is important to realize that the numbers are not really part of your data. They are only there for your convenience. If you want to get rid of the numbers, you can turn off the number option as follows: :set nonumber If line numbers are turned off, you can check where you are in the file by pressing ^G. This displays the name of the file along with your position in the file. There are two important uses for line numbers. First, as you will see later, you can use them with many of the ex commands. Second, you can use the G (go to) command to jump to a specific line. Simply type the number of the line, followed by G. Do not type a space or press <Return>. For example, to jump to line 100, type: 100G To jump to the beginning of the editing buffer, type 1G or :1. With newer versions of vi, you can use gg as a synonym for 1G. Alternatively, you can jump to a specific line by typing : (colon), followed by a line number, followed by <Return>. Here are some examples. The first command jumps to line 1; the second command jumps to line 100; the last command jumps to the end of the file. (When you specify line numbers, the $ character stands for the last line in the file.)
:1
Here is a summary of all the variations:
You will find G and 1G (or gg) particularly useful, so take a moment and memorize them right now.
As we discussed earlier in the chapter, you must type a command to change to input mode in order to insert text into the editing buffer. When you are finished inserting text, you press <Esc> to leave input mode and return to command mode. (Remember: When you press <Esc> in command mode, vi will beep. If you are not sure what mode you are in, press <Esc> twice. When you hear the beep, you will know you are in command mode.) There are twelve commands to change to input mode. Half of these commands are for entering new data; the other half are for replacing existing text. Of course, you will ask, why do you need so many different commands just to change to input mode? The answer is that each command opens the editing buffer in a different place. Thus, when you want to insert data, you can choose whichever command works the best in the current situation. Here are the commands:
To see how this works, let's say you are editing a term paper for your Advanced Classical Music class. You are writing about famous lyrics(*) and the current line happens to be: For a dime you can see Kankakee or Paree * Footnote The line is taken from the 1939 song "Lydia the Tattooed Lady", written by Harold Arlen and Yip Harburg. Over the years, the song was popularized by Groucho Marx, who loved to sing it at the drop of a hat (and sometimes even without the hat). The cursor is under the letter "K" and you are in command mode. If you type i, you will change to input mode. As you type, the data will be inserted before the "K". The letters to the right will be moved over to make room. For example, say that you type: iAAA<Esc> (The <Esc> returns you to command mode.) The current line would look like: For a dime you can see AAAKankakee or Paree Now, instead, suppose you had pressed a to change to input mode. In this case, the data would be inserted after the "K". So, let's say you start with the original line and type: aBBB<Esc> The current line would now look like: For a dime you can see KBBBankakee or Paree — hint — To remember the difference between the i and a commands, think of i=insert, a=append. By using the I (uppercase "I") and A (uppercase "A") commands, you can insert data at the beginning or end of the current line, respectively. For example, let's say you start with the original line and type: ICCC<Esc> The current line would look like: CCCFor a dime you can see Kankakee or Paree If the current line is indented using spaces or tabs, vi will do the intelligent thing and start inserting after the indentation. Now, let's say you started with the original line and typed: ADDD<Esc> The data you typed is appended to the end of the line. The current line looks like: For a dime you can see Kankakee or PareeDDD Finally, to insert below the current line, use the o (lowercase letter "o") command. To insert above the current line, use the O (uppercase "O") command. In either case, vi will open a brand new line for you. — hint — To remember the difference between the o and O commands, remember two things: First, the letter "o" stands for "open". Second, imagine that the command name is a balloon filled with helium. The larger balloon, O, floats higher, above the current line. The small balloon, o, floats lower, below the current line. As you work in input mode, there are two things I want you to remember. As we discussed earlier in the chapter: • You can use the keys listed in Figure 22-7 to correct mistakes without having to leave input mode: <Backspace> (or <Delete>) to erase a character, ^W to erase a word, and ^X (or ^U) to erase an entire line. • You can insert a control character by prefacing it with ^V; for example, to enter a backspace, type ^V^H. On the screen, you will see ^H, even though it is a single character. As I explained earlier, there are many commands to move the cursor. In particular, the ^ (circumflex) command moves to the beginning of the current line (after any indentation); the $ (dollar sign) command moves to the end of the current line. Thus, if you want to insert data at the beginning of the current line, you can type ^ followed by i, instead of I. Similarly, you can insert at the end of the line by using $a instead of A. Here then, is a wonderful illustration of the beauty of the design of vi. By learning a few extra commands, you can often type one character (I or A) instead of two (^i or $a). If you are a beginner, this may not seem like much, but after just a few days with vi, you will see that anything that saves keystrokes used for common operations is a real convenience. Of course, you do have to learn the extra commands, which is why I say that vi is easy to use, but difficult to learn. If you are used to editing with a mouse, do not scoff at vi's older, command-oriented design. I urge you to take some time to learn all the important vi commands. Once you do, you will be pleased at how easy it is to edit data without having to take your hands off the keyboard to move a mouse or to press special keys. Moreover, you will find that using vi's powerful cursor movement commands is a lot easier and a lot faster than using a mouse to click on a scroll bar(*). * Footnote You can judge how quickly someone's mind works by noticing how he or she uses a mouse. The faster the flow of ideas (it's called "ideaphoria") the more likely the person is to prefer the keyboard to the mouse. As a general rule, people with high ideaphoria do not like to move their hands away from the keyboard, because it would slow them down. Have you ever watched someone read a Web page? People with high ideaphoria will press the <PageUp>, <PageDown> or <Space> keys. People with low ideaphoria will use the mouse to move the scroll bar up and down. — hint — Tools that are simple enough to use on the first day will feel clunky and awkward after the first month.
In the last section, we looked at commands that change to input mode so you can insert data into the editing buffer. In this section, we will examine how to change data that is already in the editing buffer. First, I will discuss seven vi commands. All but one of these replace data by changing to input mode. Let's start with the one command that does not change to input mode. To replace a single character by another character, type r followed by the new character. For example, let's say that you are writing one of your professors a letter explaining why you were not able to finish your term paper. You are in command mode, and the current line is: would mean missing The Sopranos rerun. I gm sure you You notice that the word "gm" is wrong. Move the cursor to the "g" and type: ra The current line now looks like: would mean missing The Sopranos rerun. I am sure you Since you changed only one character, there was no need to enter input mode. Suppose, however, you want to replace more than one character by overwriting. Move to where you want to start the replacement and type R (uppercase "R"). You will change to input mode and each character you type will replace one character on the current line. When you are finished, press <Esc> to return to command mode. Here is an example. The current line is as you left it above. You move the cursor to the "T" in "The" and type: RMa's funeral<Esc> The current line is now: would mean missing Ma's funeral. I am sure you When you use the R command to replace text, vi will not move off the current line. Thus, if you type past the end of the line, vi will simply append the extra characters to the end of the line. Sometimes, you will want to replace one or more characters with data that is not exactly the same size. There are a number of commands you can use. The s (substitute) command allows you to replace a single character with many characters. In our example, move the cursor to the a in "Ma" and type: s The a will change to a $, and you will be in input mode. You will see: would mean missing M$'s funeral. I am sure you The $ shows you which character is being replaced. Type as much as you want and press <Esc> when you are done. Let's say you type: other<Esc> The current line is now: would mean missing Mother's funeral. I am sure you The C (uppercase "C") command is a variation of this type of change. It allows you to replace all the characters from the cursor to the end of the line. In our example, say that you move to the "I" and type: C You will change to input mode and the last character to be replaced is marked with a $: would mean missing Mother's funeral. I am sure you$ The current character is the "I". Type what you want and press <Esc>. Let's say you type: We all hoped that<Esc> The current line becomes: would mean missing Mother's funeral. We all hoped that Sometimes the easiest thing to do is replace an entire line. There are two commands that will do the job: S or cc. Just move to the line you want to replace and type either of these commands. You will be in input mode. When you press <Esc>, whatever you typed will replace the entire line. Why are there two identical commands whose names look so different? Many of the vi command names follow a pattern. There are names with one lowercase letter, two lowercase letters, or one uppercase letter. According to this pattern, both S and cc should be the command to replace an entire line. Thus, you can use whichever one makes more sense. (If you can't see the pattern right now, don't worry. Wait until you learn some more commands.) The final vi command to replace data is extremely useful. This command is c followed by one of the commands to move the cursor. Once again, you will be put into input mode. This time, whatever you type will replace everything from the cursor up to the position indicated by the move command. This can be a tad confusing, so here are a few examples. Say that the current line is: would mean missing Mother's funeral. We all hoped that The cursor is at the "M". You want to replace the entire word "Mother" with "my dog". Type: cw This changes to input mode and marks the last character to be replaced with a $. You will see: would mean missing Mothe$'s funeral. We all hoped that You now type: my dog<Esc> The current line becomes: would mean missing my dog's funeral. We all hoped that Thus, the combination cw allows you to change a single word. You can use c with any of the cursor movement commands that are single characters. If you want, you can also use a repeat count. For example, the command c5w replaces 5 words. The command c4b replaces from the current position back 4 words. The command c( replaces back to the beginning of the sentence. The command c} replaces to the end of the paragraph. To replace 6 paragraphs, move to the beginning of the first paragraph and type c6}. The following summary shows the vi replacement commands:
As we discussed earlier, when you use vi, you have access to both the vi (screen-oriented) commands and the older ex (line-oriented) commands. So far, most of the commands we have talked about have been vi commands. With this section, we begin to cover the ex commands. All ex commands begin with a : (colon) character. Whenever you type a colon at the beginning of a command, vi immediately displays it on the command line (at the bottom of the screen). As you type the rest of the command it is echoed on this line (which is why it is called the command line). As you will see, ex commands are longer and more complex than vi commands. For this reason, vi echoes them as you type so you can see what you are doing. The only vi commands that are long and complex are the search commands (/ and ?), which is why they too are displayed on the command line. To replace a particular pattern, you use the ex command :s (substitute). The syntax is: :s/pattern/replace/ where pattern is the pattern you want to replace, and replace is the replacement text. For example, to replace "UNIX" with "Linux" on the current line, use: :s/UNIX/Linux/ Using :s in this way will replace only the first occurrence of the pattern on the current line. If you want to replace all occurrences, you would type the letter g (global) at the end of the command. For instance, to change all occurrences of "UNIX" to "Linux" on the current line, you would use: :s/UNIX/Linux/g If you want vi to ask your permission before making the change, add c (confirm) to the end of the command: :s/UNIX/Linux/c Of course, you can combine both g and c: :s/UNIX/Linux/cg When you use the c modifier, vi will display the line that contains the pattern. It will point out the location of the pattern and then wait for a decision. If you want to make the replacement, type y (for yes) and then press <Return>. Otherwise, type n<Return> (for no) or simply press <Return> by itself. (If you don't specify "y" or "n", vi will prudently assume you don't want to make the change.) To delete a pattern, simply replace it with nothing. For example, to remove all the occurrences of "UNIX" on the current line, use: :s/UNIX//g As a convenience, if you do not use a c or a g at the end of the command, you can omit the final / character. As an example, the following two commands are equivalent:
:s/UNIX/Linux/
There are two important variations of the :s command. First, you can specify a particular line number after the colon. This tells vi to perform the substitution on that particular line. For example, to change the first occurrence of "UNIX" to "Linux" on line 57, use: :57s/UNIX/Linux/ (Reminder: Use :set number to display line numbers; :set nonumber to not display line numbers.) Instead of a single line number, you can indicate a range by separating two line numbers with a comma. For example, to make the same replacement on lines 57 through 60, use: :57,60s/UNIX/Linux/ In this case, vi will replace the first occurrence of the specified pattern on each line in the range. Most of the time, you won't use specific line numbers. However, there are three special symbols that make this form of the command particularly useful. The . (period) stands for the current line, and the $ (dollar sign) stands for the last line in the editing buffer. Thus, the following command replaces all occurrences of "UNIX" with "Linux", from the current line to the end of the editing buffer: :.,$s/UNIX/Linux/g To make the same change from the beginning of the editing buffer (line 1) to the current line, use: :1,.s/UNIX/Linux/g The third special symbol is % (the percent sign), which stands for all the lines in the editing buffer. Thus, to change every occurrence of "UNIX" to "Linux" on every line in the editing buffer, use: :%s/UNIX/Linux/g This is the same as making the substitution from line 1 to line $ (the end of the editing buffer): :1,$/UNIX/Linux/g Using % is a lot more convenient than typing 1,$, so be sure to remember this handy abbreviation, you will use it a lot. From time to time, you will want vi to ask for confirmation before each substitution. This allows you to control which instances of the pattern are replaced. As we discussed, all you need to do is use the c (confirm) modifier, for example. :%s/UNIX/Linux/cg When you use such a command, you can stop part way through by pressing ^C (the intr key). This aborts the entire command, not just the current substitution. For reference, here is a summary of the :s command:
At the end of the command, you can use c to tell vi to ask for confirmation, and g (global) to replace all occurrences on each line. To specify a line number, you can use an actual number, a . (period) for the current line, or $ (dollar sign) for the last line in the editing buffer. The number 1 represents the first line in the editing buffer.
There are several ways to delete data from the editing buffer, using both vi and ex commands. The vi commands are as follows:
In addition, there are two variations of an ex command:
Regardless of which command you use, you can undo any deletion by using the undo commands, u and U (discussed in the next section). Remember this: it may save your life one day. The simplest delete command is x (lowercase "x"). It deletes the character at the current cursor position. For example, say you are writing a letter to your parents telling them all about life at school. The current line of the editing buffer contains: |
|
I love heiQnous paWrties and avoid the library as a rule |
|
You notice that there is a mistake in the third word. You move the cursor to the "Q" and type: x The current line is now: |
|
I love heinous paWrties and avoid the library as a rule |
|
The X (uppercase "X") command deletes a single character to the left of the cursor. For example, in the line above, you notice there is another mistake in the fourth word. You move to the "r" and press: X The current line is now: I love heinous parties and avoid the library as a rule |
|
I love heinous parties and avoid the library as a rule |
|
The D (uppercase "D") command deletes from the cursor to the end of the line. For example, say that you move to the space following the word "library" and type: D The current line becomes: I love heinous parties and avoid the library The next deletion command, d (lowercase "d") is followed by a cursor movement command. This deletes text from the cursor to the position indicated by the move command. This is similar to the c (change) command we discussed earlier. Here are some examples:
— hint — There are two especially useful ways to use the d command. First, to delete all the lines from the current line to the end of the editing buffer, use dG. Second, to delete all the lines from the current line to the beginning of the editing buffer, use either dgg or d1G. (As I mentioned earlier, the gg command does not work with older versions of vi.) To continue with our example, the current line is still: I love heinous parties and avoid the library You move to the beginning of the word "heinous" and delete 4 words by typing: d4w The current line becomes: I love the library The final vi deletion command is dd. This deletes the entire current line. If you want to delete more than one line, use a repeat count in front of the command. For example, to delete a single line, use: dd To delete 10 lines, use: 10dd At times, you will find it more convenient to delete using line numbers. To do so, you use the ex command :d. To use the :d command, you specify either a single line number or a range (two numbers separated by a comma). For example, to delete line 50, use: :50d To delete lines 50 through 60, use: :50,60d (Reminder: To display line numbers use :set number; to turn off line numbers, use :set nonumber.) As with the other ex commands, the symbol . (period) stands for the current line and $ (dollar sign) stands for the last line in the editing buffer. Thus, to delete from the beginning of the editing buffer to the current line, use: :1,.d This has the same effect as dgg or d1G. To delete from the current line to the end of the editing buffer, use: :.,$d This has the same effect as dG. To delete the entire editing buffer, use either of the following commands:
:1,$d
Remember that % stands for all the lines in the editing buffer.
Once you start making substitutions and deletions, it becomes important to be able to undo your changes. For instance, say you want to change all the occurrences of the word "advertisement" to "ad". You decide to enter: :%s/advertisement/ad/g However, you accidentally make a typing mistake, leaving out the second "d": :%s/advertisement/a/g You have just replaced all occurrences of "advertisement" with the letter "a". However, you can't fix the problem by changing all the "a's"to "ad" because there are "a's" all over the place. You could use the :q! command and quit without saving your work (if you were working with an existing file), but then you would lose all your changes for the entire editing session. Is there anything you can do? Here is a similar situation. You want to delete 10 lines, but instead of typing 10dd you type 100dd. You have just deleted 100 lines. Is there any way to get them back? The answer to both questions is yes. There are two commands you can use to undo changes, as well as a command to repeat the last change:
The u (lowercase "u") command will undo the last command that changed the editing buffer: an insertion, a substitution, a change or a deletion. In both our examples, all you would have to do is type u and the substitution/deletion would be nullified. If, after pressing u, you decide that you really did want the change, simply press u again. The u command can undo itself. (If only the rest of life were that simple.)(*) * Footnote Life is only that simple with vi. With Vim, pressing u more than once in a row undoes previous commands, one at a time. Of course, in many cases, this might be exactly what you want. The U (uppercase "U") command will undo all the changes you made to the current line since you last moved to it. For example, let's say you move the cursor to a particular line and make a lot of changes without leaving that line. Unfortunately, you make a big mess of it, so much so that all you want is for the line to be just as it was when you moved to it. Simply type U and the line will be restored to its original content. If, after pressing U, you don't like the results, you can undo it with the u (lowercase "u") command. The U command will undo as many changes as necessary, all at once, to restore the current line. However, U will only work as long as you stay on the line. As soon as you move the cursor to a new line, the U command will apply to that line, and there is no easy way to restore the old line. In addition to u and U, there is another important command that involves the last change to the editing buffer. It is the . (dot) command. You use it to repeat the last command that modified the editing buffer. This command can be very useful, so let's take a look at an example. Say that you want to insert the name "Mxyzptlk" at several different places in the editing buffer. This is a difficult name to spell, and it is a bother to have to type it more than once, so here's the smart way to do it. Move to the place where you want to make the first insertion and type: iMxyzptlk<Esc> You have inserted the name into the editing buffer. Now, move to the next place where you want to make the same insertion and type: . The exact same insertion will be repeated for you. You can use the . command as many times as you want. Be careful though: as soon as you make another change, even a tiny one-character deletion, the effect of the . command will change as well.
Whenever you delete one or more lines of text, vi saves the deletion in a special storage area called a NUMBERED BUFFER. There are 9 such buffers, numbered 1 through 9. At any time, you can insert the contents of a numbered buffer into the editing buffer. To do so, type a " (double-quote) followed by the number of the buffer, followed by a p or P (put) command. (Reminder: When you are working with lines, the p command inserts below the current line; the P command inserts above the current line.) For example, to insert the contents of buffer #1 below the current line, you would use: "1p To insert the contents of buffer #2 above the current line, you would use: "2P In this way, you can recall and insert any of your last 9 deletions. Let's say, for example, you have made several deletions and you want to restore one of them. However, you can't remember which one it was. Start by typing "1p. If that doesn't give you the text you want, type u to undo the insert and try "2p. If that doesn't work, type u to undo the insert and try "3p. Keep going until you get what you want. The sequence would look like this: "1pu"2pu"3pu... This in itself is pretty cool. However, vi can do more. After you undo the first insertion, if you use the . (dot) command to repeat the insertion, vi will automatically increase the buffer number by 1. This means, instead of using the above sequence, you can use: "1pu.u.u... To test this, use vi to create a file that contains the following five lines:
111
Type 1G or gg to jump to the first line. Then type dd five times in a row to delete each line separately. Now try the recovery sequence above and watch what happens. Reminder: The numbered buffers only store deleted lines, not parts of a line or individual characters. For example, if you use 10dd to delete 10 lines, the deletion is saved in a numbered buffer. If you use 5x to delete 5 characters, however, the deletion is not saved in this way.
The vi editor has a special facility that enables you to move or copy text from one place to another. In this section, we'll talk about moving. In the next section, we'll talk about copying. At all times, vi keeps a copy of your last deletion in a storage area called the UNNAMED BUFFER. At any time, you can copy the contents of the unnamed buffer to the editing buffer by using the p and P (put) commands. (The reason this storage area is called the unnamed buffer is that there are other, similar storage areas which have names.) The p (lowercase "p") command inserts the contents of the unnamed buffer after the current position of the cursor. For example, say that the current line contains: This good is a sentence. You move to the "g" and delete one word. As you do, that word is copied to the unnamed buffer: dw The current line now looks like this: This is a sentence. Now you move to the space after "a" and type: p The contents of the unnamed buffer is inserted to the right of the cursor. The current line becomes: This is a good sentence. Here is an example that uses the P (uppercase "P") command. Say that the current line contains: This is right now. You move to the space before the word "right" and type: de This erases up to the end of the word and leaves you with: This is now. Now move to the period at the end of the line and type: P The deletion is inserted to the left of the cursor. The current line becomes: This is now right. It is important to understand that the unnamed buffer can only hold one thing at a time. For example, let's say you have just deleted 1,000 lines of text. A copy of the text is stored in the unnamed buffer. If you want, you can insert it somewhere else in the editing buffer. Now, you delete a single character. The 1,000 lines of text are flushed from the unnamed buffer. If you use the p command now, you will get your last deletion, that is, the single character. To continue, consider, for a moment, the combination xp. The x command deletes the character at the current cursor position. The p command inserts the deletion to the right of the cursor. The net result is to transpose two characters. For example, say that the current line is: I ma never mixed up. You move to the first "m" and type: xp The current line is now: I am never mixed up. Another important combination is deep, which you can use to transpose two words. Here is an example. Say that the current line contains: I am mixed never up. Move to the space before the word "mixed". (Take care to move to the space before the word, not to the first letter of the word.) Now type: deep The de command deletes the space and the following word, after which the current line looks like: I am never up. The second e command moves forward to the end of the next word. The p then inserts the deletion after the cursor. The net result is: I am never mixed up. In this way, you have used deep to transpose two words. Take a moment right now to memorize this combination, so you can type it quickly when you need it. Whenever you delete whole lines, p and P will insert whole lines. The p command will insert below the current line; P will insert above the current line. For example, let's say you want to move 10 lines from one place to another. To start, move the cursor to the first line of text. Then use the dd command with a repeat count to delete 10 lines: 10dd These lines are deleted from the editing buffer and copied to the unnamed buffer. Now move the cursor to the line under which you want to make the insertion and type: p Consider, now, what happens when you type ddp. The dd command deletes the current line. The next line becomes the new current line. The p inserts the deletion below the new current line. The net result is to transpose two lines. (Try it.) To summarize:
Copying text from one location to another is a three-step process. First, you use the y, yy or Y commands to copy text from the editing buffer to the unnamed buffer without deleting the original text. Second, you move the cursor to wherever you want to insert the text. Finally, you use p or P to perform the insertion. When you copy text to the unnamed buffer without deleting it, we say that you YANK the text. (Hence the names y, yy and Y.) The y and yy commands work the same as d and dd, except they yank instead of delete. Here are some examples:
Let's say that you want to copy 5 paragraphs from one place to another. To start, move the cursor to the beginning of the first paragraph. Next, yank the 5 paragraphs into the unnamed buffer without deleting the text: y5} Now move the cursor to the line under which you want to make the insertion and insert the text: p For convenience, you can use Y as a synonym for yy. Thus, the following commands both yank 10 lines into the unnamed buffer:
10yy
Notice something interesting. The y command is analogous to d in that they both copy text to the unnamed buffer, from the current character to the end of a cursor move. (The only difference is that d deletes and y yanks.) Similarly, yy is analogous to dd in that they delete/yank entire lines. The Y command, however, does not work the same as D. The Y command yanks entire lines. The D command deletes from the current character to the end of the line. If you want to yank from the current character to the end of the line, you must use y$. To yank from the current character to the beginning of the line, you would use y0. — hint — Whenever you delete or yank text, the text remains in the unnamed buffer until you enter another delete or yank command. Thus, you can use the p or P commands to insert the same text, over and over, into different locations within the editing buffer.
The vi editor has a specific command to change letters from lowercase to uppercase or from uppercase to lowercase. The command is a ~ (tilde). Simply move the cursor to the letter you want to change and press: ~ The ~ causes vi to change the case of the current character and then advance the cursor one position. For example, say that the current line contains: "By Jove," he said, "that's a CAPITAL idea." The cursor is at the "C". You press ~. The current line now looks like: "By Jove," he said, "that's a cAPITAL idea." The cursor is now at the "A". Since, ~ moves the cursor one position to the right, you can type ~ repeatedly to change a sequence of letters. In our example, you can change the rest of the word to lowercase by typing six more tilde characters: ~~~~~~ The current line becomes: "By Jove," he said, "that's a capital idea." If you type ~ when the cursor is at a character that is not a letter, such as a punctuation symbol, vi will advance the cursor, but will not make a change. Thus, it is safe to "tilde" your way across a vast distance, as vi will simply skip over the non-alphabetic characters. To make this easy, you can put a repeat count in front of this command. For example, to change the case of a 7-letter word, move the cursor to the beginning of the word and type: 7~ The case of the entire word will be changed, leaving the cursor one position past the end of the word. Note: With some versions of vi, the ~ command will not move past the end of the current line, even when you use a large repeat count, such as 100~. Other versions of vi will process as many characters as you specify, even across multiple lines. When you have a spare moment, you may want to experiment with your version of vi to see whether or not the ~ command will move past the end of a line.
Like most complex Unix programs, vi supports a number of OPTIONS that enable you to control various aspects of its operation. When you start vi, each option is given a default value. If you want to change a particular aspect of how vi behaves, you can set the value of the appropriate option by using the :set command. There are two forms of the syntax, as there are two different types of options:
:set [no]option...
where option is the name of an option, and value is the value the option should have. In most cases, the default values will work just fine (which is why they are the defaults). However, from time to time, you may want to make changes. We have already done this three times in this chapter. First, we used the showmode option to tell vi to display a reminder whenever we are in input mode. The command we used was: :set showmode The second option we used was number to display line numbers: :set number Finally, we used nonumber to turn off the numbering: :set nonumber There are two types of vi options. The first type are SWITCHES, which are either off or on. The options I just mentioned are all switches. To turn on a switch, you use its name. To turn off a switch, you type "no" in front of the name. For example:
:set showmode
The second type of options, VARIABLES, contain a value. For instance, the tabstop variable sets the tab spacing. By default, tabstop is set to 8, which means that tabs are expanded to every 8th position (in common with Unix in general; see Chapter 18). If you want the tabs to expand to, say, every 4th position, you would set the tabstop variable to 4: :set tabstop=4 As a convenience, it is possible to set more than one option within the same command, for example: :set showmode nonumber tabstop=4 The actual options that are available depend on which version of vi you are using. As you would expect, newer versions have more options. Typically, standard vi has about 40 or so options, of which 16 are important. Vim has more than 340 options, almost all of which you never need. For reference, Figure 22-10 shows the important vi options. Figure 22-10: vi Options: Switches and Variables You can control various aspects of vi by using two different types of options: switches (off or on), and variables (store a value). These two lists show the most useful switches and variables, along with their abbreviations, default values, and meaning.
As you can see from the two figures, almost all options have abbreviations. For your convenience, you can use these abbreviations instead of typing the full name. For example, the following two commands are equivalent:
:set showmode nonumber tabstop=4
— hint — To set options automatically each time you start vi, place the appropriate :set commands in an initialization file (discussed later in the chapter).
To display the values of one or more options, you use a variation of the :set command. The syntax is: :set [option[?]... | all] where option is the name of an option. To display the value of all options, use: :set all Using this command is the best way to see a list of all the options supported by your version of vi. To display the value of a single option, type the name of the option followed by a ? (question mark). For example:
:set number?
As a convenience, it is possible to display the value of more than one option name in a single command: :set number? showmode? wrapmargin? Finally, to display the values of only those options that have been changed from their default values, use :set by itself: :set When you use this last command, you may see options you don't remember changing. This is because every system has a number of initialization files that are read by vi when it starts. One of these files is under your control, and you can use it to set up your working environment to suit your needs. (We'll talk about this later in the chapter.) The other initialization files are either created automatically when vi is installed or are set up by your system administrator. Typically, these files will contain commands to modify the values of certain options, which will then show up in the list of options having non-default values.
When you type a document, you need to break the text into lines. One way to do this is to press <Return> at the end of each line. As I explained in Chapter 7, pressing <Return> generates a newline character, which marks the end of a line. This works fine for small amounts of text, but if you are doing a lot of typing, it's more convenient to let vi break the lines for you automatically. To do this, you set the wrapmargin (wm) option. The syntax is: :set wrapmargin=n where n is the number of positions from the right margin where you want lines to start breaking. For convenience, you can use the abbreviation wm instead of the full name. The wrapmargin option only affects input mode. When you set wrapmargin to a number greater than 0, it causes vi to break a line into two as you are typing when the line extends within that many characters of the right margin. For example, to tell vi to break your lines automatically when they get within 6 characters of the right margin, use either of the following commands:
:set wrapmargin=6
If you want the longest possible lines, use a value of 1: :set wm=1 To turn off automatic line breaking, set wm to 0: :set wm=0 If you are working with indented text, you can turn on the autoindent (ai) option: :set autoindent This tells vi to match the indentation to the line above or below the line you are typing. Automatic line breaking only affects text as you type it. To reformat existing text, you can use either the r and J commands (see the next section) or the fmt command from Chapter 18 (discussed later in the chapter). — hint — If you set wrapmargin to anything smaller than 6, there will be very little space at the end of each line, which makes it awkward to make corrections. In my experience, the best setting for wrapmargin is between 6 and 10, which leaves plenty of room for small changes.
There will be many times when you want to break long lines into two or join short lines together. For example: This line is much too long and must be broken into two. You want to break this line after the word "and". The easiest way is to move the cursor to the space following "and" and type: r<Return> Using the r command replaces a single character with another character. In this case, the r command replaces the space with a newline, effectively breaking the line. If you have lines that are too short, you can combine them by moving the cursor to the first line and type J (uppercase "J"). This combines the current line and the next line into one long line. When vi joins lines, it automatically inserts spaces in the appropriate places, a single space between words and a double space at the end of a sentence. (Isn't that nice?) To join more than two lines at the same time, put a repeat count before the J command. Here is an example. Your editing buffer contains the following lines:
This sentence
Move the cursor to the first line and type: 3J The result is: This sentence is short. This sentence is also short. — hint — The r and J commands are useful for making small adjustments. However, when you need to reformat anything longer than 5-6 lines of text, it is usually better to use the fmt command as explained later in the chapter.
There will be many times when you will find it convenient to copy or move lines by using line numbers. For these operations, you use the ex commands :co (copy) and :m (move). Both commands use the same format. The only difference is that :m deletes the original lines and :co does not. To use these commands, you specify a single line number or a range of line numbers before the command name. These are the lines to be copied or moved. After the command name, you specify the target line number. The new lines will be inserted below the target line. The syntax is:
x[,y]:coz
where x, y and z are line numbers. The source lines (x, or x through y) are copied or moved, and inserted below the target line (z). Here are some examples:
(Reminder: To display line numbers use :set number; to turn off line numbers, use :set nonumber.) As with other ex commands, you can use a . (period) to refer to the current line and a $ (dollar sign) to refer to the last line in the editing buffer. For example, the following command moves lines 1 through the current line to the end of the editing buffer: :1,.m$ You can also use line 0 (zero) to refer to the beginning of the editing buffer. For example, the following command moves from the current line through the last line to the beginning of the editing buffer: :.,$m0 These last two commands are interesting. They both swap the top and bottom parts of the editing buffer. However, there is a subtle difference. With the first command, the current line ends up at the bottom of the editing buffer. With the second command, the current line ends up on top. (Take a moment to think about this.)
There are several ways to use regular shell commands without having to stop vi. First, you can enter a command by typing :! followed by the command. This tells vi to send the command to the shell to be executed. When the command finishes, control will be returned to vi. For example, to display the time and date, enter: :!date After the command is finished, you will see a message. The message will vary depending on your version of vi. Here are the most likely ones:
Press ENTER or type command to continue
At this point, simply press <Return> and you will be back in vi. To repeat the most recent shell command — regardless of how long it has been since you entered it — use: :!! For example, if the last shell command you entered was date, you can display the time and date once again by using :!!. To insert the output of a shell command directly into the editing buffer, you can use the :r! command. We'll talk about this command in the next section, where you will find some examples. From time to time, you will want to enter more than one shell command. You can do so by starting a new shell. There are two ways to do this. First, you can use the :sh command: :sh This will pause vi and start a new copy of your default shell. You can now enter as many commands as you want. When you are finished with the shell, stop it by pressing ^D or by entering the exit command. You will be returned to vi. Alternatively, you can start a new shell by running an actual command. For example, to start a new Bash shell, run the bash program: :!bash To start a new Tcsh shell, use: :!tcsh (The various shells are discussed in Chapter 11.) As with :sh, when you end the shell, you will be returned to vi. This technique is handy when, for some reason, you want to use a non-default shell. For example, say that you normally use Bash but, just this once, you want to test something by running the Tcsh. All you have to do is use the command :!tcsh. To summarize:
To read data from an existing file into the editing buffer, you use the :r command. The syntax is: :[line]r file where line is a line number and file is the name of a file. The :r command reads the contents of the file and inserts it into the editing buffer after the specified line. For example, the following command inserts the contents of the file info after line 10: :10r info To refer to the beginning of the editing buffer, use line 0 (zero). For example, to insert the contents of info at the beginning of the editing buffer, use: :0r info To refer to the end of the editing buffer, use $. For example, to insert the contents of info at the end of the editing buffer, use: :$r info If you omit the line number, vi will insert the new data after the current line. This is probably the most useful form of the :r command. You simply move the cursor to where you want to insert the new data and enter the :r command. For example, let's say you want to insert the contents of the file info at the end of the current paragraph. Use the } (right brace) command to jump to the end of the paragraph, then insert the data:
}
There is a variation of the :r command that is especially useful. If, instead of a file name, you type an ! (exclamation mark) followed by the name of a program, vi will execute the program and insert its output into the editing buffer. Here is an example. The ls program displays a list of the files in your working directory (see Chapter 24). To insert such a list after the current line, enter: :r !ls As a second example, here is how you would insert the current time and date above the first line of the editing buffer: :0r !date To complete our discussion of :r, here is a wonderful time-saving idea that illustrates the power of this command. In Chapter 19, we discussed how to use the look command to help with spelling. For example, say that you want to use the word "ascetic", but you are not quite sure how to spell it. You can use look to display possible words from the dictionary file: look asc Below is some typical output. A quick perusal of the list shows the exact word you want (in the 5th line):
ascend
Let's say you are working with vi, typing into the editing buffer, and you get to the point where you want to insert this particular word into the text. Press <Esc> to change from input mode to command mode, and then enter the command: :r !look asc The output of the look command will be inserted after the current line (the last line you typed). Look at the list and delete all words you don't want. In this case, you would delete all but the 5th word. (If you don't want any of the words, you can use the u command to undo insertion.) Once you have deleted all but the correct word, move up to the last line you typed and type: J This will join the new word onto the end of the line. Finally, to return to input mode, ready to insert text at the end of the line, type: A This allows you to append data to the end of the current line. You are now back in business: continue typing. At first, a sequence of commands such as the one above may seem a bit complex. Actually, once you get used to it, it's quite simple. Moreover, you can do the entire thing without taking your hands off from the keyboard. Try it: it's way cool. Here is a summary of the :r command:
— hint — If you don't like the result of a :r or :r!command, you can reverse it with the u (undo) command.
The ! and !! (exclamation mark) commands will send lines from the editing buffer to another program. The output of the program will replace the original lines. For example, you can replace a set of lines with the same data in sorted order. Here is how it works. Move to the line where you want to start. Type the number of lines you want to process, followed by !! (two exclamation marks), followed by the name of a program, followed by <Return>. For example, say that you have 5 lines that contain the following data, which you want to sort. (The sort program is discussed in Chapter 19.)
entertain
Move to the first line and enter: 5!!sort Once you type the second !, vi will move the cursor to the command line and display a ! character. You can now type any shell command directly on the command line. If necessary, you can press <Backspace> (or <Delete>) to make corrections before you press <Return>. In our example, the original 5 lines will be replaced by:
anaconda
If you don't like the results, as always, you can undo the change by using the u command. Here is another example you will find especially useful. In Chapter 18, we discussed the fmt (format) program. This program reformats the text into lines that are (by default) no longer than 75 characters. While doing so, fmt preserves spaces at the beginning of lines, spaces between words, and blank lines. In other words, fmt will make your text look nice without changing the paragraph breaks. The fmt program is useful for formatting all or part of your editing buffer when you are creating documents. Once you know how to use fmt, you don't have to worry so much about line breaks as you are entering or modifying your data, because you can always fix them later. As an example, the following command will format 10 lines, starting from the current line: 10!!fmt So far, all our examples have used the !! (double explanation mark) command. The ! (single exclamation mark) command works in much the same way, except that it gives you more flexibility in specifying the range of input lines. Type ! followed by a command to move the cursor, followed by the name of a program. All the lines from the current line to the end of the cursor move will be sent to the program for processing. For example, let's say you want to format the text from the current line to the end of the paragraph. Remembering that the } (right brace bracket) command moves the cursor to the end of the paragraph, you would use: !}fmt Later in the chapter, I'll show you how to make this command especially easy to use. (See the section on macros.) Moving on, here is an easy way to format the entire editing buffer. Jump to the first line of the editing buffer by typing gg or 1G. Then enter: !Gfmt (Remember, the G command jumps to the end of the editing buffer.) Similarly, you could sort the entire editing buffer by using gg or 1G followed by: !Gsort To summarize:
When you stop vi using the ZZ command, it automatically saves your data. However, there are several commands you can use to write data to a file whenever you want. These commands are important as they allow you to back up your data from time to time without quitting vi. They also allow you to save data to a different file. The commands are:
The :w command writes the contents of the editing buffer to the original file, replacing the current contents of the file. For example, let's say you start vi by entering the command: vi memo The contents of the file memo are copied to the editing buffer. No matter how many changes you make to the editing buffer, the original file memo is not changed. This is important as it allows you to quit without changing your file (by using the :q! command). However, at any time, you can copy the contents of the editing buffer to the original file by entering: :w Normally, you don't need to do this unless you are going to use the :e command to start editing a new file (see below). However, if you have made a lot of changes, you might want to take a moment and save them to the original file. This will protect you against losing your work if something goes wrong. If you specify the name of a file after the :w command, vi writes the data to that file. For example, to save the contents of the editing buffer to a file named extra, enter: :w extra If the file does not already exist, vi will create it. If the file does exist, vi will display a warning message. Here are two typical messages:
File exists - use "w! extra" to overwrite
If you really do want to overwrite the file, you must use :w! instead: :w! extra To append data to the end of an existing file, type >> (two greater-than signs) after the command name. For example: :w>> extra Using >> preserves the old data. Notice the similarity to the >> notation used to append standard output to an existing file (see Chapter 15). If you want to write only certain lines from the editing buffer, you can specify them in the usual manner. For example, to write line 10 to a file named save (replacing the contents of save), enter: :10w save To append lines 10 through 20 to the file named save, use: :10,20w>> save Earlier in the chapter, I explained that there were two ways to quit vi. To save your data and quit, you use the command ZZ; to quit without saving, you use :q!. Actually, there is a third way. As long as you have already used the :w command to save your data, you can quit by using :q. As a convenience, you can combine these two commands: :wq Thus, the combination :wq has the same effect as ZZ.
When you start vi, you can specify the name of the file you want to edit. For example, to edit a file named memo, you would enter: vi memo If you decide to edit a different file, you do not have to quit and restart the program. To change to a new file, use the :e command, followed by the name of the file. For example, to edit a file named document, enter: :e document When you start editing a new file, the previous contents of the editing buffer are lost, so be sure to use the :w command first to save your data. When you use the :e command, vi will check to see if you have saved your data. If there is unsaved data, vi will not let you change to a new file. If you would like to override this protection, use the :e! command. For example, say that you start vi using the command: vi memo The contents of memo are copied to the editing buffer. As it happens, you make so many mistakes that you would rather just start over. The last thing you want to do is save the contents of the editing buffer back to the original file. Just enter: :e! You are now editing a copy of the original memo file: the previous changes have been thrown away. To summarize:
To create abbreviations for frequently used words or expressions, you use the :ab (abbreviate) command. The syntax is: :ab [short long] where short is an abbreviation and long is the replacement for that abbreviation. Here is an example. You are working on a resumé for a summer job, and you find it tiresome to type "exceptionally gifted" over and over. Instead, you can establish an abbreviation, say, "eg". Type :ab, followed by the short form, followed by the long form: :ab eg exceptionally gifted From now on, whenever you are in input mode and you type eg as a separate word, vi will automatically replace it with "exceptionally gifted". Notice that the substitution only takes places when "eg" is a word on its own; vi is smart enough not to replace "eg" within another word, such as "egotistical". To remove an abbreviation, use the :una (un-abbreviate) command. The syntax is: :una short where short is an abbreviation. Simply type :una followed by the name of the short form you wish to remove. For example: :una eg At any time, you can see a list of all your abbreviations by entering the :ab command by itself: :ab — hint — To define abbreviations automatically each time you start vi, place the appropriate :ab commands in your initialization file (discussed later in the chapter).
As we discussed in the previous section, the :ab command enables you to create abbreviations to use in input mode. Instead of typing the same text over and over, you can use an abbreviation. Analogously, the :map command enables you to create one-character abbreviations that are used in command mode. In effect, this allows you to create your own customized one-character commands, which are called MACROS. The syntax is: :map [x commands] where x is a single character, and commands is a sequence of vi or ex commands. Here is an example of a simple macro. Earlier in the chapter (in the section on moving text), I showed you how to transpose two words: move the cursor to the space in front of the first word and type deep. To make this more convenient, you can define a macro: :map K deep Now, to transpose any two words, all you have to do is move the cursor to the space in front of the first word and press K. By definition, macro names must be a single character. If you use a name that already has a meaning, the character will lose that meaning. For example, earlier in the chapter, we talked about the x (lower case "x") and X (uppercase "X") commands. The x command deletes the current character (the character to which the cursor is pointing); X deletes the character to the left of the cursor. Consider the following macro definition: :map X dd This command creates a macro named X (uppercase "X") that deletes the current line. Once you define this macro, the regular X command is lost. Still, you may not mind. If you rarely use the command, you might find it convenient to type X to delete a line. Usually, however, it is a good idea not to replace regular commands. This raises the question: which characters are not used by vi or Vim? Very few, actually. As you can see from Figure 22-11, there are only 14 characters not used by vi. Vim is even more extreme: the only common characters it doesn't use as command names are ^K and \ (backslash). This is not as much of a restriction as you might think, as there are several Vim commands you will probably not need, so it's safe to replace them. These characters are also listed in Figure 22-11. Figure 22-11: Characters to use as vi and Vim macro names The :map command allows you to create a macro, an abbreviation for a sequence of vi or ex commands. A macro name must be a single character. If you choose a name that already has a meaning as a command, that meaning will be lost. The first table shows those characters that are not used as vi commands and, hence, are safe to use as macro names.
With Vim, virtually all characters are used as command names. Nevertheless, some commands are used so infrequently, there is no reason not to replace them. These characters are shown in the second table.
In a real sense, macros are tiny programs. As with all programming tools, there are far more details than you will ever need, so I won't go into all the fine points.(*) Instead, I'll show you a few more useful macros to give you an idea of what they can do for you. * Footnote If you learn enough tricks and take enough time, you can write very complex vi macros. For example, there are people who have written macros to solve the Towers of Hanoi problem and to emulate a Turing Machine (two classical computer science problems). If you like this sort of thing, you should know that Vim comes with much more sophisticated tools than standard vi. With Vim, you can record, replay and modify macros. You can also write programs using a full-fledged scripting facility. For more information, search the Web for "vim macros" and "vim scripting". As we discussed earlier in the chapter, the G command moves the cursor to the end of the editing buffer. The 1G (go to line 1) command moves to the beginning of the buffer. With some versions of vi (and with Vim), you can use gg instead of 1G. If your version of vi doesn't support gg, however, it is handy to have a simple command to take its place. Consider the following: :map g 1G This command defines a macro named g that expands to the command 1G. Now, when you want to zoom around the editing buffer, you can type g (lowercase "g") to jump to the beginning and G (uppercase "G") to jump to the end. Here is another, more complicated macro. Let's say you are writing a program in a language such as C or C++ in which comments are enclosed by /* and */, for example: /* This line is a comment */ The following macro creates a comment out of an ordinary line by inserting /* at the beginning of the line, and */ at the end of the line: :map * I/* ^V<Esc>A */^V<Esc> Let's take this macro apart. Following :map, you see a * (star) character. This will be the name of the macro. Next come the commands. To begin, we use I to enter input mode at the beginning of the line. Then we type /* followed by a space. At this point, we need to press the <Esc> key to quit input mode. To insert an <Esc> code into the macro, we type ^V<Esc>. (As we discussed earlier in the chapter, ^V [Ctrl-V] tells vi that the next key is to be taken literally.) Next we use the A (append) command to enter input mode at the end of the line. We then type a space, followed by /*. To quit input mode, we use another <Esc>. If you enter the above command for yourself, you will see that the <Esc> code is displayed as ^[. In other words, what you will see on your screen will be: :map * I/* ^[A */^[ This is because the <Esc> code is actually ^[, in the same way that a backspace is ^H (see Chapter 7), and a tab is ^I. Some versions of vi allow you to assign a macro to the function keys <F1> through <F10>. To do so, you refer to the function key by typing a # character followed by a number: 1=F1, 2=F2... 0=F10. For example, this following command creates a macro assigned to the <F1> key: :map #1 :set all At any time, you can display a list of all your macros by using the :map command by itself: :map To remove a macro, use the :unmap command. The syntax is: :unmap x where x is the name of a macro. For example:
:unmap g
When vi or Vim starts, it looks for an initialization file in your home directory. If such a file exists, the program will read it and execute any ex commands that it finds. This allows you to initialize your working environment automatically. (The home directory is discussed in Chapter 23, initialization files in Chapter 14.) With vi, the initialization file is named .exrc (pronounced "dot-E-X-R-C"). With Vim, the file is named .vimrc ("dot-vim-R-C")(*). As we discussed in Chapter 14, the initial . (dot) indicates that these are hidden files; the "rc" designation stands for "run commands". * Footnote Vim will first look for a .vimrc. If this file does not exist, it will then look for a .exrc file. Thus, if you have both files, only the .vimrc file will be read. Creating a vi initialization file is straightforward: just insert the ex commands you want to be executed automatically each time you start vi. In particular, you should include all the :set (option), :ab ( abbreviation), and :map (macro) commands you use regularly. You can also use run shell commands by using the :! command. As vi reads the initialization file, lines that begin with a " (double quote) character are ignored, which means you can use such lines for comments. Similarly, spaces and tabs at the beginning of a line are also ignored, allowing you to indent lines for readability.(*) Finally, vi assumes that everything it reads is an ex command, so you do not need to start any of the commands with a colon. * Footnote Some versions of vi (and Vim) will also ignore blank lines in an initialization file, which lets you make your file even easier to read. If your version of vi does not allow blank lines and you use them, you will see a non-specific error message, such as: "Error detected in .exrc." To illustrate these ideas, Figure 22-12 contains a sample initialization file you can use with vi or Vim. Figure 22-12: vi/Vim sample initialization file When you start vi or Vim, the program looks for an initialization file in your home directory. Here is a sample file you can use as a template to create your own initialization file. See text for details.
" =================================
" Sample vi/Vim initialization file
" =================================
"
" 1. Options
    set autoindent
    set compatible
    set ignorecase
    set showmatch
    set showmode
    set wrapmargin=6
"
" 2. Abbreviations
    ab eg exceptionally gifted
    ab h Harley
"
" 3. Macros
    map K deep
    map X dd
    map g 1G
    map #5 {!}fmt^M
"
" 4. Shell commands
    !date; sleep 2
Section 1 sets options as follows: autoindent: (Input mode) When using wrapmargin for automatic indentation, match the indentation to the line above or below. compatible: (Vim only) Forces Vim to run in vi-compatible mode. Use this if Vim does not run in vi mode, even when you use the -C option. exrc: When starting, look for a second initialization file in the current directory (explained in the next section). ignorecase: When searching, ignore differences between upper and lower case (very handy). showmatch: (Input mode) When you type a closing Parenthesis, bracket or brace, highlight the matching opening parenthesis, bracket or brace. showmode: Display a reminder when you are in input mode. wrapmargin: Specify how close to the end of a line the text should be to trigger automatic indentation. Section 2 creates the abbreviations. This is a good place to specify shortcuts for tricky words, HTML tags, programming keywords, and so on. Section 3 defines the macros. As we discussed earlier in the chapter, macros can be complex (especially with Vim). The sample macros here are mostly straightforward. However, I do want to make two comments. First, if your version of vi supports the gg command, you don't need the g macro. Second, the macro that uses the <F5> function key (#5) ends with a ^M character — the carriage return code — to simulate your pressing the <Return> key. Note this is a single control character, not two separate characters. When you type this line into the initialization file, you must press ^V<Return> or ^V^M to insert an actual ^M. Section 4 contains shell commands. I have used a single command line to show you how it works. In this case, I have used the date command (Chapter 8) to display the time and date. The sleep command pauses for the specified number of seconds (in this case, 2). If your initialization file contains a bad command, vi will display an error message and quit executing the file at that point. Although vi will start properly, the rest of the initialization commands in the file will not be processed. Vim is more forgiving: it will display an error message, ask you to press <Enter>, and then continue with the next command in the file.
For situations in which you need extra customization, it is possible to use an extra initialization file. Before I can explain how it works, I need to briefly mention a couple of ideas we will be discussing in Chapter 24. When a userid is created, it is given its own directory, called a "home directory". Within your home directory, you can create as many subdirectories as you need. Each time you log in, you start work in your home directory. However, it is easy to change from one directory to another as you work. At any time, the directory you are currently using is called your "working directory". When you run vi or Vim, it starts by executing the initialization file in your home directory. It then checks the status of the exrc option. If this option is turned on, the program looks in your current directory for a second initialization file to execute (assuming your current directory is different from your home directory). In this way, you can organize your files into subdirectories, each of which has its very own initialization file. For example, let's say you are currently working on three projects: an essay, a program, and a Web page. The files for these projects are kept in three separate directories named essay, program and webpage. In each directory, you create a customized .exrc or .vimrc file that contains the options, abbreviations and macros you want to use when you edit files for that particular project. You are working in the program directory and you want to edit a file named test.c. You enter the command: vi test.c As soon as vi starts, it looks for an initialization file in your home directory. Once the commands in this file are executed, vi checks the exrc option. If it is turned on, vi looks for a second initialization file in the program directory (your current directory). In this way, you are able to customize your working environment in a way that is suitable for editing programs.
At the beginning of the chapter, we talked about Vim, a complex text editor that is backward compatible with vi. Vim was created in 1988 by the Dutch programmer Bram Moolenaar as an "improved" version of a vi clone. Since then, Vim has been extended enormously, with hundreds of new features. At the same time, Vim has become so popular that, on many Unix and Linux systems, it takes the place of vi. Although you can run Vim in "vi-compatible" mode, it is much more than an improved version of vi. Vim is a very sophisticated editor in its own right, significantly different from vi. The truth is, Vim is so complex that it is impossible for anyone to teach it to you. You must learn it on your own. However, when you start, you will find an immediate problem: the Vim documentation is not at all suitable for beginners. The solution is to start by learning vi. Once you understand vi, you will have some context. You can then teach yourself Vim by adding to your knowledge a bit at a time. This is one reason why, in this chapter, we have concentrated on vi, not Vim. (The other reason is that vi is ubiquitous, while Vim is not available on many Unix systems.) So, if you want to learn Vim, here is my advice. Start by reading this chapter and practicing until you feel you have mastered vi. That should take you at least a month or two. During this time, you will run Vim in vi-compatible mode. (The instructions for doing so can be found earlier in the chapter.) Later, you can turn off compatible mode and start using Vim in its own right. My guess is you have used many programs — especially GUI-based programs — that you were able to pick up on the fly as you were using them. Vim is different. Vim is something you must teach yourself and, to do so, you must read the documentation.(*) Start by running the following command from the shell prompt: vimtutor * Footnote If you ask another person to teach you Vim, you will just end up confused, and he or she will end up frustrated. Don't say I didn't warn you. This will display a tutorial that summarizes the basic commands (most of which you will have already learned from this chapter). When you are finished, type :q. Next, start Vim and take a look at the online help by entering, in turn, each of the following commands. (Again, you can type :q to quit.)
:help
If you find reading the documentation in this way tedious (as I do), read it online. You can find what you need at www.vim.org. (Hunt around until you find the Vim "User Manual".) Please don't let my comments discourage you. Vim is an amazing program and, if you feel so inclined, you should definitely learn it. To inspire you, Figure 22-13 contains a summary of the most important enhancements offered by Vim. As you build on your knowledge of vi to learn Vim, my advice is to learn how to use the various features in the order you see them in the figure.
Vim is a highly sophisticated text editor with a great many enhancements over standard vi. Here is a summary of the most important such features. The best way to learn Vim, is to start by mastering vi. Then teach yourself how to use the enhancements in the order I have listed them.
To close the chapter, I'd like to tell you a true story, illustrating the type of wistfulness expressed by the American poet John Greenleaf Whittier (1807-1892) in his poem Maud Muller when he wrote:
For of all sad words of tongue or pen,
As you can see in Figure 22-13, one of the important enhancements offered by Vim is "screen splitting", the ability to split your screen into horizontal or vertical windows. This is a powerful tool in that it allows you to view more than one file at the same time. Interestingly enough, way back in 1978 at U.C. Berkeley, Bill Joy (the creator of vi) was planning to put that exact feature into an early version of the program. Here is the story in his own words, from a 1984 interview in Unix Review magazine: "What actually happened was that I was in the process of adding multi-windows to vi when we installed our VAX [computer], which would have been in December of '78. We didn't have any backups and the tape drive broke. I continued to work even without being able to do backups — and then the source code got scrunched and I didn't have a complete listing. "I had almost rewritten all of the display code for windows, and that was when I gave up. After that, I went back to the previous version and just documented the code, finished the manual, and closed it off. If that scrunch had not happened, vi would have multiple windows. And I might have put in some programmability, but I don't know." It happened that, at the time, the American philosopher Roseanne Roseannadanna was visiting the Berkeley Unix lab (Figure 22-14). When Joy told her what happened she remarked, "Well Bill, it's just like my old Daddy used to tell me, 'Roseanne Roseannadanna, if it's not one thing, it's another.'"
Review Question #1: How do you start vi when you want to:
• Edit a file named document
How do you start Vim in vi-compatibility mode? Review Question #2: How do you quit vi if you have already saved your work? How do you save your work and then quit? How do you quit without saving? Review Question #3: As you work with vi, your data is kept in a storage area. What is this storage area called? The vi editor operates in two principle modes: command mode and input mode. Describe each mode. How do you change from command mode to insert mode? How do you change from insert mode to command mode? Review Question #4: Specify the best command to move the cursor to each of the following destinations. Whenever possible, use alphabetic keys.
• One position left, down, up, right
Review Question #5: Within command mode, how do you:
• Undo the last command that modified the editing buffer.
Applying Your Knowledge #1: Start vi and create a brand new empty file named temp. Insert the following lines into the file:
one 1
Use a single vi command to save your work and quit. Applying Your Knowledge #2: Start vi to edit the file temp from the previous question.
Using vi commands only:
Using vi commands only:
At this point, the editing buffer should look
like it did when you started.
Applying Your Knowledge #3: Start vi to edit the file temp from the previous question.
Using ex commands where possible:
Using ex commands where possible:
Compare the vi commands you used in Exercise #2 with the ex commands you used in Exercise #3. What advantages did the ex commands have? Applying Your Knowledge #4: Start vi to edit the file temp from Exercise #1: • Insert the date and time at the bottom of the editing buffer Where is the cursor? Why? Without first moving the cursor: • Use a single command to sort all lines in the editing buffer in reverse alphabetical order • Quit without saving For Further Thought #1: Once you are comfortable with the vi editor, you will find it to be quick, powerful, and easy to use. However, vi is a very complex program that takes a lot of effort to master. The backward compatible replacement, Vim, is even more powerful, more complex, and even harder to learn. Considering that vi is well over 30 years old and is so difficult to learn, why do you think it is still so popular in the Unix community? Do you see a future in which complex tasks will be carried out exclusively by easy-to-use tools, or will there always be a need for programs like vi? For Further Thought #2: Broadly speaking, vi has two different types of commands: screen-oriented vi commands and line-oriented ex commands. The two types of commands are completely different from one another and, indeed, were developed for different types of hardware. Nevertheless, they combine nicely to create a powerful editing environment. Why is this? What does this tell you about the types of tools we should be designing for smart people?
List of Chapters + Appendixes
© All contents Copyright 2026, Harley Hahn
| |||||||||||||||||||||||||||||||||||||||||||||||||||||||||||||||||||||||||||||||||||||||||||||||||||||||||||||||||||||||||||||||||||||||||||||||||||||||||||||||||||||||||||||||||||||||||||||||||||||||||||||||||||||||||||||||||||||||||||||||||||||||||||||||||||||||||||||||||||||